Solution Graphics

Foodbuzz
Ask an Expert - Visit my Virtual Office at LivePerson
Showing posts with label Cake. Show all posts

Cookie and Cake ideas from Wilton.com


Because this week is the start of the NFL Playoffs and the Superbowl will be here before you know it, I have put together a collection of football themed, cake decorating supplies. Click the arrows to view.

Read more »

In Labels: , , , , , on .

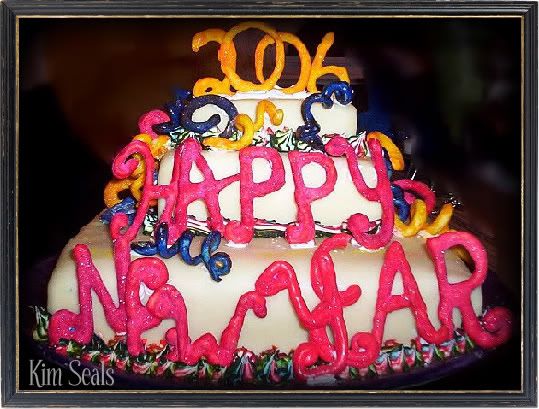
New Year's Eve has to be one of the hardest holidays to decorate a cake for. Here are a few ideas to help get you started.


New Year's Baby - To make, use the Wilton Bear Pan. Of course you will need to make adjustments to the details to suit your theme.
New Year's Baby Cake


New Year Streamer Cake

New Year's Streamer Cake


Champagne Bottle - To make, use the Wilton Baby Bottle Cake pan.
Champagne Bottle Cake


Clock Cake - This cake would look great with Roman Numerals...and minus the retirement references of course.
New Year Clock Cake
Read more »

In Labels: , , , , , on .

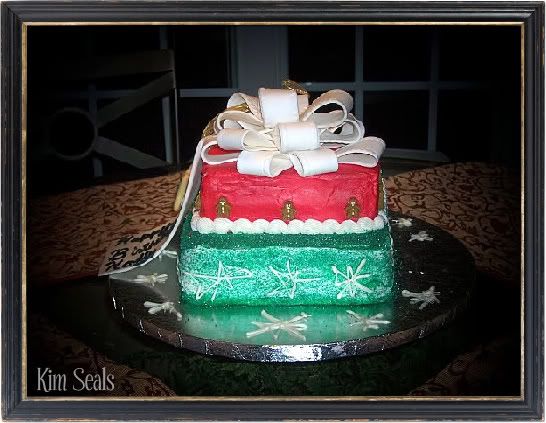
Stacked Presents Cake

These stacked presents make a great cake for any holiday celebration. In this guide you will learn how to decorate this cake as well as make the large bow topper, gift tag, and white chocolate snowflakes.

To make this cake you will need...

1 large cake board
1 4 inch square cake divider
10 inch square cake
4 inch square cake
4-5 wooden dowels
gumpaste
white and red buttercream icing
white chocolate chips
1 tube of black premade icing (optional)
gingerbread man sugar decorations
tips #3(optional), #2 and #19 or 21


Directions


Step 1

A few days in advance, make the large tag, bow and white chocolate snowflakes.

To make the snowflakes, melt white chocolate chips in the microwave. Pour the melted white chocolate into a piping bag and using tip #2, slowly pipe snowflake shapes onto a cookie sheet covered in wax paper.

To make the tag, I made a template with plain white paper and cut the gumpaste accordingly. You can not see it in this picture but I also poked a hole in the tag and ran a ribbon through it.

Making the large bow is very similar to the directions in my small gumpaste bow tutorial. However, instead of 2 loops and a middle piece you will need approximately 16 loops. If you look at the picture you will notice that the loops on the bottom are long and skinny and as you move towards the top of the bow they get more rounded. Keep this in mind when you prepare them for drying.

***Decorator's Tip*** Once all of your loops are dry your bow is ready to be assembled. Use a 2 inch circle of gumpaste as the base of your bow. This will help hold it together.


Step 2

Place the 10 inch cake on the cake board and ice with white icing. I decided to then cover the cake in green sugar to give it a shimmery look.

Next, place 4 dowels cut to size evenly around the middle of the cake for support. (See the tutorial for help on this step)

Finally, put the 4 inch cake on the cake divider and ice with red icing. Then, place this cake in the center of the 10 inch cake.

***Decorator's Tip*** Because this is only a 2 tier cake you should not need any more dowels for support but, if you are traveling with this cake you may want to hammer a sharpened dowel down the center of the stacked cakes. This will prevent the top tier from falling off.


Step 3

Using tip #19 or 21 and white buttercream icing, pipe a shell boarder around the bottom of the red cake. Next, place the sugar gingerbread men around the red cake and the white chocolate snowflakes around the green cake. Scatter a few extra white chocolate snowflakes around the cake board. Finally, place the tag and large bow on the cake. If desired, you can write a message on the tag with the tube of black premade icing and tip #3.

***Decorator's Tip*** If you are traveling with this cake, you may want to wait to place the tag, bow and extra snowflakes on the cake.
Read more »

In Labels: , , , , , , , , on .

Forum Screen

Can I decorate with ganache icing? Can you freeze buttercream icing? How many batches of icing and cake mix do I need? How long can you freeze a cake?

These are just some of the cake decorating questions people are asking in their Google searches. It may be difficult to find answers to these specific questions but not anymore. Piece of Cake Decorating is now offering a Q & A Forum. This is the place to ask any cake question you may have. We will even help you brainstorm ideas. So be sure to visit us at http://pieceofcakedecoratin.forumotion.net.
Read more »

In Labels: , , , , , on .

Today I came across a blog, Sweet Little Memories, that talked about a soap scented like coffee and chocolate. The baker in me immediately thought about cake and I began to search for a taste to put with this scent. I came across this very easy recipe for a coffee/chocolate cake called Wake Up Coffee Cake. It sounds delicious!

Wake up coffee cake (recipe from CakeCentral.com)

Ingredients

1 cup of sugar

instant coffee to taste

3 cups of flour

3 eggs

4 tsp baking powder

2 cups of water


Instructions

    1. Melt chocolate
    2. Mix the water and coffee together
    3. Combine flour eggs sugar and coffee together. Mix well
    4. Add baking powder and mix
    5. Bake for 25-35 minutes
The more instant coffee you put in the stronger it will be.
Read more »

In Labels: , , , , , on .

Image Idea 1Image Idea 2Image Idea 3


Today I came across a blog about decoupage art. It is called Handmade by Decoupage Art. Seeing this site gave me a new ideas for our edible photo images. Our images can easily be cut using a sharp knife and applied to cake as decoupage art. They are easily attached using a small amount of water and can be applied to either buttercream or fondant icings. Above I have given you ideas found on the Lucks Food Decorating Company Website.
Read more »

In Labels: , , , , , , , , , on .

Inspiration comes from everywhere. Today I read two blogs that motivated me to do something great. I'm Still Standing and Confessions of a Playground Princess are two wonderful blogs written by a truly inspiring women. Do not miss out on these great reads.

After reading these blogs I started doing a little research and came across a wonderful, cake oriented, charity. It is called Free Cakes for Kids and they believe, as do I, that every child deserves a birthday cake. That is why it is their mission to help make birthdays special for as many children as possible. This group is 100% non-profit and made up of volunteer bakers from all over the country. You do not need to own a bakery to help support this cause, just a big heart and a love for baking. Every day these volunteers are creating amazing cakes for children that would not otherwise have one. If you love baking and are looking for a way to help make the world a better place, check out www.freecakesforkids.com and find out how you can become a volunteer.
Read more »

In Labels: , , , , , , on .

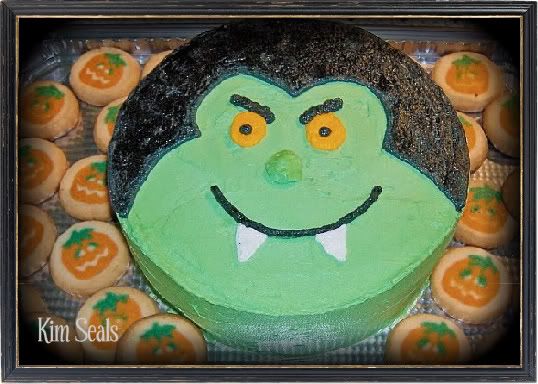
Vampire Cake

In this guide you will be given step-by-step instructions on how to decorate this cute vampire cake.

I know it seems early but Halloween will be here before you know it. If you are planning a party this year, don't forget the cake! Between HBO's True Blood and the Twilight series, Vampires are all the rage right now. Here is an easy vampire cake that just about anyone can do.

To make this cake you will need...

2 10 inch round cakes
Green, black, yellow/gold and white buttercream icing
4 Tips # 5

Recommended products: It is very difficult to make true black. When I only need a small amount like this, I always buy pre-made black icing.


***Decorator's tip*** If you do not have four #5 tips, do not worry. You will get the same effect using tips #4 or 6. If you do not want to use a tip at all, just cut the end of the piping bag to size. It will work just as well but your lines will not be as tight. This techniques works best for piping the eyes and nose because of their shape.


Directions:


Step 1

Level, tort and fill the cakes. They can be placed on a 12 or 14 inch cake board. In this picture, the cake is placed on a large cake board with Pillsbury Pumpkin Sugar Cookies scattered around for added decoration. Ice the cake with your green buttercream icing.


Step 2

Using a toothpick, outline the vampire's hair. Next, using tip #5 and black buttercream icing, pipe the outline of the hair and fill in with tight lines.


***Decorator's Tip*** To smooth out the striped effect you get from filling in an outline using a piping bag, simply put a little cornstarch on your finger and gently pat it flat. Most of the cornstarch will fade into the icing but the excess can be brushed away with a decorating brush.


Publish Post

Step 3

Using tip # 5 and yellow icing, pipe the eyes on the cake. Add the pupils using the extra black icing.


Step 4

Using tip # 5 and green icing, pipe the nose. Next, add the mouth and eyebrows with the left over black icing and the teeth (tip #5) with white icing.
Read more »

In Labels: , , , , , , , , , , , on .

Slumber Party Cake


In this guide you will be given step-by-step instructions on how to decorate this large bed. I will also discuss how to make the blanket, girls, and headboard.

Today I was reading this great blog, www.shwanda.com, and was inspired to share this cake. I thought of this cake because the blog chronicles the life of a blended family with 5 kids, 4 cats, 3 dogs, 2 fish, and a dog...oh and don't forget Mom and Dad. Can't you just picture them all in a big bed like this? So as you can see, this cake can be used for more than a slumber party. It can be the "family bed" as well.


You will need:
Pink fondant
Tan fondant
Royal icing or chocolate colored yellow, brown, black, and gold for hair and crown.
Buttercream icing colored white and pink
White Chocolate
Wax Paper


Directions:


Step 1

A few days in advance you need to make the fondant faces and chocolate work. To make the headboard, draw a template on a white piece of paper. Tape down template onto flat surface and cover with wax paper. Next, melt the white candy melts and pour in a piping bag. Pipe the white chocolate on your template.


*Decorator's Tip* Pipe the spindles for the headboard as thick as you can. Chocolate is very delicate.


Option #2 for the headboard: If you look behind the white headboard you can see a silver board in the same shape. Because the chocolate was do delicate, I placed the silver headboard behind the chocolate one. If my client wasn't insistent on the chocolate headboard I would have left the silver one by itself. To make the silver headboard I cut foam core board to shape and covered it with Wilton Fanci Foil.


Step 2: Make the faces

The faces are made of fondant circles died tan (fondant can also be purchased tan) I used royal icing to make the hair, bows and crown. Chocolate can also be used to make these features. I used black icing for the eyes and pink icing for the mouth.


Step 3

Level off and fill the cakes. Cover the cake with buttercream. On the sides of the cake, use a star tip and pipe vertical stripes to look like a bed skirt.


Step 4

The bodies under the blanket are made with fondant. Shape the fondant to look like a fat hot dog and space them on the cake as needed, leaving room at the top for the head. Roll out a long strip of fondant to make a very long pillow. The heads will eventually rest on this strip.

Step 5

Die the fondant pink and roll it out large enough to cover the top and part of the sides of the cake. Clean up the edges of the fondant by trimming it with a pizza cutter or knife.


Step 6

Lay fondant blanket over the top of the bed. Carefully press the fondant down between the fondant bodies to give the appearance of the girls laying in the bed.


Step 7

Place heads on the cake. In my cake the birthday girl is wearing a crown. It is held on the head with royal icing.


Step 8

Place headboard on cake. It is secured in the back with extra buttercream icing.


*Decorator's tip* If you are transporting the cake you may want to wait until you arrive at the party to place the headboard on the cake.


Step 9

Pipe large circle dots on the blanket.
Read more »

In Labels: , , , , , , , , , , , on .

Last week I posted about Unique Cake Decorating Items on Etsy.com. One of these items was a cake topper that used beads. Today I came across a blog post (August Birthstones-Peridot, Sardonyx, Carnelian) by Silver Rose Blogs and came up with a new cake idea using birthstones and beads.

Sometimes it can be difficult coming up with ideas for a birthday cake. Especially when a person's interests are not easily transferred into cake. When you need to make a birthday cake but don't have any ideas or inspirations, make a birthstone cake.

Beads can be used many different ways on a cake. They can be strung on a string, then wrapped around the bottom as a boarder and strung on wire to be used as a cake topper or placed all around the cake so the cascade down the sides.

If you do not want to use real beads, you can also purchase or make edible beads in the color of your choice. To make your own, all you need is a mold like the ones listed below and dyed gumpaste.


If you want to know more about birthstones, check out Silver Rose Blogs for more information.
Read more »

In Labels: , , , , , , , , , on .

Movie Cake


In this guide you will be given step-by-step instructions on how to make movie themed, gumpaste decorations for your cake.

This is a great cake for any movie theme. As you can see, I made this as a birthday cake but it would also be great as an anniversary cake, movie night cake, or even an Oscar party.

Make decorating this cake even easier. Complete a cake kit and individual gumpaste decorations now available at my handmade shop.

To make this cake you will need...


12 or 14 inch round cake board
10 inch round cake
Large Circle cookie cutter
Medium sized petal cutter
Large and small star cookie cutter
2 lollipop sticks
Tips #5, 3, and 2
Gray, white, brown, black, and yellow gum paste
White, red, yellow, and black buttercream icing


You do not need an air brush but it will definitely save you time on any cake, especially when you need to make black and red decorations.

Directions: 

Step1
A few days in advance make the filmstrips, clap board, film reel, billboard and stars. 
  • To make the filmstrips cut rectangular shaped pieces of gumpaste and mold them to shape using tissue.  You can use tan gumpaste and once dry you can paint on the black frames.  Another option is to use white gumpaste and paint everything once it dries.
  •   To make the movie reel, roll out black gumpaste leaving it fairly thick and cut out a long strip.  Roll this strip around itself to resemble a rolled up filmstrip.  Next, roll out the gray gum paste and cut out two large circles.  Then, with the petal cutter cut out the holes around the center of the circles (refer to picture above).  Once everything is dry, assemble the movie reel by applying some water to each piece and stick them together.  They will need to dry for at least one more day.
  • To make the clapboard, roll out black gumpaste and cut to shape.  When rolling out the gumpaste, leave it on the thick side so it holds up better once it dries.  When dry, pipe on the white details with white buttercream icing.  Another option is to use white gumpaste, tape off the details you want to leave white (i.e. the stripes) with scotch tape, then airbrush or paint the clapboard black.  When the black color dries you can remove the tape.
  • To make the billboard, roll out a thick piece of white gumpaste and cut a large rectangle to the size you desire.   Place 2 lollipop sticks in the bottom and let dry.  Once the gumpaste is dry, pipe on the details with buttercream icing and tip #2 for the lights and #3 for the words.
  •  To make the stars, roll out yellow gumpaste and cut out the stars with a small and large cookie cutter.

Step 2

Finally it is time to level, tort and fill the cakes.  Place them on your cake board and ice with white buttercream icing.


Step 3

With red buttercream icing and tip #5, pipe on the red carpet.  If you have an airbrush, you can airbrush on the carpet but be sure to make a template so that you do not get red on the rest of the cake. 


 Step 4

As a boarder, place the small stars around the bottom of the cake. 


Step 5

Place your gumpaste decorations on the cake.  Be sure to secure them in place with buttercream icing.
Read more »

In Labels: , , , , , , , , , , , , , , , , , on .

Photobucket


I made these cakes for an Asian themed bridal shower. The guide you will be reading is for the Chinese Lantern Cake only. You will be given step-by-step instructions on how to properly support this cake as well as tips for decorating.

You can purchase the
How to Make a Fortune Cookie Cake separately.

To make the lantern cake you will need...

14 inch, round, silver cake board
4-5 9x9 inch square cakes (number of cakes depends on how high you want the lantern)
2-3 cardboard cake dividers
Pencil Sharpener
Hammer
Rolled Fondant - Black
3-4 gum paste orchids (instructions for flowers not included)

This is all you need to make the flowers. For best results, mix the gum paste with some fondant so it does not dry as quickly. The flower kit is a great investment for any cake decorator. Trust me, you will use this more than once.


Directions:


1) Bake, tort, and level your cakes. To ensure proper support you will need to put 2 cakes on a cardboard cake divider. So, stack the first two cakes on the silver cake board, the next to cakes on a cardboard divider and the last cake on another divider. (See our post on How to Place Dowels in a Cake if you are unsure how to place dowels in a cake.)

***Decorator’s Tip*** Cut and tape wax paper on the bottom of your cardboard dividers so they don’t stick to the cake below it.

2) Place 4 wooden dowels equally around the cake on the silver cake board. Place the 2 cakes on the cardboard divider on top.

3) Sharpen 4 more dowels and put them equally around the cake. This time you will use a hammer to hit the dowel through the cardboard divider and to the silver cake board so be sure to place the dowels so that they will not hit the dowels below them.

4) Place the last cake and divider on top. Then sharpen one last dowel and drive it through the center of all of the cakes until you hit the silver cake board. This will keep the cake from tipping over.

5) Cover the entire cake with white butter cream icing.

6) Cut thin strips of black fondant and place them on the cake to match the picture.

7) Place flowers around the cake.

***Decorator’s Tip*** If you are delivering this cake, it is best to wait until you arrive at your destination to place the flowers on the cake.

Read more »

In Labels: , , , , , , , , , , , , on .

Photobucket
I made these cakes for an Asian themed bridal shower. The guide you would be purchasing will give you instructions on how to make the Fortune Cookie Cake only. The How to Make a Chinese Lantern cake guide was written separately.

To make this cake you will need...
14 inch, round, silver cake board
Two 10 inch, round cakes
White gumpaste
3-4 orchid flowers (instructions for flowers not included)

This is all you need to make the flowers. For best results, mix the gum paste with some fondant so it does not dry as quickly. The flower kit is a great investment for any cake decorator. Trust me, you will use this more than once.


Directions:


Step 1


A few days in advance, roll out white gumpaste and cut a rectangle shape for the fortune.

***Decorator’s Tip*** When cutting rectangle shape, keep the 10 inch cake pan near by in order to make sure your proportions are correct.


Step 2

Bake two 10 inch, round cakes.  Level one of the cakes then fill and stack both cakes on the silver cake board.  When stacking, the top cake should stay rounded and NOT level.

***Decorator’s Tip***  After this step, freeze the cake to make it easier to carve.


Step 3

Cut out a triangle shape out of the cake and trim cake off the top to give the cake a smoother look.  Keep trimming the top and triangle cut out until you are happy with the shape of your fortune cookie.


Step 4

Color the fondant tan (you could also leave the fondant white and airbrush it later).  To get tan I used a combination of brown and ivory.


Step 5

Ice the cake with buttercream icing.  Cover the cake in fondant.

***Decorator’s Tip*** You may need an extra set of hand to help lay the fondant in the cut part of the cake without tearing.


Step 6

Write your message on the gumpaste fortune and place it on the side of the cake.  Then, place your gumpaste flowers around the cake.

***Decorator’s Tip***  If you are transporting this cake, you may want to wait until you arrive at your destination before putting the fortune and flowers on the cake.

Read more »

In Labels: , , , , , , , , , , , , on .

Photobucket
There are 2 ways to make this cake. Below you will find my "novice" instructions, which uses a car shaped cake pan. If you are looking to carve your Lightning McQueen cake, "experienced" instructions are also available here.


To make the "novice" cake you will need...


3D Wilton Cruiser Pan
Large rectangular cake board
Tips # 2, 3 and 5
Red and black fondant
Red gumpaste
Thick Wire
Tan, white, orange, yellow, and black buttercream icing
Blue tinted piping gel
Crushed graham crackers
Rice Krispie Treats
Plastic cacti


Another item that will help decorate this cake is an airbrush. You will be able to cover the car in white fondant then airbrush it red. It will save you a great deal of time.


Directions for the "novice" cake:

****Please keep in mind that by using the cake mold listed above, your cake may not look exactly like Lightning McQueen because, while this mold gives you a car shape, it is not his exact shape.****


Step 1

A few days in advance, make the spoiler out of red gumpaste and place 4 thick wires
into the spoiler as it dries (the longer the better). These wires will hold the spoiler on the
cake.


Step 2

Bake the 3D Cruiser cake and freeze. To get the cake to look more like Lightning McQueen, you will need to trim cake off the top and possibly the hood to give it more of a curve.


Step 3

Once you are happy with the shape of the cake, ice the entire car with buttercream icing.


Step 4

Cover the cake with fondant. You can either cover the cake with red fondant or cover the cake with white fondant and airbrush the whole cake red.


Step 5

Use the white buttercream and tip #3 or 5 to pipe on the windows. 

****Decorator’s Tip**** Use a toothpick to outline all of the windows and the lightning bolt onto the car.


Step 6

Outline all of the windows with the black icing and tip # 2.


Step 7

Repeat the above two steps to pipe on the large lighting bolts, head lights, tail lights, and the large number on top, using yellow and orange or white buttercream (colors will depend on what you are piping).


Step 8

With tip #2 and black icing, pipe numbers on the sides of the car as well as the passenger side headlight and tail light.


Step 9

With tip #2 and yellow icing, pipe the child’s name to resemble the Rusteeze logo.


Step 10

With tip #2 and blue piping gel pipe on eyes. Be careful, as the piping gel will run if you use too much. Finally, add the pupil on the eyes with a small black dot.


Step 11

The only part that is left of the car is to make the wheels. To do this, cut circles out of Rice Krispie Treats and cover with black fondant. You can also cover with white fondant and airbrush them black. Add a red circle to the center of the wheel and pipe the word Lightyear onto the wheels. Once the car is sitting on the bottom cake you can place the wheels onto the cake. The exact size of the wheels will vary depending on the size of your wheel well. My wheels fit so snugly that I was able to place them into the well and they did not fall.


Step 12

Finally, bake, level and fill the 2 14x11 cakes. Place onto the large rectangular cake board and cover with tan icing. Next, sprinkle the crushed graham crackers on top to look like sand. Place 4 dowels into the cake to support the car. The placement of the dowels will depend on the placement of the car. Just be sure to use 2 dowels for the front of the car and two for the back.


Step 13

Place the wheels and spoiler onto the car and put the cacti onto the large cake.

****Decorator’s Tip**** If you are having trouble getting the spoiler to stay up you can take 4 lollipop sticks and place them behind the spoiler for support. Cover these sticks with black or gray buttercream. If you look at the original Lightning McQueen, you will see he has something similar on the back of his spoiler.
Read more »

In Labels: , , , , , , , , , , , , , on .

Photobucket
This is a great baby shower cake when the parents do not know the sex of the baby.
To make this cake you will need...
12 inch round cake board
10 inch round cake
8 inch round cake
Tips # 3 and 5
Wooden Dowel Rods
2 lollipop Sticks
Sage Green(light moss green) and white buttercream icing
White and sage green gum paste
White pearl dust


Directions:


Step 1:


A few days in advance, make the gum paste bow and stroller.

***Decorator’s Tip*** Click here to purchase a gum paste stroller otherwise follow these instructions. To make the stroller, cut 2 large circles and 4 small circles out of white gum paste. Cut out ¼ of each of the large circles to make the body of the stroller. Once the gum paste dries, sandwich the lollipop stick between the body of the stroller and the wheels. Remember to let some of the sticks hang below the wheels so that you have something to stick into the cake. In order to get the lollipop sticks to stay you will have to wrap the parts touching the stroller in gum paste and wet with water. Once dry you can stick on the sage green details and paint with pearl dust.

Directions to make the gum paste bow can be found here.


Step 2

Bake, level and fill 10 inch and 8 inch cakes. Then, place it on the 12 inch round cake board.Ice the 10 inch cake with sage green buttercream icing.


Step 3

Place 4 wooden dowels into the cake in order to support the top tier.


Step 4

Place the 8 inch cake onto an 8 inch card board cake board. Ice the cake with sage green buttercream icing and place on the center of the 10 inch cake


Step 5

With a sharpened wooden dowel, hammer through the center of the cakes to secure the cakes together. Ice over the exposed dowel.


Step 6

Using tip #5 pipe a boarder around both tiers.


Step 7

Cut out ribbons for the bow and place onto the front of the cake as desired. Next, place the bow on top of the ribbon. Dust with white pearl dust for added shimmer.


Step 8

Using tip # 3, pipe footprints on the sides of both tiers.


Step 9

Place the stroller on top of the cake.

Read more »

In Labels: , , , , , , , , , , , on .


This is one of my favorite cakes and it was fairly easy to make. I think this would be a great cake for a beginner.


Photobucket


You will need.....


Round silver 12 inch cake board

1 8 inch round cardboard cake board

Wooden Dowels

Jungle animals

Diego topper or toy

Jungle tree toppers or toys

1 10 inch round cake

1 8 inch round cake

Light brown buttercream icing for covering cakes

Dark green, blue, and gray buttercream icing for piping

Wilton tips 3 (2 of them), 5, 20 or 21 (star tip), 233 (grass and hair tip), and 67 (leaf tip)


**Decorators Tip** Use couplers when piping on this cake. A coupler will allow you to change tips without changing piping bags.


Directions:


Step 1:

Level, tort, and fill cakes. Next, place the 10 inch cake along the back edge of the silver cake board and cover with light brown buttercream icing. Then, place the 8 inch cake on the cardboard cake board and cover with light brown buttercream icing but do not place on top of 10 inch cake yet.

Step 2:

Place 4 wooden dowels towards the back center of the 10 inch cake. You will need to stick the dowels in to measure, then take them out and cut to size. Once cut put them back into the cake. These will help support the top tier. **Place the dowels in a small circle, leaving a space in the center for the final dowel. **

Step 3:


Place the 8 inch cake on top of the 10 inch cake and dowels. As mentioned above, put the top tier towards the back of the cake so we are able to add the waterfall later.

Step 4:

With a toothpick, outline the shape of the waterfall and lake at the top. Once you are happy with the outline, pipe blue buttercream icing onto the cake with tip number 3 (make sure to use a coupler). To make the icing look like flowing water, take your spatula and make the icing uneven. Now change to the star tip and pipe the splashing water at the bottom of each tier.

Step 5:

Using your other tip 3 and a coupler, pipe green vines on the side of the cake. Then, change to your leaf tip and pipe leaves on the vines. Switch again to your grass tip and pipe grass around the edge of each cake and around the lake and waterfall.

Step 6:

With the gray buttercream icing and tip 5, pipe rocks around the lake and waterfall. Finally place the animals, Diego, and trees on the cake.

Read more »

In Labels: , , , , , , , , , on .

Photobucket Photobucket


This cake was fairly easy to make but very time consuming. To make this cake you will need...


Wilton Mini Wonder Mold Doll Pan

10 inch Round Cake Pan

12 Wilton Mini Doll Picks

Two 14 inch Silver Cake Boards

Large Star Tip


Directions:


Step 1

Bake 2 10 inch round cakes and 12 mini wonder mold doll cakes. Then, level, tort, and fill the 10 inch cake.


Step 2

Cover the 10 inch cake with ganache icing. Once the cake is covered in ganache, place the cake on one of the silver cake boards and pipe boarder around the bottom of the cake using a large star tip. I placed the cake off center to leave room in front for some of the Barbies.


*Decorator's Tip* To create a two-color boarder, put both of your colors in the bag side by side. When you pipe, the icing will appear stripped.


Step 3

Decorate the cone shaped cakes to look like dresses. This can be done anyway you wish so I will not give step-by-step directions.


Step 4

Place mini doll picks into the top of each dome cake and place cakes randomly on the board.


Step 5
For extra decoration I made royal icing flowers ahead of time and placed them around the cakes.

Read more »

In Labels: , , , , , , , , on .

Martini Cake


This is a great cake. It is hard to see in the picture but the top of the cake is covered in edible glitter to make the white parts of the cake look like glass.


You will need:
1 cake board
parchment paper
disposable or reusable piping bags
tip #'s 2, 3, and 5
1/2 a sheet cake
1 tube of Wilton black icing
1 tube of Wilton red icing
Edible glitter
Piping gel
pink paste coloring
green fondant


Directions:

*Decorator's Tip* To make a colorful cake board I simply use foam core board covered in wrapping paper and cellophane.


Step 1
Level out the cakes and stack with buttercream in the middle. This cake will be difficult to make with any other filling as you will need to carve the cake in the next step.


Step 2
Using the parchment paper, make a martini glass template. Place the template on top of the cake and cut. If you are feeling confident you can carve the cake by eye.


Step 3
Ice the cake with white icing.


Step 4
Color the piping gel with the pink paste coloring. Place in a piping bag with tip #5 and pipe onto the top of the cake to resemble a drink. Do not go to the edge of the cake.


Step 5
Using tip #3 pipe a black outline along the top outline of the cake.


Step 6
Put edible glitter on all of the top white parts of the cake. This will give the cake a glass feel.


Step 7
Make the olives by shaping the green fondant into an oval and place a small indent on each side. Then, using tip #2 pipe red icing into each indent to make the pimento


Reader photos using this guide...

 Sallie
Read more »

In Labels: , , , , , , on .