Solution Graphics

Foodbuzz
Ask an Expert - Visit my Virtual Office at LivePerson
Showing posts with label decorating. Show all posts

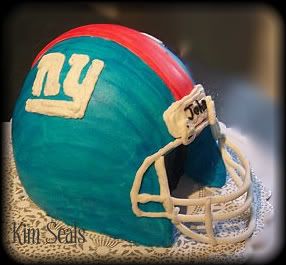
In the picture above I wanted to add the NY Giants logo to the side of a helmet cake.  I knew there was no way I would be able to pipe it free hand, make it straight AND be happy with the location on the first try.  My solution was simple...


  • Make a template. I made a rough sketch but you could also print the logo off the computer.
  • Stick it on and trace it with a toothpick.
  • Pipe on the logo using the outline I made.
Read more »

In Labels: , , on .

Margaritaville/Beach Cake

In this guide you will be given step-by-step instructions on how to decorate this beach/Margaritaville themed cake. I will also give tips on how to make edible sand and water.

This cake was made for a group birthday party and the theme was Jimmy Buffet's Margaritaville. In this cake guide you will learn techniques like making sand and making the water look more realistic.

To make this cake you will need:


12 or 14 inch cake board
2 10 inch round cakes
Blue buttercream icing
Royal icing tropical flowers (instructions not included but click to purchase)
Graham Crackers or Nilla Wafers
Blue icing coloring
Piping gel
Tips #2 and 19
Toy palm trees
Toy or handmade paper parrots (instructions included)
Margaritaville sign (instructions included)
Mini margaritas (instructions included)
Mini beach towel
Mini surf board


Directions:


Step 1:


Level, tort and fill your cakes then place them on the cake board. Ice the cakes with light blue buttercream icing. In order to make the beach look hilly, ice mounds on the top half of the cake.


Step 2:

Ground up the Nilla Wafers using a food processor or a Zip Lock bag and a rolling pin. Then, place the crumbled wafers on the top of the cake to make sand.


Step 3:

Color the piping gel blue and spread it on the other half of the cake as pictured. To get the water to look wavy, spread it so that the piping gel is not smooth.


***Decorator's Tip*** For an added detail, put a small amount of light blue icing on a tooth pick and run it through the "water." This will make it look like the top of your waves has foam.


Step 4:

Using tip #19, pipe on your boarder along the edge of the water on top of the cake. Then, place the royal icing flowers around the bottom of the cake as a boarder.


Step 5:

Place your trees, surfboard, and other accessories on the cake. Finally, write your message in the water with light blue icing and tip #3.


Instructions for paper parrots, sign, and mini margaritas:

  • The paper parrots and sign were very easy to make. Save these pictures to your desktop and open them in any picture program that allows you to resize images. Paint will work just fine. Next, print and cut out your pictures. Finally, tape them to a toothpick. If you want to hide the toothpick just put the same picture on the other side but remember that you will need to use the mirror images for the parrots.

  • To make the mini margaritas, I purchased miniature dollhouse glasses. I first dipped the rim in a little bit of water and then into some sugar. To make the drink, I filled the glass with light green icing.


Read more »

In Labels: , , , , , , , , , , , , , , on .

Photobucket
This is a great baby shower cake when the parents do not know the sex of the baby.
To make this cake you will need...
12 inch round cake board
10 inch round cake
8 inch round cake
Tips # 3 and 5
Wooden Dowel Rods
2 lollipop Sticks
Sage Green(light moss green) and white buttercream icing
White and sage green gum paste
White pearl dust


Directions:


Step 1:


A few days in advance, make the gum paste bow and stroller.

***Decorator’s Tip*** Click here to purchase a gum paste stroller otherwise follow these instructions. To make the stroller, cut 2 large circles and 4 small circles out of white gum paste. Cut out ¼ of each of the large circles to make the body of the stroller. Once the gum paste dries, sandwich the lollipop stick between the body of the stroller and the wheels. Remember to let some of the sticks hang below the wheels so that you have something to stick into the cake. In order to get the lollipop sticks to stay you will have to wrap the parts touching the stroller in gum paste and wet with water. Once dry you can stick on the sage green details and paint with pearl dust.

Directions to make the gum paste bow can be found here.


Step 2

Bake, level and fill 10 inch and 8 inch cakes. Then, place it on the 12 inch round cake board.Ice the 10 inch cake with sage green buttercream icing.


Step 3

Place 4 wooden dowels into the cake in order to support the top tier.


Step 4

Place the 8 inch cake onto an 8 inch card board cake board. Ice the cake with sage green buttercream icing and place on the center of the 10 inch cake


Step 5

With a sharpened wooden dowel, hammer through the center of the cakes to secure the cakes together. Ice over the exposed dowel.


Step 6

Using tip #5 pipe a boarder around both tiers.


Step 7

Cut out ribbons for the bow and place onto the front of the cake as desired. Next, place the bow on top of the ribbon. Dust with white pearl dust for added shimmer.


Step 8

Using tip # 3, pipe footprints on the sides of both tiers.


Step 9

Place the stroller on top of the cake.

Read more »

In Labels: , , , , , , , , , , , on .

Photobucket


This is a very easy cake to make and will be loved by boys of all ages. Whether you are a cake decorating novice or expert, this is a great cake to make.


To make this cake you will need...

1 Foam board cut to size

Sports themed wrapping paper

Clear cellophane

1 Wilton Ball Pan - bake 1 cake

1 Wilton Wonder Pan or Pampered Chef's Large Glass Measuring Cup- bake 1 cake

1 Bread Pan - bake 2 cakes

Chocolate icing

White, orange, and tan buttercream icing

1 tube of black icing

1 tube of red icing

Tips #3, 5, and 21


Directions:


Step 1:

Cover the cut foam board with sports themed wrapping paper and then clear cellophane.


Step 2:


Make the basketball by placing the half of a ball cake onto the cake board and cover it with orange icing. Using the black icing and tip #5, pipe the lines onto the ball.

***Decorator's Tip*** To ensure accuracy in your piping, first draw the lines on the cake with a toothpick.


Step 3:

  • Make the football by first cutting the cake from the Wilton Wonder Mould (or Pampered Chef) in half and trim off and extra from the top. **Do not throw the trimmings away!**
  • Place the cut sides down with the larger sides facing each other. You will now have something that resembles a football.
  • Use the trimmings to give each end of the football more of a point.
  • Ice the cake with chocolate or brown icing.
  • Using tip #21 or any tip with a flat edge and white buttercream, pipe the large lines on the football. Using tip #5 and white buttercream, pipe on the stitching.


Step 4:

  • To make the baseball bat, place the two bread pan cakes side by side to make one long cake. You can fill these cakes if you wish.
***Decorator's Tip*** Carve the cake before you put it on the cake board.
  • Cut the cake into the shape of a bat. If you are hesitant to do this, you can always draw it out on a piece of paper and use it as a template. This way you will be sure that your bat is symmetric.
  • Ice the bat with tan icing. Using tip #21 and red icing, pipe on the red tape on the bat's handle. Write your message using tip #3 and black icing.

Read more »

In Labels: , , , , , , , , on .


My first tutorial is aimed at those cake decorators who are just starting and those who need a quick refresher. This video gives some great tips on making bags and piping on cakes.
Read more »

In Labels: , , , , , , on .

Having trouble finding instructions on how to decorate a cake? We can help. For a small $5 fee and our money back guarantee we will create a custom cake guide. Your guide will include step-by-step instructions and sketches when needed. Just simply click the "add to cart" button below and be sure to leave your e-mail address at the checkout. Once we have been notified of your purchase, we will e-mail you about your request. Please be prepared to respond with a detailed description and/or a picture of your request. If for any reason we are unable to help you, we will issue a full refund. We look forward to creating a guide for you. And remember, if you ever have any questions about anything on our site, you can e-mail us at kseals@pieceofcakedecorating.com.


Read more »

In Labels: , , , , , , , , , , , , , , , , , , , on .


Here you will find my three main categories of tricks.  In them you will find some of the things I have learned from experience and have helped me over the years.  Some of them may seem wacky but remember, I do not have any professional training.  Aside from a few Wilton Decorating Classes and Food Network's Cake Challenges, I am completely self taught.

If you can't find what you need here, just e-mail your question to kseals@pieceofcakedecorating.com and I will answer you withing 24 hours and post about it a few days later.

Choose a category to get started...


Icing Tricks


Decorating Tricks


Baking Tricks
Read more »

In Labels: , , , , on .