Solution Graphics

Foodbuzz
Ask an Expert - Visit my Virtual Office at LivePerson
Showing posts with label Disney. Show all posts
Last month my oldest son turned four and wouldn't you know, he asked for a roller coaster on his cake!  Because I am always looking to challenge myself, I was determined to make it edible.  After searching the internet for pictures, it was nearly impossible to find a cake with a gumpaste roller coaster.  The few I found I wasn't crazy about but I learned enough to create something I loved.  In the end it was the easiest part of the entire cake and I am excited to share it with you.
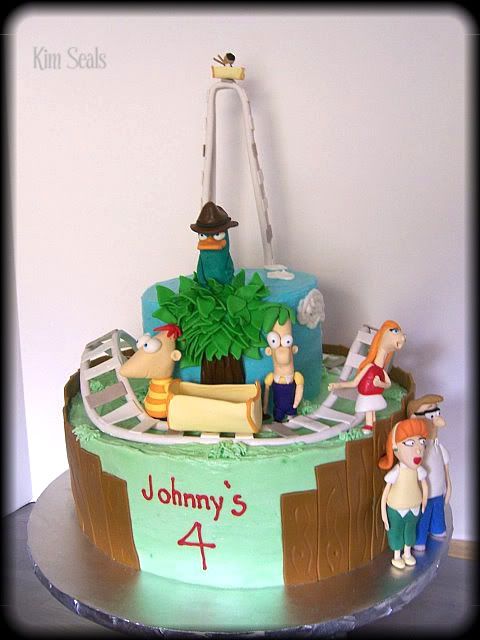
The cake is themed around the Disney cartoon Phineas and Ferb.  More specifically, the episode where the brothers build a roller coaster.  All the characters were hand made from gumpaste and the cakes are 12 and 6 inch rounds iced in buttercream with fondant details.

Give yourself about a week to let the roller coaster dry.  You may be able to get away with making it a few days earlier but I wouldn't risk it.  You will need...

clay extruder
flexible cardboard (I used a USPS shipping envelope)
tape
dowels
floral wire (20+ gauge)
cookie sheet and styrofoam
gumpaste (1lb)


Step 1

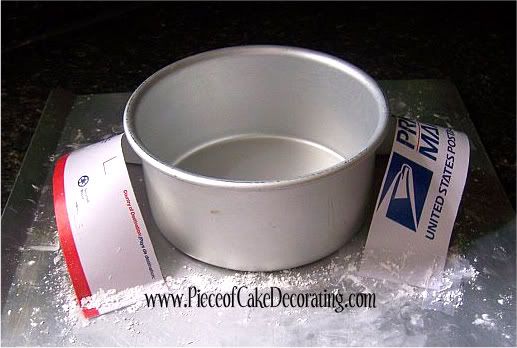
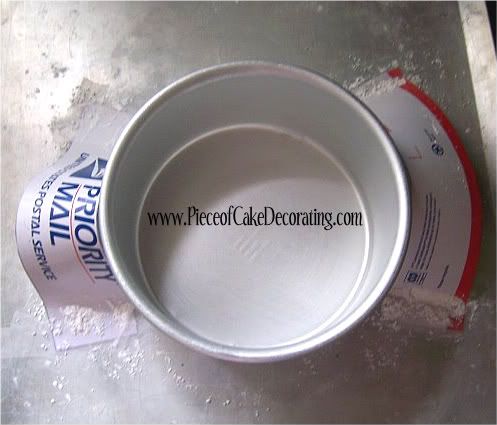
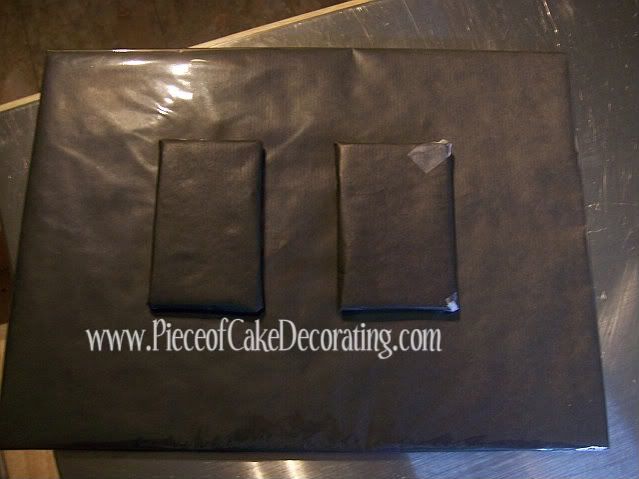
Before you can begin working with the gumpaste you need to create a "mold" or form for your roller coaster to dry on.  This roller coaster was made in two parts and the forms were made according to the pictures below.

I used a 6 inch cake pan to make sure my roller coaster was the right size.
The powdered sugar is important.  The last thing you want is for your gumpaste to stick.

You are now ready to make the rails of your roller coaster. This is extremely easy if you have a clay extruder.  Place your gumpaste into the extruder and using the largest circle disk, press out your rails.  Don't worry if your rail is not long enough.  You can hide the seam later with a plank.  Once you have 2 rails around your cake pan, spaced 1 inch apart, you can move on to your tall piece.

* Please note:  I forgot to take a picture of the gumpaste sitting on the form but, I did not make a full circle. I left a space in the back to place the tall piece of the roller coaster. *

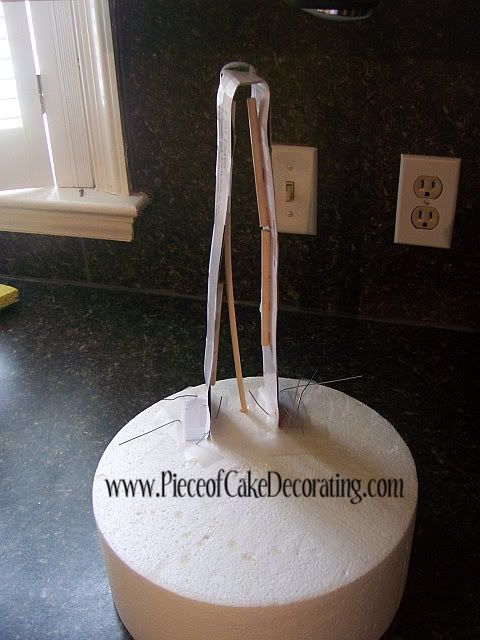
Dowels were taped to the cardboard for added support.  One dowel was stuck into the Styrofoam for stability.

Once the form was secured to the Styrofoam with tape, I used wire to be absolutely sure it would not come off.  The rails were made the same as before however this time I inserted a wire about 2-3 inches into each end of the rails and entirely into the Styrofoam.  The wire will give this tall piece more support when put on the cake.

**Decorator's Tip** For even more support and food safety, place drinking straws over the exposed wire before putting it on the cake.  This piece will not budge!


Step 2

Roll out your gumpaste and cut 1 inch x 1/2 inch rectangles for the beams/slats of the roller coaster.  Let them sit for a few minutes to become a little stiff then attach with water or gum glue (a mixture of gumpaste melted in water).  Make sure you cover any seams in your rails.

Store in a cool dry place and after a week it should be stiff enough to place on your cake.
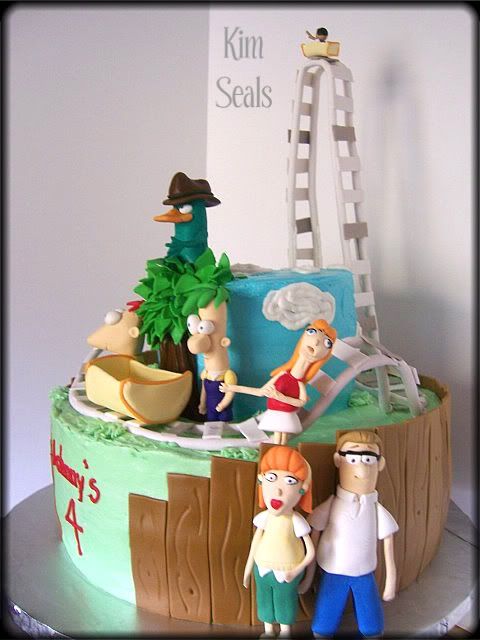


Here is another view for you to reference.  I was nervous about this roller coaster and a little over booked with cakes so mine actually sat for 3 weeks!  My husband swore it would fall apart but it did not budge and was completely hard.
Read more »

In Labels: , , , , on .


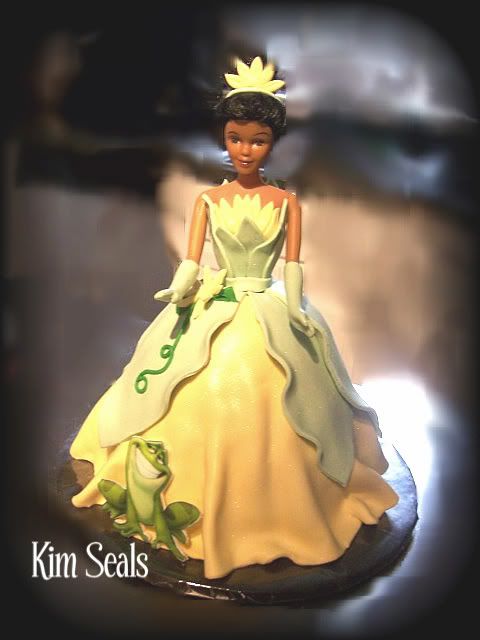
In this guide you will be given step-by-step instructions on how to make Tiana from Disney's 'The Princess and the Frog.'  Specifically, you will see how to lay the fondant to look like a dress.

To make this cake you will need...

1 covered, 10 inch cake board
Wilton Wonder Mold Pan or Pampered Chef's 4 cup, glass     measuring cup
large Wilton, Ethnic Doll Pick
buttercup yellow and sage green fondant
1 batch of buttercream icing
1/4 cup dark green buttercream icing or a tube of pre-made green icing
edible image plaque of the frog
small and medium daisy cutters
tips #2 and #67


Directions:

Step 1

A few days in advance, cover your cake board and make your edible image plaque of the frog.  Because it is a trademarked image, I cannot sell these plaques but if you have an edible printer, you can read my Sugar Plaque Tutorial and make your own.


Step 2

Bake your cake according to the pan's instructions.  Place the cake in the center of your cake board and ice with buttercream icing.


 Step 3

Cover your cake with the buttercup yellow fondant.  Make sure to bunch it at the bottom as I have here to give the appearance of a flowing skirt.


Step 4


Roll out the sage green fondant and cut out 5-6 large petal shaped pieces.  To make a petal template, draw your shape on a piece of paper, cut it out and place it on the fondant to cut your shapes with an Exact-o Knife or pizza cutter.


Notice in the pictures how the petals are arranged.  They are attached using a little bit of water.  Pieces of napkin where used to prop up parts of the dress until the fondant set.


Step 5

Dress your doll pick.  The first thing that should be done when dressing your doll is make the gloves.  This takes a bit of patience.  Roll out a thin piece of sage green fondant and wrap it around one of the hands and lower arm.  Flatten the fondant the best you can without tearing a hole.  Using scissors, cut around the finger tips.  To give the appearance of fingers, make indents between each finger using a toothpick.  Repeat on the other hand.

If you look at the original picture you will notice that the yellow part of her dress, covering her bust, looks like daisy petals.  Roll out the buttercup yellow fondant and cut out 3 medium and 2 small daisies using your daisy cutters.  Cut one of the small daisies in half for the tiara and use the remaining small petal to decorate her dress in the last step.  The medium flowers are used to cover Tiana's bust line.  They can be attached with a little bit of water.

***Decorator's Tip***  Let the tiara petals sit in a slightly curved position until you are done decorating so that the fondant can dry a little.

Next, using the same method for making large petal shapes in step 4, make 5 medium and 3 small petal shapes for the rest of her dress.  Use the pictures below to help you with placement.  They can also be attached using a bit of water.

**Please note that even though the pictures show the doll pick in the cake, I do not insert it until the next step.  It may not make a difference but it was easier for me to do it this way.**


Step 6

Stick your doll pick into the cake.  Cut a small strip of green fondant to make a belt and cover he transition between the cake and doll pick.

Step 7

Make the tiara by rolling out a small snake of sage green fondant to resemble a headband.  Place the headband on the doll's head and attach the 1/2 daisy using a small amount of water.

Step 8

Pipe the curly stem and leaves on the dress using tips # 2 and #67 respectively.  Attach the flower using a dot of green icing.  Finally, secure the frog plaque in place using a small amount of green icing.


***Decorator's Tip*** To make the dress pop, dust it with pearl luster dust.


Reader photos using this guide...

Sallie
Read more »

In Labels: , , , , , on .


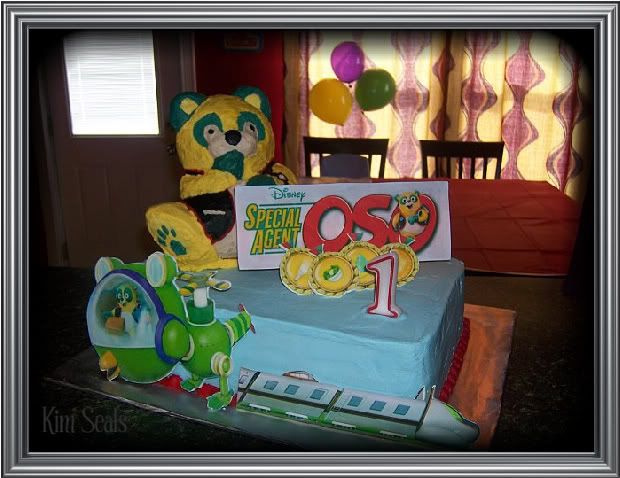
I made this cake for my son's 1st birthday.  He just loves Special Agent Oso, making this cake a big hit.  In this guide you will learn how to decorate Wilton's Bear Pan to look like Oso.  All other decorations are sugar plaques and can be made using my Sugar Plaque Tutorial.

To make this cake you will need...


large cake board
1/2 sheet cake
Wilton Bear Pan cake
Sugar Plaques - sign, 4 Digi Medals, Whirly Bird, Rapi (train)
wooden dowels
cardboard cake divider
Saran Wrap
blue, yellow, blue-green, black, tan, and red buttercream icing
tips #5 (x 4), #32 and #102


Directions:

Step 1

A few days in advance make your sugar plaques.


Step 2

Level, tort and fill your 1/2 sheet cake and place it on the cake board.  Then, ice your 1/2 sheet cake with blue buttercream icing.


Step 3

Cut your cardboard cake divider to the shape of the bear's bottom and cover it in Saran Wrap.


Step 4

Decide where you want the bear to sit and place your dowels, cut to size, into the cake for support.  I chose the back left corner.  Then, hammer a sharpened dowel down the center of the bear and slightly into your cake board.  This will keep the bear from falling off.


Step 5


Using tip #5 for each, pipe horizontal lines to fill in the stomach, nose, eyes, ears, hands, and vest...in that order.  After each section is finished take time to smooth out the icing.  The best way to do this is to put a little powdered sugar on your finger and pat it flat.
***Decorator's Tip*** If you look at Oso's nose you will see a little powdered sugar left behind.  I was not worried about this because by the time I finished decorating the cake, it melted into the icing.  If for some reason it does not, put a little water on a decorator's brush and touch the sugar with the brush (do not rub) and it will disappear.


Step 6

Using a spatula, cover the rest of the bear with yellow buttercream icing.  You can smooth any lumpy areas with your finger and powdered sugar as mentioned above but it does not need to be perfect because Oso is meant to look furry.


***Decorator's Tip*** Use a tapered spatula for those hard to reach spots.


Step 7

Pipe a boarder around the 1/2 sheet cake using red buttercream icing and tip #32.


Step 8

Place your sugar plaques on your cake.
Read more »

In Labels: , , , , , on .

Photobucket
There are 2 ways to make this cake. Novice directions which use a car cake pan are also available. There, I will discuss how to recreate this 3D car cake with step-by-step instructions and decorating tips. Below, however,  the "experienced" instructions which will guide you through the carving process.


To make the "experienced" cake you will need...

Two 14x11 cakes
Two 13x9 cakes
One 9x9 cake
4 wooden dowels
Large rectangular cake board
Tips # 2, 3 and 5
Red and black fondant
Red gumpaste
Thick Wire
Tan, white, orange, yellow, and black buttercream icing
Blue tinted piping gel
Crushed graham crackers
Rice Krispie Treats
Plastic cacti


Another item that will help decorate this cake is an air brush. You will be able to cover the car in white fondant then airbrush it red. It will save you a great deal of time.


Directions for the "experienced" cake:


Step 1

A few days in advance, make the spoiler out of red gumpaste and place 4 thick wires
into the spoiler as it dries (the longer the better). These wires will hold the spoiler on the
cake.

The size of your spoiler will depend on the size of your cake.  Mine was roughly 7 inches long and 2 inches high.

Step 2


The easiest way to make this cake is to start with the car.  Bake, fill, and stack the 2 13x9 cakes.  Also bake the 9x9 cake and put these cakes in the freezer for 1 day.  Take a large cardboard cake board and cut it to the general shape of the car like the image below.


Step 3

Once the cakes are frozen, use the cut cake board as a guide to carve the shape of the car.  Once you have the general shape, place the cake on the cut cake board and add the curves on the hood, trunk, and doors.  The trick here is to take it slow and look at the car from all angles.  Remember, you can always take off a little more but you can’t put the cake back on once you cut it.

Below are some drawings to help you visualize the shape of the car.  The top 2 photos are of the car's body.  It is made from the two 9x13 cakes and I have drawn a side view of the car.  In the bottom drawing, you can see that the hood is carved from a single layer 9x9 cake and is a rounded triangle shape.  Do not carve the hood until you have read step 4.


Step 4

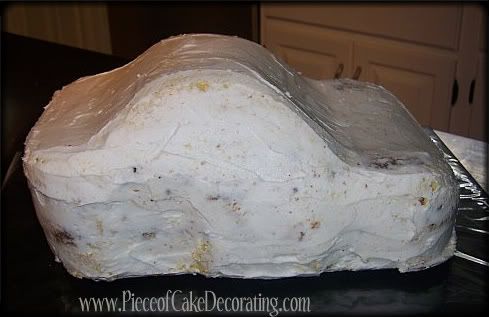
When you are happy with the shape of the car and you have scooped out the wheel wells, it will be time to start the hood.  To do this, measure and cut the square cake to size.  When you are sure it will fit, place the cake on top of the car’s body and cut it to shape.  Your final carved cake should look something like this...

Ice with buttercream icing and cover the cake with fondant.


You can either cover the cake with red fondant or cover the cake with white fondant and airbrush the whole cake red.


Step 5

Use the white buttercream and tip #3 or 5 to pipe on the windows. 

****Decorator’s Tip**** Use a toothpick to outline all of the windows and the lightning bolt onto the car.


Step 6

Outline all of the windows with the black icing and tip # 2.


Step 7

Repeat the above two steps to pipe on the large lighting bolts, head lights, tail lights, and the large number on top, using yellow and orange or white buttercream (colors will depend on what you are piping).

***All of these details were done freehand but you can make a mini template to ensure unity.***


Step 8

With tip #2 and black icing, pipe numbers on the sides of the car as well as the passenger side headlight and tail light.


Step 9

With tip #2 and yellow icing, pipe the child’s name to resemble the Rusteeze logo.


Step 10

With tip #2 and blue piping gel pipe on eyes. Be careful, as the piping gel will run if you use too much. Finally, add the pupil on the eyes with a small black dot.


Step 11

The only part that is left of the car is to make the wheels. To do this, cut circles out of Rice Krispie Treats and cover with black fondant. I now make my wheels by attaching two black gumpaste circles together with gumglue.  With a gumpaste tool or any straight edge you can add tread marks. As an added bonus, the circle cutter you use to make the wheels acts as a template for the size of your wheel well.

Add a red circle to the center of the wheel and pipe the word Lightyear onto the wheels. Once the car is sitting on the bottom cake you can place the wheels onto the cake.

***Decorator's Tip***

If you are placing your car cake on a cake board instead of a cake, you can build up the cake board with covered pieces of foam to make the car appear to sit on its wheels.


Step 12

Finally, bake, level and fill the 2 14x11 cakes. Place onto the large rectangular cake board and cover with tan icing. Next, sprinkle the crushed graham crackers on top to look like sand. Place 4 dowels into the cake to support the car. The placement of the dowels will depend on the placement of the car. Just be sure to use 2 dowels for the front of the car and two for the back.


Step 13

Place the wheels and spoiler onto the car and put the cacti onto the large cake.

****Decorator’s Tip**** If you are having trouble getting the spoiler to stay up you can take 4 lollipop sticks and place them behind the spoiler for support. Cover these sticks with black or gray buttercream. If you look at the original Lightning McQueen, you will see he has something similar on the back of his spoiler.


Reader photos using this guide...

Kym from Holland

Kym from Holland

 Sallie
Read more »

In Labels: , , , , , , , on .

Photobucket
There are 2 ways to make this cake. Below you will find my "novice" instructions, which uses a car shaped cake pan. If you are looking to carve your Lightning McQueen cake, "experienced" instructions are also available here.


To make the "novice" cake you will need...


3D Wilton Cruiser Pan
Large rectangular cake board
Tips # 2, 3 and 5
Red and black fondant
Red gumpaste
Thick Wire
Tan, white, orange, yellow, and black buttercream icing
Blue tinted piping gel
Crushed graham crackers
Rice Krispie Treats
Plastic cacti


Another item that will help decorate this cake is an airbrush. You will be able to cover the car in white fondant then airbrush it red. It will save you a great deal of time.


Directions for the "novice" cake:

****Please keep in mind that by using the cake mold listed above, your cake may not look exactly like Lightning McQueen because, while this mold gives you a car shape, it is not his exact shape.****


Step 1

A few days in advance, make the spoiler out of red gumpaste and place 4 thick wires
into the spoiler as it dries (the longer the better). These wires will hold the spoiler on the
cake.


Step 2

Bake the 3D Cruiser cake and freeze. To get the cake to look more like Lightning McQueen, you will need to trim cake off the top and possibly the hood to give it more of a curve.


Step 3

Once you are happy with the shape of the cake, ice the entire car with buttercream icing.


Step 4

Cover the cake with fondant. You can either cover the cake with red fondant or cover the cake with white fondant and airbrush the whole cake red.


Step 5

Use the white buttercream and tip #3 or 5 to pipe on the windows. 

****Decorator’s Tip**** Use a toothpick to outline all of the windows and the lightning bolt onto the car.


Step 6

Outline all of the windows with the black icing and tip # 2.


Step 7

Repeat the above two steps to pipe on the large lighting bolts, head lights, tail lights, and the large number on top, using yellow and orange or white buttercream (colors will depend on what you are piping).


Step 8

With tip #2 and black icing, pipe numbers on the sides of the car as well as the passenger side headlight and tail light.


Step 9

With tip #2 and yellow icing, pipe the child’s name to resemble the Rusteeze logo.


Step 10

With tip #2 and blue piping gel pipe on eyes. Be careful, as the piping gel will run if you use too much. Finally, add the pupil on the eyes with a small black dot.


Step 11

The only part that is left of the car is to make the wheels. To do this, cut circles out of Rice Krispie Treats and cover with black fondant. You can also cover with white fondant and airbrush them black. Add a red circle to the center of the wheel and pipe the word Lightyear onto the wheels. Once the car is sitting on the bottom cake you can place the wheels onto the cake. The exact size of the wheels will vary depending on the size of your wheel well. My wheels fit so snugly that I was able to place them into the well and they did not fall.


Step 12

Finally, bake, level and fill the 2 14x11 cakes. Place onto the large rectangular cake board and cover with tan icing. Next, sprinkle the crushed graham crackers on top to look like sand. Place 4 dowels into the cake to support the car. The placement of the dowels will depend on the placement of the car. Just be sure to use 2 dowels for the front of the car and two for the back.


Step 13

Place the wheels and spoiler onto the car and put the cacti onto the large cake.

****Decorator’s Tip**** If you are having trouble getting the spoiler to stay up you can take 4 lollipop sticks and place them behind the spoiler for support. Cover these sticks with black or gray buttercream. If you look at the original Lightning McQueen, you will see he has something similar on the back of his spoiler.
Read more »

In Labels: , , , , , , , , , , , , , on .