Solution Graphics

Foodbuzz
Ask an Expert - Visit my Virtual Office at LivePerson
Showing posts with label gumpaste. Show all posts
 

This sugar plaque is made from an edible image with a dried, gumpaste backing.  Your sugar plaque can have just about any image you want (trademark images excluded).  In the notes to seller please indicate whether you would like your image to stand up on your cake (like above).  These plaques will have dowels attached with chocolate on the back.  Once I receive your order, I will contact you via e-mail to obtain the picture.


Sugar Plaques can now be purchased through my sister site www.KimsCake.com.
Read more »

In Labels: , , , , , on .


The ruby slippers were used on a Wizard of Oz themed cake but, as you can see, I can make a variety of styles and colors.  At the time of purchase please describe the shoes as best as you can in the notes to seller.  It is always an added plus if you can provide a picture.  If this is possible, please mention it in the notes to seller as well.

Visit my handmade shop to purchase.
Read more »

In Labels: , , , on .


These ruby slippers were used on a Wizard of Oz themed cake.  They can easily be personalized by changing the color or details.

In this tutorial you will use something called gum glue.  You can easily make gum glue by mixing about 1 tablespoon of water and a 1/4 teaspoon of gumpaste.  Stir the mixture as the gumpaste dissolves in the water.  It can be stored up to 1 week in the refrigerator.


You will need...

red fondant/gumpaste mixture
shoe template
Exacto Knife
decorator's brush
gum glue (water and gumpaste mixture)
tissues or napkins
pre made red icing
tip #2
piping gel
red sugar crystals


Directions:


Step 1

Print out your shoe template on card stock (especially the base support ).  Cut the pieces out and assemble the support.

Follow these steps to print your templates.
1.  Right click on the image and select 'copy image.'
2.  Open the program of your choice.  Word and Paint work great.
3.  Hit 'CTRL-V' to paste the picture on the page.

You now have the freedom to size the template to your needs.


***Decorator's Tip*** Making adjustments to your template is a great way to make your shoes unique.


Step 2

Using the red gumpaste, make the heels of your shoes and place them behind your base support.  Be sure to use the 'sole' template as a guide for the shape of your heel.


***Decorator's Tip*** Make your heal slightly higher than the support and have it follow the angle of the shoe.  This will give it a more natural looking arch.


Step 3


Roll out your gumpaste and cut out the soles of your shoe using the template and an Exacto Knife.  Brush the top of the heel with gum glue and place the soles on the support base.


***Decorator's Tip*** I chose to leave the shoe lining/insert off my ruby slippers.  If you will be using your insert, now is the time to roll out your gumpaste, cut out your piece and attach it to the sole of the shoe using a decorator's brush and gum glue.


Step 4
Roll out your gumpaste and cut out the tops of the shoe using the template and an Exacto Knife.  Apply a small amount of gum glue around the edge of the toe and put on the top of the shoe.  Use tissue or napkins to hold the shape until the gumpaste dries.


Step 5


Roll out your gumpaste one last time and cut out the back/side of the shoe using the template and an Exacto Knife.  Just as before, apply a small amount of gum glue to the remaining edge of the shoe and attach the final piece.  Use napkins or tissue to hold the shoe's form until the gumpaste dries.


The shoe will need to dry out for at least a day, maybe two.  Once you feel they are strong enough, move on to the next step.


Step 6

Using a tube of pre made red icing and tip #2, fill in the gaps around the edge of the shoe and where the sides meet the top.  This is also a good time to fill in any cracks in the gumpaste.


Step 7


Brush piping gel all over the shoe, inside and out.  Finally, roll the shoe in red sugar crystals.  All mistakes should be hidden and your shoe will sparkle in the light.


For another great gumpaste shoe tutorial visit www.how2cakes.com.

Read more »

In Labels: , , , , on .


I know what you are thinking, what does a pasta machine have to do with cake decorating?  It is actually a very useful tool when rolling out fondant.  I am very excited to review this product as I have seen it used for gumpaste and fondant on a number of cake decorating shows.  I hope to show you just how useful it can be.

I also want to quickly tell you about the site that is sponsoring this review.  CSN Stores, an online store, sells products like mailboxes, bar stools, bakeware, toys and so much more.  I'll give you more of the company details with my review but in the mean time, you should definitely check out their site.  You name it, they have it and at a great price too!
Read more »

In Labels: , , , on .

CD Collection Cake

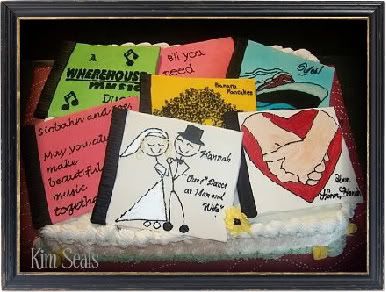
I made this cake for a bridal shower. The couple met in a music store so I created CD covers to tell the story of their relationship. If you follow the CDs around you can see where they met, how he proposed, and their wedding song. There are also filler CDs which include a picture of interlocked hands to represent their marriage, one of the bride's favorite songs, The Beatles' song title "All You Need is Love," and a sweet message.


To make this cake you will need...

1/2 sheet cake
large cake board
white buttercream icing
white gumpaste
black fondant or gumpaste
airbrush kit (optional)
projector (optional)
pre made black icing
tips #2 #3 #5 #68 #35

Other useful items:


Directions:


Step 1

A few days in advance, make your CD cases/covers. First you must roll out white gumpaste and cut out seven 9 1/2'' x 9'' rectangles. Let the gumpaste dry for 1-2 days and flip half way through to speed the drying process. Once the gumpaste is dry, airbrush them your desired colors.


***Important note*** If you are not using an airbrush, make sure to color your gumpaste before you roll and cut it.

There are a few ways to get the pictures onto the gumpaste.

  1. If you have the skills, you can freehand the pictures.
  2. Apply an edible image to the gumpaste. Click here to purchase an image.
  3. Use a projector to paint or pipe your image onto the gumpaste.

For this cake I used option number 3. It was a lot of work but the images really popped off the cake.


Step 2

To make all of the CDs I used the same process.

1. Place the original picture in the projector.

Original Image

2. The image is projected onto the gumpaste. Then, using tips #2 or #3 and the pre made black icing, pipe the outline of the image onto the gumpaste.

projected imageFinal Product

3. If needed, use the edible airbrush ink to paint your pictures. For this CD I painted the grooms hat, tie and shoes with black ink. To make the bride's dress pop, I mixed clear vanilla extract with pearl dust and painted her dress, veil, and shoes. To add a personal touch, I gave the bride blond hair.

***Notes on the CDs*** I did a Google images search to find the images. All of the CD piping was done using a projector. This includes the handwriting. Below is a list of the CDs I made and any important tips for decorating them.
  • Music Store CD - I airbrushed it green and piped the logo onto the CD using black icing and tip #3. Musical notes were also added using black icing and tip #3.
  • Filler CD #1 - I airbrushed it a combo of red and pink and piped the words 'All You Need is Love' using tip #3 and black icing.
  • Proposal CD - I airbrushed the gumpaste blue and piped the outline of a boat and the word 'Yes!' using black icing and tip #2. The boat was then painted using red, black, and pearl edible ink. To make the water stand out on a blue background, I painted blue piping gel on the bottom half of the CD.
  • Message CD- I airbrushed the gumpaste pink and piped the following message using black icing and tip #3: 'Siobhan & Joe, May you always make beautiful music together."
  • Filler CD #2- I airbrushed the gumpaste yellow and piped on the original Banana Pancakes CD cover using black icing and tips #2 and #1.
  • Wedding Song CD- See above.
  • Marriage CD- The gumpaste was left white and the image was piped using black icing and tip #2. I then painted the picture using flesh and red colored edible ink.
Once all of the CDs are dry you can add the black strip to the left side of each CD. Roll out black fondant or gumpaste and cut to size. Attach the strip with piping gel. To give it a rigid look, I made small indents into the black strip using a gumpaste tool. The end of a paintbrush or a fork will also work.


Step 3

Level, tort and fill your 1/2 sheet cake. Place the cake on your cake board and ice with white buttercream icing. The sides of the cake should be lightly iced. Next, pipe vertical lines on the sides with tip #68 and a shell boarder around the top with tip #35.

Iced Cake


Step 4

Place your CDs on top of the cake. Use a mound of buttercream icing underneath the CDs you want to appear propped up.

***Decorator's Tip*** You may want to practice arranging your gumpaste CDs before you put them on the cake to prevent them from becoming ruined.

For an added touch, add gumpaste or royal icing flowers around the cake.
Read more »

In Labels: , , , , , , , on .

Gumpaste Hydrangea


I came across this great 2 part gumpaste hydrangea tutorial at the Petalsweet Cakes Blog. Part 1 of the tutorial gives detailed instructions and pictures to making the beautiful flowers seen above. Part 2 then discusses how to color and assemble the bouquet. 

*Update: Jacqueline has recently posted a Part 3 to her tutorial.  Here she discusses how to make the gumpaste leaves.

I know these flowers look intimidating but Jacqueline does such a great job with this tutorial that if you have just a little bit of gumpaste experience, you will be able to make these flowers.


Hydrangea Tutorial Part 1
Hydrangea Tutorial Part 2
*update: Hydrangea Tutorial Part 3
Read more »

In Labels: , , , on .

Last week I posted about Unique Cake Decorating Items on Etsy.com. One of these items was a cake topper that used beads. Today I came across a blog post (August Birthstones-Peridot, Sardonyx, Carnelian) by Silver Rose Blogs and came up with a new cake idea using birthstones and beads.

Sometimes it can be difficult coming up with ideas for a birthday cake. Especially when a person's interests are not easily transferred into cake. When you need to make a birthday cake but don't have any ideas or inspirations, make a birthstone cake.

Beads can be used many different ways on a cake. They can be strung on a string, then wrapped around the bottom as a boarder and strung on wire to be used as a cake topper or placed all around the cake so the cascade down the sides.

If you do not want to use real beads, you can also purchase or make edible beads in the color of your choice. To make your own, all you need is a mold like the ones listed below and dyed gumpaste.


If you want to know more about birthstones, check out Silver Rose Blogs for more information.
Read more »

In Labels: , , , , , , , , , on .