Solution Graphics

Foodbuzz
Ask an Expert - Visit my Virtual Office at LivePerson
Showing posts with label carved cake. Show all posts

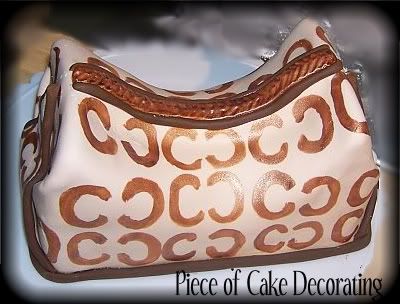
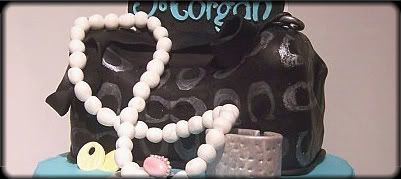
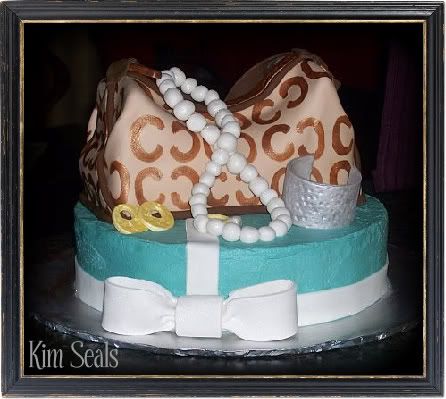
This was my first purse cake and I had so much fun making it.  In this guide I will give you step-by-step instructions on how to make the Coach bag, jewelry, and round Tiffany's Box pictured above.  If you want to make a larger purse than I have, follow the same steps with a 1/2 or full sized sheet cake.

You can now make decorating this cake even easier by purchasing the gumpaste jewelry from my handmade shop.

To make this cake you will need...

14-18 inch round cake board
10 inch round cake
1/4 sheet cake
1/4 sheet cake, cake divider
wooden dowels
Tiffany blue buttercream icing
tan, brown and white fondant
white gumpaste
silver, gold and pearl luster dust
any decorating tip
small circle cookie cutter
brown food coloring
clear extract (any flavor)
piping gel
silver cake crystals
decorator's brush
jewelry wire
toothpicks


Directions:

Step 1

A few days in advance, make the gumpaste jewelry and bow.  To make the gumpaste bow follow my Gumpaste Bow Tutorial.  Once the bow has dried, cover it with pearl luster dust.

To make the pearl necklace, make small balls with white gumpaste and string them on jewelry wire before they dry.  Once the gumpaste beads are dry, brush on pearl luster dust.

To make the earrings, roll out a small amount of white gumpaste.  Using a small circle cookie cutter, cut out two earrings.  Then, with the back side of any decorating tip, cut out a smaller circle towards the top of the larger circle.  The back of a decorator's brush can be used to make the small dents in the gumpaste.  When the earrings are dry, brush them with gold luster dust.

***Decorator's Tip*** You can make a paint out of the luster dust by adding a small amount of clear extract (any flavor) to the powder.  This is what I have done here and it makes the color darker.

To make the bracelet, roll out white gumpaste and cut a large strip.  Use a drinking glass or paper towel roll to help shape the bracelet.  Again, the back of the decorator's brush can be used to make the small dents in the gumpaste.  Once the bracelet is dry, paint it with the sliver luster dust and clear extract mixture mentioned above.

Use white gumpaste to make the ring.  The band was painted with gold luster dust and the diamond was covered in silver cake crystals.  Clear piping gel helped the crystals to stick to the gumpaste without melting them.


Step 2

Level, tort and fill your 10 inch round cake.  Once your cake is placed in the center of your cake board, cover it in Tiffany blue buttercream icing.

***Decorator's Tip*** To achieve the Tiffany blue color I used a combination of  blue, yellow, and green food coloring.  I used a lot of blue, a fair amount of yellow and a very small amount of green.  Add a small amount of each at a time because once the color is added you cannot go back.


Step 3

Roll out white fondant and cut it into 1 inch strips to make the ribbon on the box.  The fondant ribbon going over the top of the cake is approximately 16 inches long.  Your length will vary depending on the height of your cake.  The fondant ribbon going around the cake is approximately 32 inches long.  I made it a little longer than the circumference of the circle to be sure I had enough.  Notice the fondant ribbon going across the top is slightly off center.  This is characteristic of a Tiffany's box.  Finally, brush the ribbon with pearl luster dust to match the bow.


***Decorator's Tip***  Wilton's Fondant Ribbon Cutter makes this step very easy!


Step 4

Place 4 wooden dowels, cut to size, around the center of the cake.  These will be used to support the purse so the best placement is between where the 4 corners will fall and the center of the cake.


Step 5 - time to make the purse!


Cut the 1/4 sheet cake into 3rds.  Level, fill and stack these cakes on a cake divider cut to the same size (made from the 1/4 sheet cake divider).


Step 6


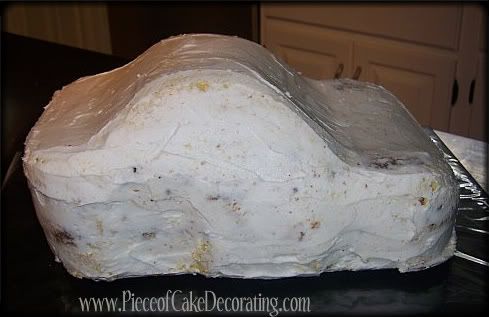
Carve a valley in the center of the cake.  The trick here is to remember that the more exaggerated the cut, the more it will show once it is covered in fondant.  Take a little off at a time until you are happy with the result.


Step 7
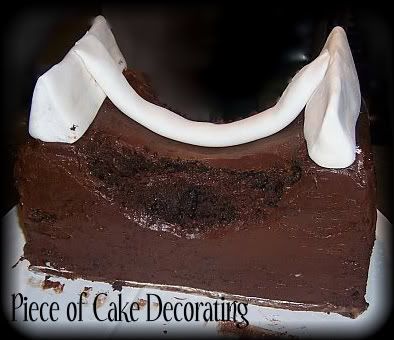

Mold two peaks and a long snake (the zipper) out of white fondant an place them as I have in the picture.  Modeling chocolate will also work well here.  I have made the cake this way because the fondant will not collapse under the weight of the tan fondant that I will cover the cake in later.  It was my fear that using all cake would cause the purse to smoosh down once it was covered in fondant.

Once the fondant was placed on the cake I realized that I was not happy with the shape of the purse so I trimmed more cake off on a curved angle on both sides of the cake.


Step 8

Cover the rest of the cake in icing.  This will help smooth it out and prevent the spaces from showing in the tan fondant.


Step 9


Cover the cake in tan fondant.  As you lay the fondant across the cake, make sure you ease it into place.  Move across the cake from left to right.  If you just lay the fondant down you risk tearing it at the peaks.  The left and right sides were pinched at the corners and trimmed to form triangle folds.  They were then secured into place with a little water and toothpicks while I moved on to the next step.  They will be removed later.


Step 10

To make the zipper, roll out a long snake using tan fondant.  Flatten it slightly and cut to size.  Secure it to the cake with water.  Now is also a good time to make the rings to hold the strap and the zipper pull.


Step 11

Mix gold luster dust and brown food coloring to make bronzed colored paint.  Paint the Coach C's all over the cake, the zipper parts, and the strap rings bronze.


Step 12
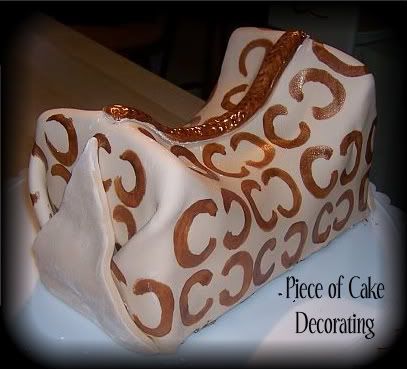


Roll out more tan fondant and cut out two large triangle pieces for the sides.  Remove the toothpicks and secure into place by brushing the back side of the triangle with water.

Paint the Coach C's on the triangle pieces.


Step 13

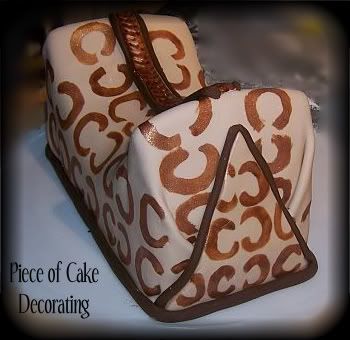
Make a very long, thin snake out of brown fondant.  This will be used as trim along the zipper, around the triangle pieces, and around the bottom of the cake.  Attach the trim in that order.


Step 14

Place the purse on top of the 10 inch round cake.  I did not dowel this cake because I felt the size and height were going to keep the cake pretty stable and my assumption was correct.  The cake traveled fully assembled and made it safely.

Step 15
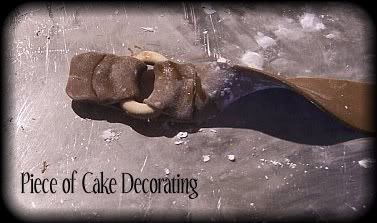

Make the strap by rolling out brown fondant and cutting a 3/4 inch strip.  Thread it through both both rings as pictured and secure to the cake with piping gel.  I am showing you the back side of the strap.

I have used piping gel this time because it holds faster.


Step 16

Using piping gel, attach the zipper pull and drape the pearl necklace down the front of the bag.  Then, arrange the jewelry as desired and attach the bow with piping gel.

Phew!  That's it, your cake is ready to eat.  :) However, after all that work, I would make sure people stare at it for awhile.
Read more »

In Labels: , , , , , on .

Photobucket
There are 2 ways to make this cake. Novice directions which use a car cake pan are also available. There, I will discuss how to recreate this 3D car cake with step-by-step instructions and decorating tips. Below, however,  the "experienced" instructions which will guide you through the carving process.


To make the "experienced" cake you will need...

Two 14x11 cakes
Two 13x9 cakes
One 9x9 cake
4 wooden dowels
Large rectangular cake board
Tips # 2, 3 and 5
Red and black fondant
Red gumpaste
Thick Wire
Tan, white, orange, yellow, and black buttercream icing
Blue tinted piping gel
Crushed graham crackers
Rice Krispie Treats
Plastic cacti


Another item that will help decorate this cake is an air brush. You will be able to cover the car in white fondant then airbrush it red. It will save you a great deal of time.


Directions for the "experienced" cake:


Step 1

A few days in advance, make the spoiler out of red gumpaste and place 4 thick wires
into the spoiler as it dries (the longer the better). These wires will hold the spoiler on the
cake.

The size of your spoiler will depend on the size of your cake.  Mine was roughly 7 inches long and 2 inches high.

Step 2


The easiest way to make this cake is to start with the car.  Bake, fill, and stack the 2 13x9 cakes.  Also bake the 9x9 cake and put these cakes in the freezer for 1 day.  Take a large cardboard cake board and cut it to the general shape of the car like the image below.


Step 3

Once the cakes are frozen, use the cut cake board as a guide to carve the shape of the car.  Once you have the general shape, place the cake on the cut cake board and add the curves on the hood, trunk, and doors.  The trick here is to take it slow and look at the car from all angles.  Remember, you can always take off a little more but you can’t put the cake back on once you cut it.

Below are some drawings to help you visualize the shape of the car.  The top 2 photos are of the car's body.  It is made from the two 9x13 cakes and I have drawn a side view of the car.  In the bottom drawing, you can see that the hood is carved from a single layer 9x9 cake and is a rounded triangle shape.  Do not carve the hood until you have read step 4.


Step 4

When you are happy with the shape of the car and you have scooped out the wheel wells, it will be time to start the hood.  To do this, measure and cut the square cake to size.  When you are sure it will fit, place the cake on top of the car’s body and cut it to shape.  Your final carved cake should look something like this...

Ice with buttercream icing and cover the cake with fondant.


You can either cover the cake with red fondant or cover the cake with white fondant and airbrush the whole cake red.


Step 5

Use the white buttercream and tip #3 or 5 to pipe on the windows. 

****Decorator’s Tip**** Use a toothpick to outline all of the windows and the lightning bolt onto the car.


Step 6

Outline all of the windows with the black icing and tip # 2.


Step 7

Repeat the above two steps to pipe on the large lighting bolts, head lights, tail lights, and the large number on top, using yellow and orange or white buttercream (colors will depend on what you are piping).

***All of these details were done freehand but you can make a mini template to ensure unity.***


Step 8

With tip #2 and black icing, pipe numbers on the sides of the car as well as the passenger side headlight and tail light.


Step 9

With tip #2 and yellow icing, pipe the child’s name to resemble the Rusteeze logo.


Step 10

With tip #2 and blue piping gel pipe on eyes. Be careful, as the piping gel will run if you use too much. Finally, add the pupil on the eyes with a small black dot.


Step 11

The only part that is left of the car is to make the wheels. To do this, cut circles out of Rice Krispie Treats and cover with black fondant. I now make my wheels by attaching two black gumpaste circles together with gumglue.  With a gumpaste tool or any straight edge you can add tread marks. As an added bonus, the circle cutter you use to make the wheels acts as a template for the size of your wheel well.

Add a red circle to the center of the wheel and pipe the word Lightyear onto the wheels. Once the car is sitting on the bottom cake you can place the wheels onto the cake.

***Decorator's Tip***

If you are placing your car cake on a cake board instead of a cake, you can build up the cake board with covered pieces of foam to make the car appear to sit on its wheels.


Step 12

Finally, bake, level and fill the 2 14x11 cakes. Place onto the large rectangular cake board and cover with tan icing. Next, sprinkle the crushed graham crackers on top to look like sand. Place 4 dowels into the cake to support the car. The placement of the dowels will depend on the placement of the car. Just be sure to use 2 dowels for the front of the car and two for the back.


Step 13

Place the wheels and spoiler onto the car and put the cacti onto the large cake.

****Decorator’s Tip**** If you are having trouble getting the spoiler to stay up you can take 4 lollipop sticks and place them behind the spoiler for support. Cover these sticks with black or gray buttercream. If you look at the original Lightning McQueen, you will see he has something similar on the back of his spoiler.


Reader photos using this guide...

Kym from Holland

Kym from Holland

 Sallie
Read more »

In Labels: , , , , , , , on .

Photobucket
I made these cakes for an Asian themed bridal shower. The guide you would be purchasing will give you instructions on how to make the Fortune Cookie Cake only. The How to Make a Chinese Lantern cake guide was written separately.

To make this cake you will need...
14 inch, round, silver cake board
Two 10 inch, round cakes
White gumpaste
3-4 orchid flowers (instructions for flowers not included)

This is all you need to make the flowers. For best results, mix the gum paste with some fondant so it does not dry as quickly. The flower kit is a great investment for any cake decorator. Trust me, you will use this more than once.


Directions:


Step 1


A few days in advance, roll out white gumpaste and cut a rectangle shape for the fortune.

***Decorator’s Tip*** When cutting rectangle shape, keep the 10 inch cake pan near by in order to make sure your proportions are correct.


Step 2

Bake two 10 inch, round cakes.  Level one of the cakes then fill and stack both cakes on the silver cake board.  When stacking, the top cake should stay rounded and NOT level.

***Decorator’s Tip***  After this step, freeze the cake to make it easier to carve.


Step 3

Cut out a triangle shape out of the cake and trim cake off the top to give the cake a smoother look.  Keep trimming the top and triangle cut out until you are happy with the shape of your fortune cookie.


Step 4

Color the fondant tan (you could also leave the fondant white and airbrush it later).  To get tan I used a combination of brown and ivory.


Step 5

Ice the cake with buttercream icing.  Cover the cake in fondant.

***Decorator’s Tip*** You may need an extra set of hand to help lay the fondant in the cut part of the cake without tearing.


Step 6

Write your message on the gumpaste fortune and place it on the side of the cake.  Then, place your gumpaste flowers around the cake.

***Decorator’s Tip***  If you are transporting this cake, you may want to wait until you arrive at your destination before putting the fortune and flowers on the cake.

Read more »

In Labels: , , , , , , , , , , , , on .

Photobucket
There are 2 ways to make this cake. Below you will find my "novice" instructions, which uses a car shaped cake pan. If you are looking to carve your Lightning McQueen cake, "experienced" instructions are also available here.


To make the "novice" cake you will need...


3D Wilton Cruiser Pan
Large rectangular cake board
Tips # 2, 3 and 5
Red and black fondant
Red gumpaste
Thick Wire
Tan, white, orange, yellow, and black buttercream icing
Blue tinted piping gel
Crushed graham crackers
Rice Krispie Treats
Plastic cacti


Another item that will help decorate this cake is an airbrush. You will be able to cover the car in white fondant then airbrush it red. It will save you a great deal of time.


Directions for the "novice" cake:

****Please keep in mind that by using the cake mold listed above, your cake may not look exactly like Lightning McQueen because, while this mold gives you a car shape, it is not his exact shape.****


Step 1

A few days in advance, make the spoiler out of red gumpaste and place 4 thick wires
into the spoiler as it dries (the longer the better). These wires will hold the spoiler on the
cake.


Step 2

Bake the 3D Cruiser cake and freeze. To get the cake to look more like Lightning McQueen, you will need to trim cake off the top and possibly the hood to give it more of a curve.


Step 3

Once you are happy with the shape of the cake, ice the entire car with buttercream icing.


Step 4

Cover the cake with fondant. You can either cover the cake with red fondant or cover the cake with white fondant and airbrush the whole cake red.


Step 5

Use the white buttercream and tip #3 or 5 to pipe on the windows. 

****Decorator’s Tip**** Use a toothpick to outline all of the windows and the lightning bolt onto the car.


Step 6

Outline all of the windows with the black icing and tip # 2.


Step 7

Repeat the above two steps to pipe on the large lighting bolts, head lights, tail lights, and the large number on top, using yellow and orange or white buttercream (colors will depend on what you are piping).


Step 8

With tip #2 and black icing, pipe numbers on the sides of the car as well as the passenger side headlight and tail light.


Step 9

With tip #2 and yellow icing, pipe the child’s name to resemble the Rusteeze logo.


Step 10

With tip #2 and blue piping gel pipe on eyes. Be careful, as the piping gel will run if you use too much. Finally, add the pupil on the eyes with a small black dot.


Step 11

The only part that is left of the car is to make the wheels. To do this, cut circles out of Rice Krispie Treats and cover with black fondant. You can also cover with white fondant and airbrush them black. Add a red circle to the center of the wheel and pipe the word Lightyear onto the wheels. Once the car is sitting on the bottom cake you can place the wheels onto the cake. The exact size of the wheels will vary depending on the size of your wheel well. My wheels fit so snugly that I was able to place them into the well and they did not fall.


Step 12

Finally, bake, level and fill the 2 14x11 cakes. Place onto the large rectangular cake board and cover with tan icing. Next, sprinkle the crushed graham crackers on top to look like sand. Place 4 dowels into the cake to support the car. The placement of the dowels will depend on the placement of the car. Just be sure to use 2 dowels for the front of the car and two for the back.


Step 13

Place the wheels and spoiler onto the car and put the cacti onto the large cake.

****Decorator’s Tip**** If you are having trouble getting the spoiler to stay up you can take 4 lollipop sticks and place them behind the spoiler for support. Cover these sticks with black or gray buttercream. If you look at the original Lightning McQueen, you will see he has something similar on the back of his spoiler.
Read more »

In Labels: , , , , , , , , , , , , , on .