Solution Graphics

Foodbuzz
Ask an Expert - Visit my Virtual Office at LivePerson
Showing posts with label holiday. Show all posts

As a busy mom, I love recipes that save me time and money. This cake uses a box of white cake mix so it does just that.

Peppermint 3 Layer Cake

Ingredients

  • In one bowl mix:
    18 oz white cake mix
    3 egg whites
    1 1/3 cup buttermilk
    2 Tablespoons vegetable oil

    In another bowl mix together:
    1 3/4 cup yellow cake mix
    1 3/4 cup buttermilk
    1/2 cup butter
    1 egg
    1 1/2 Tablespoons cocoa
    1/2 teaspoon baking soda
    2 Tablespoons red food coloring
    1 teaspoon cider vinegar

    Frosting:
    8 oz cream cheese
    1 cup butter
    2 lbs powder sugar
    2 teaspoons peppermint extract

Instructions

  1. Preheat oven to 350 degrees and prepare cake mix as directed above.
  2. Pour each batter, alternating colors into 3, 9 inch round pans.
  3. Bake 20-25 minutes.

For Frosting:
  1. Mix cream cheese, butter, and peppermint flavoring together, gradually add sugar.
  2. Mix until smooth and fluffy.
  3. You can use small candy canes to decorate the outside of the cake and crushed candy canes on top if desired.


Recipe from CakeCentral.com
Read more »

In Labels: , , on .

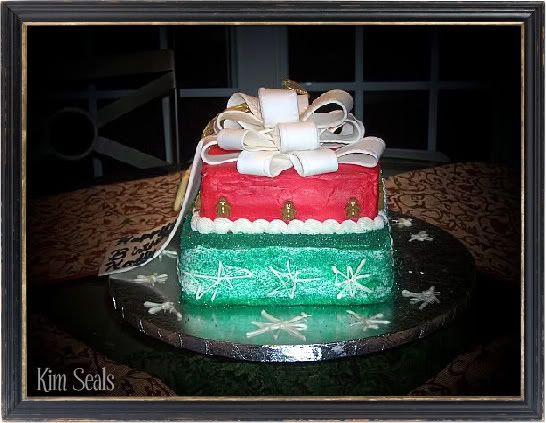
Stacked Presents Cake

These stacked presents make a great cake for any holiday celebration. In this guide you will learn how to decorate this cake as well as make the large bow topper, gift tag, and white chocolate snowflakes.

To make this cake you will need...

1 large cake board
1 4 inch square cake divider
10 inch square cake
4 inch square cake
4-5 wooden dowels
gumpaste
white and red buttercream icing
white chocolate chips
1 tube of black premade icing (optional)
gingerbread man sugar decorations
tips #3(optional), #2 and #19 or 21


Directions


Step 1

A few days in advance, make the large tag, bow and white chocolate snowflakes.

To make the snowflakes, melt white chocolate chips in the microwave. Pour the melted white chocolate into a piping bag and using tip #2, slowly pipe snowflake shapes onto a cookie sheet covered in wax paper.

To make the tag, I made a template with plain white paper and cut the gumpaste accordingly. You can not see it in this picture but I also poked a hole in the tag and ran a ribbon through it.

Making the large bow is very similar to the directions in my small gumpaste bow tutorial. However, instead of 2 loops and a middle piece you will need approximately 16 loops. If you look at the picture you will notice that the loops on the bottom are long and skinny and as you move towards the top of the bow they get more rounded. Keep this in mind when you prepare them for drying.

***Decorator's Tip*** Once all of your loops are dry your bow is ready to be assembled. Use a 2 inch circle of gumpaste as the base of your bow. This will help hold it together.


Step 2

Place the 10 inch cake on the cake board and ice with white icing. I decided to then cover the cake in green sugar to give it a shimmery look.

Next, place 4 dowels cut to size evenly around the middle of the cake for support. (See the tutorial for help on this step)

Finally, put the 4 inch cake on the cake divider and ice with red icing. Then, place this cake in the center of the 10 inch cake.

***Decorator's Tip*** Because this is only a 2 tier cake you should not need any more dowels for support but, if you are traveling with this cake you may want to hammer a sharpened dowel down the center of the stacked cakes. This will prevent the top tier from falling off.


Step 3

Using tip #19 or 21 and white buttercream icing, pipe a shell boarder around the bottom of the red cake. Next, place the sugar gingerbread men around the red cake and the white chocolate snowflakes around the green cake. Scatter a few extra white chocolate snowflakes around the cake board. Finally, place the tag and large bow on the cake. If desired, you can write a message on the tag with the tube of black premade icing and tip #3.

***Decorator's Tip*** If you are traveling with this cake, you may want to wait to place the tag, bow and extra snowflakes on the cake.
Read more »

In Labels: , , , , , , , , on .

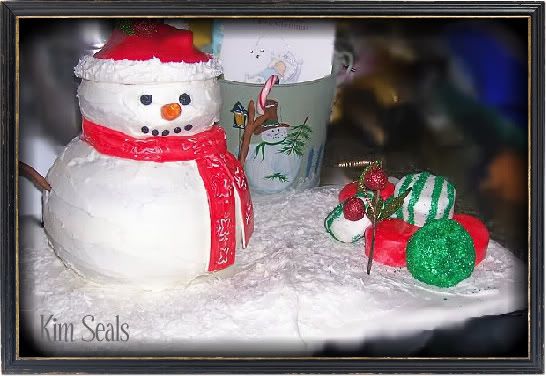
Snowman Cake

This cute snowman is one of my favorite holiday/winter cakes. In this guide you will learn how to make a snowman completely out of cake. I will also cover how to make his gumpaste Christmas hat and scarf. If you have the right cake pans, it is very easy to make.

To make this cake you will need...

Betty Crocker Bake 'n Fill Cake Pan (or a large and small Wilton Ball Pan)
2 large half ball cakes and 2 small ball inserts (when you read the directions, this will make sense)
7-8 cupcakes
large rectangular cake board or foam board
plastic shopping bags
small dowel or lollipop stick
1 large sharpened dowel
plastic wrap
tip #5
fondant icing
gumpaste (brown and orange)
white buttercream icing
1 tube of pre-made black icing
coconut shavings


Directions


Step 1

A few days in advance make the brown stick arms and orange nose out of gumpaste. Before the nose dries be sure to stick a small dowel or lollipop stick in the back.

***Decorator's Tip*** You can use colored gumpaste to make these pieces or use white gumpaste and airbrush the color on.


Step 2

To make the hills on the cake board, crumble up the plastic bags and tape them down on the cake board. Then cover the entire board with plastic wrap and ice with white buttercream icing. Finally, sprinkle the coconut shavings around the board to give the effect of fallen snow.

***Decorator's Tip*** Be sure to leave the area where the snowman will sit completely flat. If he is tilting just a little he could fall over.


Step 3

Bake 2 half ball cakes and 2 small half ball inserts. With the Betty Crocker Pan you have a small ball baking inside a large ball. The small ball is supposed to act as a filler for the large ball and it is baked this way so that all of the cake cooks evenly.

You will need to use the small inserts for the body so that the cake has proper support. The 2 extra inserts you bake will become the head of the snowman.


Step 4

Place all of the ball halves together to make 1 large and 1 small ball and ice with white buttercream icing.

The easiest way to ice a ball cake is to ice the bottom first, place it on the board, then ice the top. Follow these steps for both the large and small cakes. Once the cakes are iced and stacked, immediately hammer a sharpened dowel through the center of the snowman.

***Decorator's Tip*** For added support, trim off a small amount of cake from the top of the large ball and the bottom of the small ball. Also try to slightly hammer the dowel into the cake board.


Step 5

Decorate the snowman.

To make the scarf, roll out red fondant and cut a long rectangle and two small rectangles. These smaller rectangles will be the small hanging pieces of the scarf and should be placed on first. Pleat one end of the small rectangles and place them off to one side of the snowman. Next, take the long rectangle piece and wrap it around the neck of the snowman. Make sure to leave the seam in the back.

***Decorator's tip*** The imprints on the cake were made using the fondant decorative punch set like the one below but do not press all the way through the fondant.


To make the hat, roll out red fondant and cut a large semi-circle. Fold the semi-circle to make a cone shape and place it on the snowman's head. To make the fluffy white rim, ice with buttercream icing then, lightly press your spatula into the icing and pull away. You can also add a ball to the tip of your hat with buttercream icing.

To make the face, pipe on the eyes and mouth using the black tube of icing and tip #5. Finally, add the nose and arms to the cake.


Step 5

Make the presents.

Ice the cupcakes and cover them in fondant. To decorate you can cover them in colored fondant or airbrush white fondant to the desired color.

To get the stripes on my presents I brushed stripes of water onto the fondant and rolled them in green decorating sugar.

Finally, stack the presents to your liking.

Read more »

In Labels: , , , , , , , , on .