Solution Graphics

Foodbuzz
Ask an Expert - Visit my Virtual Office at LivePerson
Showing posts with label fondant. Show all posts
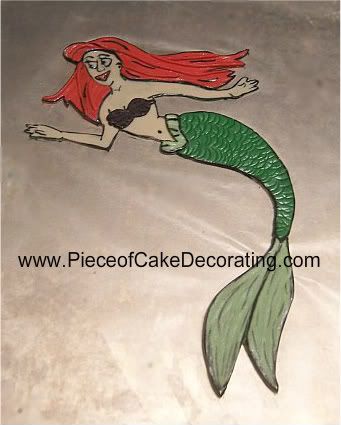
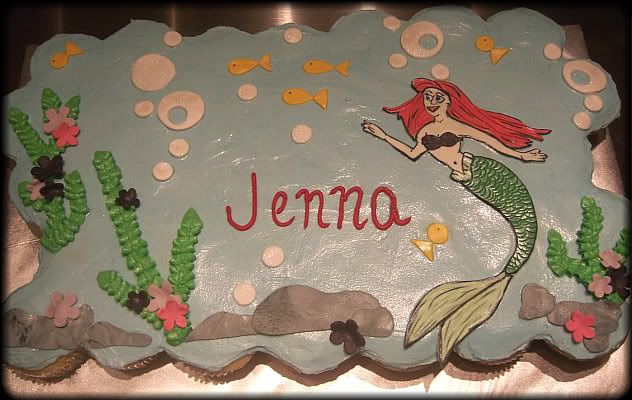
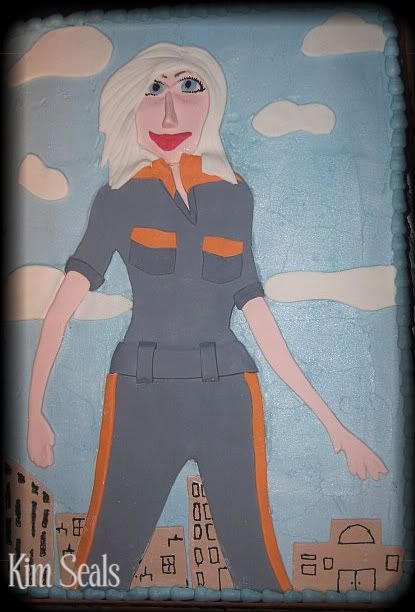
These images are a lot easier than they look and will give your cakes that wow factor you're looking for.  Before we get into the tutorial, here are a couple examples of how they can be used on a cake.


Now, down to business...

Supplies

Printed image
fondant or gumpaste (colored accordingly)
Exact-O knife
Scissors
Wax paper
Flat Surface like cardboard or a cookie sheet
Clay Extruder (optional)
Gumpaste tool (anything with a smooth edge) or the back of a small paint brush
Black and blue edible ink OR thin edible markers
Thin brush (if using edible ink)


Directions

Throughout this tutorial I will be using the Ariel image at the very top.  Keep in mind that we will be working in layers.  The very bottom layer for my image will be skin toned and we will build on top of this.

Important:  These images should be done a few days in advance to allow it to dry.

Step 1
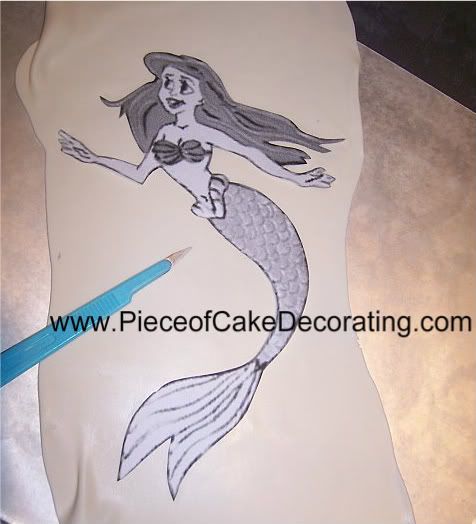
 

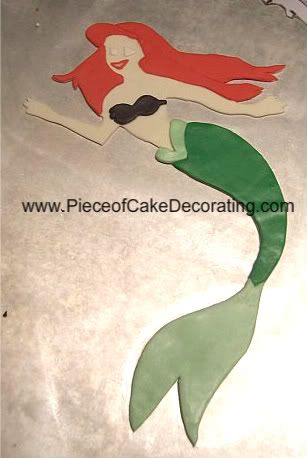
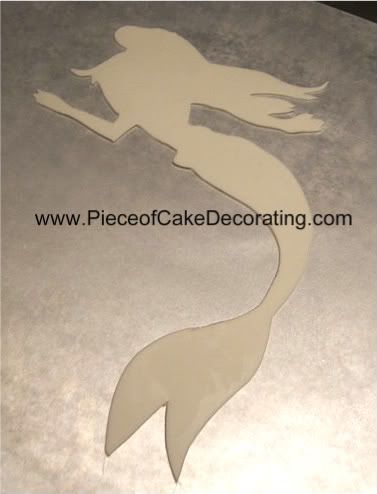
Roll out a piece of fondant (skin tone) about 1/8 of an inch thick and place it on top of a piece of wax paper on your cardboard or cookie sheet.  Then place your cut out printed image on top and, using your Exact-O knife, cut your full image out.  Your end result will look like the picture below.

Step 2
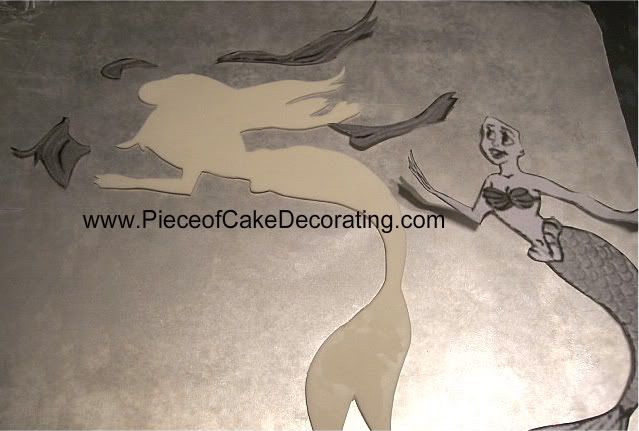


Cut the hair off your image.  I decided to cut the hair into 4 separate sections because it would be difficult to place the hair on in one piece and the fondant is more likely to stretch in the process.  We will be covering the seams later on.

Step 3
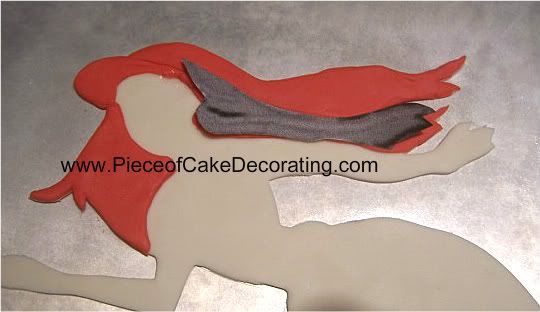
Roll out red fondant about 1/8 of an inch thick and cut out your hair pieces.  Attach with a small amount of water.  As you can see in this picture, I used my printed pieces to make sure I kept the general shape of the piece.  Here the hair stretched so, while the fondant was still soft, I adjusted its shape.  If I didn't do this, I run the risk of altering the shape of her arm, face or body.


Step 4

Repeat steps 2 and 3 with the fin and shell top.  The eyes, mouth and nose will most likely be too small to cut out so do your best to eyeball the general shape.

Step 5

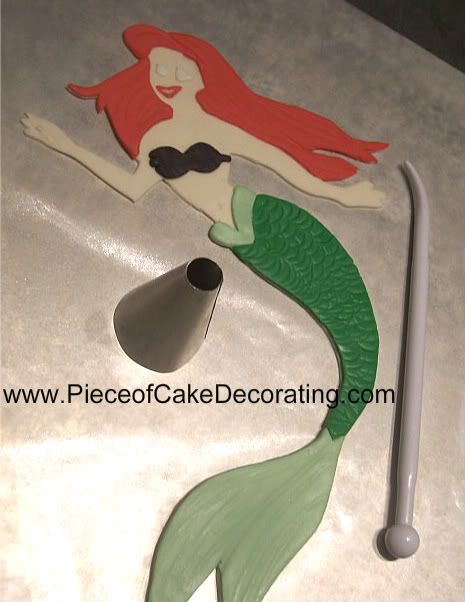
With a large round tip, add half circles to the dark green section of her body to look like scales.  Then, with the gumpaste tool, add texture to the light green fins and her purple shell top.

Step 6

Use your clay extruder (optional) to make strands of hair.  If you don't have a clay extruder you can also roll the pieces out by hand.  Place them over seams and in a few other places to add texture and dimension.  Attach with a small amount of water.


Step 7

Brush pearl luster dust over the entire image.  This helps give the appearance of her being under water.  Then, using a thin brush, outline all your pieces with black edible ink.  Add extra detail to the hair, face, hands, body and bottom fins.  Dark blue ink is used on the eyes.  This step will also work with THIN edible markers.

Step 8
Let dry a few days (at least over night) before placing on your cake.

Read more »

In Labels: , , on .


Today's post is inspired by a reader's question. She asked me for advice on working with fondant.  It can seem tricky if you aren't used to the nature of the product.  In fact, I started working on my own with fondant but never could get it quite right until I took a class and learned a few tricks that I wouldn't have figured out otherwise.  Here are a few important tips to help get you started.


  1. Kneed the fondant until it is pliable like taffy.  If the fondant is too dry then it won't lay right on the cake.  This was my biggest problem when I started.
  2. Make sure your surface is well covered with powdered sugar and your hands are greased with Crisco or vegetable shortening.  A fondant mat is probably a good purchase because most counter surfaces will suck the moisture out of your fondant (another problem I encountered).
  3. Fondant dries up quickly so make sure any fondant you are not using is in an air tight container AND covered in plastic wrap.

The fondant mat I just mentioned and a fondant rolling pin are great purchases.  A wooden rolling pin will suck the moisture out of your fondant so don't use that. A fondant smoother (pictured below) is also helpful in getting your fondant to lay smooth on your cake.  Just make sure it is dusted with powdered sugar or corn starch.


Buying fondant can be a bit pricey when you are starting out, that is why I use marshmallow fondant.  It is easy and cheap to make plus it tastes great! But, if you don't always have time to make your fondant, Satin Ice Fondant is a great choice.


Finally, try not to roll your fondant out too thin.  The thinner the fondant, the more imperfections you will see.  That is also why it is important to ice your cake as smooth as possible before you apply your fondant.  Once your cake is iced, let the icing crust up a bit then apply a small layer of piping gel around the bottom of your cake.  This will help the fondant to stick.  It has also been my experience that fondant on top of crusted icing gives it a cleaner look and a sharper edge.

Remember, practice makes perfect so don't give up if you have trouble the first few times.  You'll get it eventually.  If you have any other questions regarding this topic, please e-mail them to kseals@pieceofcakedecorating.com and you will get a response within 24 hours.   Your questions will also help other readers as I will continue to add to this post as they come in.


Gumpaste is very similar but it dries MUCH faster.  I am still learning the ins and outs of gumpaste, especially when it comes to making characters.  The gumpaste tricks I have been learning will be coming soon to PCD.
Read more »

In Labels: , , on .

Making icing and fondant is an extremely messy job.  It is impossible to have a spotless kitchen after a job like that but there are a few tricks I have come up with to minimize the mess when making fondant.

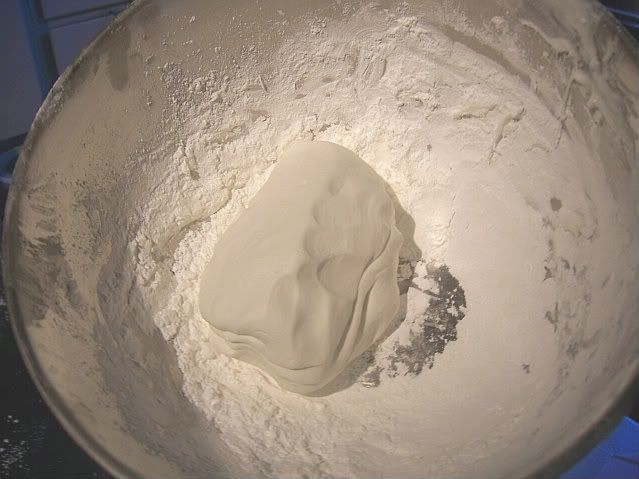
  • Work in a large bowl so you can keep the sugar off the counter.  As you can see in the picture above, I kept the fondant in the bowl until the very end.  I only kneed my dough on the counter when I do not want to add anymore sugar.
  • Before you even touch the fondant, rub vegetable shortening on your hands.  By making them greasy, the fondant will not stick to you...AT ALL!  If it does then you need more shortening.
  • If you have an electric mixer, you can use your dough hook to make the fondant.  Just be careful to mix extremely slowly in the beginning otherwise, you will have a bigger mess then you can imagine.
  • If you decide to use the mixer then grease the bowl first.  Cleanup will go much faster.
Read more »

In Labels: , , on .


I know what you are thinking, what does a pasta machine have to do with cake decorating?  It is actually a very useful tool when rolling out fondant.  I am very excited to review this product as I have seen it used for gumpaste and fondant on a number of cake decorating shows.  I hope to show you just how useful it can be.

I also want to quickly tell you about the site that is sponsoring this review.  CSN Stores, an online store, sells products like mailboxes, bar stools, bakeware, toys and so much more.  I'll give you more of the company details with my review but in the mean time, you should definitely check out their site.  You name it, they have it and at a great price too!
Read more »

In Labels: , , , on .


In this guide you will be given resources for stacking cakes and making a gumpaste ribbon as well as learn how to place real ribbon around the sides.  You can make decorating a wedding cake even easier by purchasing all gumpaste decorations needed from my handmade shop.

In honor of my friend Donna's 1 year wedding anniversary, I would like to share one of my wedding cakes with you. I did not make Donna's cake, however, I did make this cake for another friend this past June. It was a blast to make and I was honored to play a part in her special day.


To make this cake you will need...

2 14 inch round, 2 inch high cakes
2 10 inch round, 2 inch high cakes
2 6 inch round, 2 inch high cakes
Filling of your choice
About 5 batches of buttercream icing
5-6 lbs of ivory fondant
40 gumpaste roses of various sizes and colors
20 gumpaste leaves
1 ivory gumpaste bow
Ivory ribbon
Piping gel
6, 10, 14 inch round cake dividers
Wooden dowels
18 inch round wooden cake board
Wilton fanci foil

Here are a few items that can save you time and make decorating this cake even easier...


Directions


Step 1

A few weeks in advance make your gumpaste roses, leaves, and bow. For an added pop, add luster or pearl dust to your decorations. Click here for a tutorial on how to make a gumpaste bow.

Also cover your cake board with Wilton Fanci Foil.

***Decorator's Tip*** It is important to use a wooden cake board because your cake will be very heavy and you need to make sure it will be supported.


Step 2

Level, tort and fill all cakes. Each cake should be placed on it's own cake divider and covered in fondant separately. Ice each cake with buttercream icing and then cover with fondant. Click here for tips on how to cover a cake with fondant.


Step 3

Place wooden dowels around the center of the bottom two layers for support. The larger the layer, the more dowels you will need. Be sure to leave the center open because once all the cakes are stacked you will need to drive a sharpened dowel down the center of all 3 layers. Click here for more tips on how to stack cakes.


Step 4

Using a brush and some piping gel, add the ivory ribbon to the cake.


Step 5

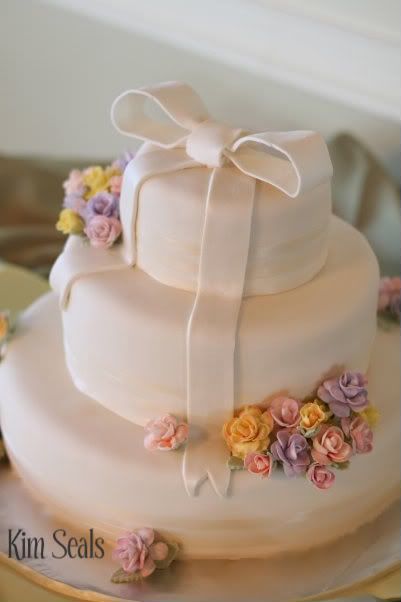
Make 2 ribbons out of fondant and drape them down the front of the cake as pictured. As you can see from my picture, one fondant ribbon is longer than the other. Use piping gel or buttercream icing to hold them in place. Next, place the gumpaste bow on top of the cake.

***Decorator's Tip*** Leave the bow on top of the cake to help you with the placement of the roses in the next step. However, when transporting the cake, it would be a good idea to leave the bow off. Once the cake is at the reception, attach the gumpaste bow with a little bit of buttercream icing.


Step 6

Place the roses on the cake. There is no right or wrong way to do this, just trust your instincts. Once all of the roses are on, add the leaves to fill in the spaces.


That's it! Decorating a wedding cake can feel overwhelming at first but if you just take one tier at a time, it is a lot easier than you think.


If you are looking for some great bridal jewelry, check out Annette Piper Dip.Gem. Handcrafted Jewellery. She also has a great blog called Under the Loupe.
Read more »

In Labels: , , , , , , , on .

Now decorating a cake is even easier. As we add cake guides to our site, we will also add the option of purchasing any of the decorations needed. Your items will be made to order and shipped USPS Priority Mail. Please allow 3-5 days for handling because all gum paste and royal icing decorations will need time to dry before they can be shipped.

For a complete list of gumpaste items for sale, please visit our handmade shop on our sister site, www.KimsCake.com.

Read more »

In Labels: , , , , , , , , on .

Slumber Party Cake


In this guide you will be given step-by-step instructions on how to decorate this large bed. I will also discuss how to make the blanket, girls, and headboard.

Today I was reading this great blog, www.shwanda.com, and was inspired to share this cake. I thought of this cake because the blog chronicles the life of a blended family with 5 kids, 4 cats, 3 dogs, 2 fish, and a dog...oh and don't forget Mom and Dad. Can't you just picture them all in a big bed like this? So as you can see, this cake can be used for more than a slumber party. It can be the "family bed" as well.


You will need:
Pink fondant
Tan fondant
Royal icing or chocolate colored yellow, brown, black, and gold for hair and crown.
Buttercream icing colored white and pink
White Chocolate
Wax Paper


Directions:


Step 1

A few days in advance you need to make the fondant faces and chocolate work. To make the headboard, draw a template on a white piece of paper. Tape down template onto flat surface and cover with wax paper. Next, melt the white candy melts and pour in a piping bag. Pipe the white chocolate on your template.


*Decorator's Tip* Pipe the spindles for the headboard as thick as you can. Chocolate is very delicate.


Option #2 for the headboard: If you look behind the white headboard you can see a silver board in the same shape. Because the chocolate was do delicate, I placed the silver headboard behind the chocolate one. If my client wasn't insistent on the chocolate headboard I would have left the silver one by itself. To make the silver headboard I cut foam core board to shape and covered it with Wilton Fanci Foil.


Step 2: Make the faces

The faces are made of fondant circles died tan (fondant can also be purchased tan) I used royal icing to make the hair, bows and crown. Chocolate can also be used to make these features. I used black icing for the eyes and pink icing for the mouth.


Step 3

Level off and fill the cakes. Cover the cake with buttercream. On the sides of the cake, use a star tip and pipe vertical stripes to look like a bed skirt.


Step 4

The bodies under the blanket are made with fondant. Shape the fondant to look like a fat hot dog and space them on the cake as needed, leaving room at the top for the head. Roll out a long strip of fondant to make a very long pillow. The heads will eventually rest on this strip.

Step 5

Die the fondant pink and roll it out large enough to cover the top and part of the sides of the cake. Clean up the edges of the fondant by trimming it with a pizza cutter or knife.


Step 6

Lay fondant blanket over the top of the bed. Carefully press the fondant down between the fondant bodies to give the appearance of the girls laying in the bed.


Step 7

Place heads on the cake. In my cake the birthday girl is wearing a crown. It is held on the head with royal icing.


Step 8

Place headboard on cake. It is secured in the back with extra buttercream icing.


*Decorator's tip* If you are transporting the cake you may want to wait until you arrive at the party to place the headboard on the cake.


Step 9

Pipe large circle dots on the blanket.
Read more »

In Labels: , , , , , , , , , , , on .

There are many different fondant recipes out there but this one is my favorite. It is not overly sweet and easy to work with. The best part about marshmallow fondant is that if it starts to become difficult to work with you just need to pop it into the microwave for a few seconds and it will regain it's elasticity; not to mention it is VERY easy to make.
To make this recipe you will need...
16 oz white mini marshmallows
2 tbs water
2 lbs powdered sugar (approx. 8 cups) (YOU WILL NOT NEED ALL OF THE SUGAR)


Directions:
1. Melt marshmallows and water in a double boiler or microwave. Heat until melted.
2. Place half of the sugar in a bowl. Make a well in the middle. Pour melted marshmallow in and mix.
3. Add remaining sugar and continue kneading. (add more powdered sugar in tablespoons as you are kneading. Mixture should not be sticky)
**Decorator's Tip** Spray your hands with cooking spray to prevent the mixture from sticking to you.
4. Wrap in plastic wrap and place in an airtight container overnight. The next day it will be stiff. To loosen it up, place the fondant in the microwave for 5 second intervals.
Read more »

In Labels: , , , , , , on .


Here is a great tutorial by shopcountrykitchen.com on covering a cake with fondant. To color the fondant, simply put coloring paste onto the fondant right before the kneading process. It is important to need the fondant until it becomes stretchy so that it doesn't crack when you try to put it on the cake.


Read more »

In Labels: , , , on .