Solution Graphics

Foodbuzz
Ask an Expert - Visit my Virtual Office at LivePerson
Showing posts with label boy. Show all posts
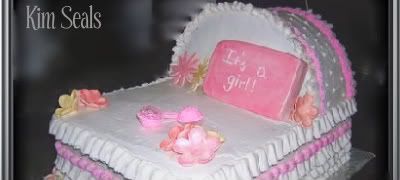
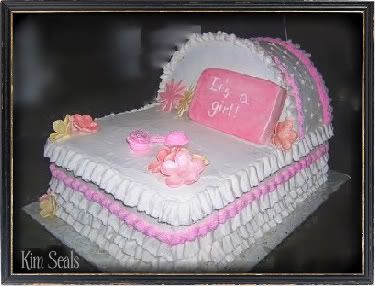
Bassinet Cake

In this guide I will discuss how to stack and support this cake as well as give you step-by-step directions for decorating.

This is a great baby shower cake and can be altered to suit a boy, girl, or unknown gender baby. The hardest part of this whole cake, not counting the gumpaste decorations, is constructing a support system so the head of the cake does not fall over. If gumpaste is not your thing, you can purchase these handmade items here.


To make this cake you will need...

3 11x9 inch cakes
1 1/2 10 inch round cakes
1 10 inch round cake divider
5-6 wooden dowels
1 11 x 9 inch cake divider
1 14 x 12 inch cake board
Wilton Tips # 3, 21, 127
White and pink buttercream icing
Gumpaste pillow and flowers
2 Small rattle favors


Directions:


Step 1

Level all cakes. Stack and fill the first two rectangle cakes on the cake board. Evenly place 4 small dowels in these cakes for support. Put the 3rd rectangle cake on your cardboard divider and place it on top.

***Decorator's tip*** You may need to trim the cake divider.


Step 2

Cut the round cakes and cake dividers in half. Stack and fill the cake halves between the two 1/2 circle cake dividers. Place these cakes on the cake as seen in the pictures below. Then take 4 sharpened dowels cut to size and place them on either side of the half circles accordingly.
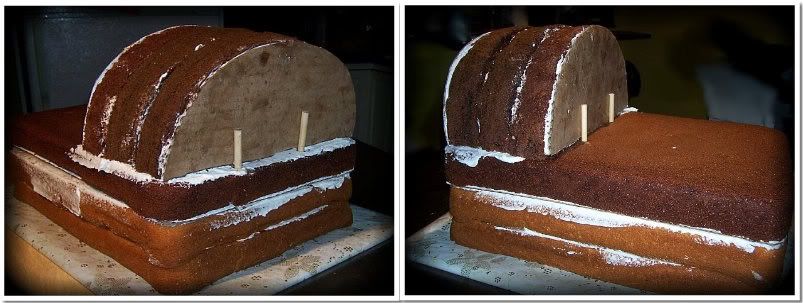
Dowel Placement
***Decorator's Tip*** You will need a hammer to drive the dowels through the rectangular cake board.


Step 3

Just as in the picture below, ice the cake with white buttercream icing. You do not need to be as need or use as much icing on the bottom two layers because you will be adding a ruffle.

Iced Cake

Step 4

Using tip # 127 and white buttercream icing, add a ruffle on the bottom 2 layers and around the edges of the 1/2 circles.

Step 5

Using tip # 21 and pink buttercream icing, add a boarder on the flat edge of the ruffles. With tip # 3 and white buttercream icing, add small dots on the shade of the bassinet.


Step 6

Place gumpaste decorations and rattles on the cake. Using tip # 3 and white buttercream icing, write your message on the pillow.
Read more »

In Labels: , , , , , , , on .


This is one of my favorite cakes and it was fairly easy to make. I think this would be a great cake for a beginner.


Photobucket


You will need.....


Round silver 12 inch cake board

1 8 inch round cardboard cake board

Wooden Dowels

Jungle animals

Diego topper or toy

Jungle tree toppers or toys

1 10 inch round cake

1 8 inch round cake

Light brown buttercream icing for covering cakes

Dark green, blue, and gray buttercream icing for piping

Wilton tips 3 (2 of them), 5, 20 or 21 (star tip), 233 (grass and hair tip), and 67 (leaf tip)


**Decorators Tip** Use couplers when piping on this cake. A coupler will allow you to change tips without changing piping bags.


Directions:


Step 1:

Level, tort, and fill cakes. Next, place the 10 inch cake along the back edge of the silver cake board and cover with light brown buttercream icing. Then, place the 8 inch cake on the cardboard cake board and cover with light brown buttercream icing but do not place on top of 10 inch cake yet.

Step 2:

Place 4 wooden dowels towards the back center of the 10 inch cake. You will need to stick the dowels in to measure, then take them out and cut to size. Once cut put them back into the cake. These will help support the top tier. **Place the dowels in a small circle, leaving a space in the center for the final dowel. **

Step 3:


Place the 8 inch cake on top of the 10 inch cake and dowels. As mentioned above, put the top tier towards the back of the cake so we are able to add the waterfall later.

Step 4:

With a toothpick, outline the shape of the waterfall and lake at the top. Once you are happy with the outline, pipe blue buttercream icing onto the cake with tip number 3 (make sure to use a coupler). To make the icing look like flowing water, take your spatula and make the icing uneven. Now change to the star tip and pipe the splashing water at the bottom of each tier.

Step 5:

Using your other tip 3 and a coupler, pipe green vines on the side of the cake. Then, change to your leaf tip and pipe leaves on the vines. Switch again to your grass tip and pipe grass around the edge of each cake and around the lake and waterfall.

Step 6:

With the gray buttercream icing and tip 5, pipe rocks around the lake and waterfall. Finally place the animals, Diego, and trees on the cake.

Read more »

In Labels: , , , , , , , , , on .

Having trouble finding instructions on how to decorate a cake? We can help. For a small $5 fee and our money back guarantee we will create a custom cake guide. Your guide will include step-by-step instructions and sketches when needed. Just simply click the "add to cart" button below and be sure to leave your e-mail address at the checkout. Once we have been notified of your purchase, we will e-mail you about your request. Please be prepared to respond with a detailed description and/or a picture of your request. If for any reason we are unable to help you, we will issue a full refund. We look forward to creating a guide for you. And remember, if you ever have any questions about anything on our site, you can e-mail us at kseals@pieceofcakedecorating.com.


Read more »

In Labels: , , , , , , , , , , , , , , , , , , , on .