Solution Graphics

Foodbuzz
Ask an Expert - Visit my Virtual Office at LivePerson
Showing posts with label how to make. Show all posts
Baseball Field Cake

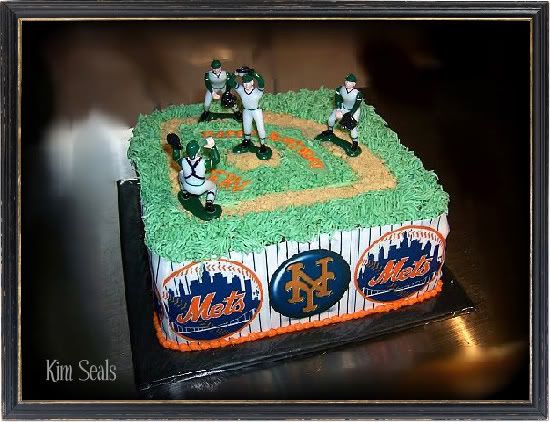
This guide will give you step-by-step instructions on how to place the edible image on the side of the cake and how to decorate the top to look like a baseball field.

If you are having a Playoff or World Series party, here is a great and easy idea for a baseball cake. I made this cake for a Mets fan and used an edible image on the sides.

Please note that if you are interested in using an edible image as I have here, I am unable to sell pictures of any copyrighted material. This means that I cannot sell images of team logos. If you are still interested, I can create a pinstripe with or without the team name.

To make this cake you will need...

2 Square cakes the size of your choice
1 Square cake board approximately 2-4 inches larger than the cake
White and Green buttercream icing (you will also need a small amount of icing in the team's color)
Tip #233 a.k.a. the grass tip
Tip # 2, 3 and 5
2 edible transfer images
Crushed animal crackers
Baseball player toppers


Directions


Step 1

Level, tort and fill your cakes. Place them in the center of your cake board and ice the sides with white buttercream icing. Once covered, place your edible image on the side of the cake.


***Decorator's tip*** By using white on the sides, you will not change the color of your image once the paper melts into your icing. If you have ordered this image from us, you will need to trim the picture to fit the size of your cake. Also spray the side of the cake lightly so the paper will melt into the icing, leaving a seamless transition. All other instructions will be included in your shipment.


Step 2

With green icing, ice a small area on top of the cake so the animal cracker crumbs have something to stick to. Then, using tip # 3, pipe a barrier for the crushed animal crackers around the base lines as well as a hill in the middle for a pitcher's mound. Then crush the animal crackers and place them on the pitchers mound and in your marked off area.


***Decorator's Tip***
It is important to decorate in this order so that any loose crumbs won't ruin your cake.


Step 3

Using tip # 233, pipe the grass on top of the cake. Then using tip #5, pipe a boarder in your team's colors ; I have used orange. Then use that same color and tip #2 or 3 to pipe your message on top. Finally, place the baseball players on top.
Read more »

In Labels: , , , , , , , , , , , , , on .

Jack-o-lantern Cake


Here is a super easy Halloween Pumpkin cake. In this guide you will learn how to stack the cakes and decorate in order to recreate this Jack-o-lantern. If you are looking to challenge yourself, cover the cake in orange fondant.

To make this cake you will need...

2 cakes baked in a bunt pan
Orange, green and black buttercream icing
Small paper or plastic cup
Round cake board


Directions

Step 1

Make sure the tops and the bottoms of the cakes are flat so the cake doesn't tip when it is decorated. Place the cakes on the cake board then fill and cover with orange buttercream icing.

***Decorator's Tip***
Place the bottom cake on the cake board so the smaller part is down and the larger part is up. The top cake has the large part on the bottom and the small part facing up. There is really only 1 way to do this so the cake looks like a pumpkin.

Step 2

Cover the small cup with green buttercream icing and place on top of the cake.


Step 3

Using black buttercream icing (or a tube of black) and tip # 3 or 4, pipe the face.

***Decorator's Tip***
If you don't trust yourself piping free hand, first draw the face with a toothpick.

That's it, 3 simple steps and you have a Jack-o-Lantern Cake. Now that you have extra time on your hands, you should check out a great blog for the crafter at heart. Destination Handmade has a little bit for everyone.
Read more »

In Labels: , , , , , , , , , , on .

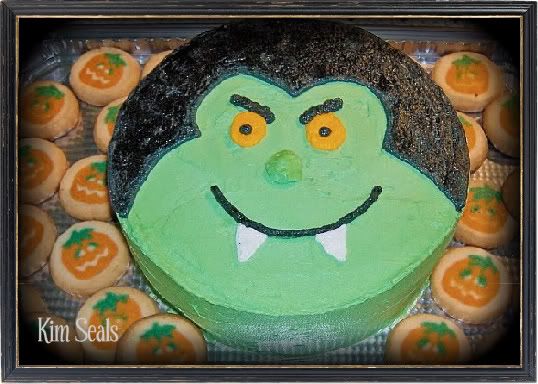
Vampire Cake

In this guide you will be given step-by-step instructions on how to decorate this cute vampire cake.

I know it seems early but Halloween will be here before you know it. If you are planning a party this year, don't forget the cake! Between HBO's True Blood and the Twilight series, Vampires are all the rage right now. Here is an easy vampire cake that just about anyone can do.

To make this cake you will need...

2 10 inch round cakes
Green, black, yellow/gold and white buttercream icing
4 Tips # 5

Recommended products: It is very difficult to make true black. When I only need a small amount like this, I always buy pre-made black icing.


***Decorator's tip*** If you do not have four #5 tips, do not worry. You will get the same effect using tips #4 or 6. If you do not want to use a tip at all, just cut the end of the piping bag to size. It will work just as well but your lines will not be as tight. This techniques works best for piping the eyes and nose because of their shape.


Directions:


Step 1

Level, tort and fill the cakes. They can be placed on a 12 or 14 inch cake board. In this picture, the cake is placed on a large cake board with Pillsbury Pumpkin Sugar Cookies scattered around for added decoration. Ice the cake with your green buttercream icing.


Step 2

Using a toothpick, outline the vampire's hair. Next, using tip #5 and black buttercream icing, pipe the outline of the hair and fill in with tight lines.


***Decorator's Tip*** To smooth out the striped effect you get from filling in an outline using a piping bag, simply put a little cornstarch on your finger and gently pat it flat. Most of the cornstarch will fade into the icing but the excess can be brushed away with a decorating brush.


Publish Post

Step 3

Using tip # 5 and yellow icing, pipe the eyes on the cake. Add the pupils using the extra black icing.


Step 4

Using tip # 5 and green icing, pipe the nose. Next, add the mouth and eyebrows with the left over black icing and the teeth (tip #5) with white icing.
Read more »

In Labels: , , , , , , , , , , , on .

Margaritaville/Beach Cake

In this guide you will be given step-by-step instructions on how to decorate this beach/Margaritaville themed cake. I will also give tips on how to make edible sand and water.

This cake was made for a group birthday party and the theme was Jimmy Buffet's Margaritaville. In this cake guide you will learn techniques like making sand and making the water look more realistic.

To make this cake you will need:


12 or 14 inch cake board
2 10 inch round cakes
Blue buttercream icing
Royal icing tropical flowers (instructions not included but click to purchase)
Graham Crackers or Nilla Wafers
Blue icing coloring
Piping gel
Tips #2 and 19
Toy palm trees
Toy or handmade paper parrots (instructions included)
Margaritaville sign (instructions included)
Mini margaritas (instructions included)
Mini beach towel
Mini surf board


Directions:


Step 1:


Level, tort and fill your cakes then place them on the cake board. Ice the cakes with light blue buttercream icing. In order to make the beach look hilly, ice mounds on the top half of the cake.


Step 2:

Ground up the Nilla Wafers using a food processor or a Zip Lock bag and a rolling pin. Then, place the crumbled wafers on the top of the cake to make sand.


Step 3:

Color the piping gel blue and spread it on the other half of the cake as pictured. To get the water to look wavy, spread it so that the piping gel is not smooth.


***Decorator's Tip*** For an added detail, put a small amount of light blue icing on a tooth pick and run it through the "water." This will make it look like the top of your waves has foam.


Step 4:

Using tip #19, pipe on your boarder along the edge of the water on top of the cake. Then, place the royal icing flowers around the bottom of the cake as a boarder.


Step 5:

Place your trees, surfboard, and other accessories on the cake. Finally, write your message in the water with light blue icing and tip #3.


Instructions for paper parrots, sign, and mini margaritas:

  • The paper parrots and sign were very easy to make. Save these pictures to your desktop and open them in any picture program that allows you to resize images. Paint will work just fine. Next, print and cut out your pictures. Finally, tape them to a toothpick. If you want to hide the toothpick just put the same picture on the other side but remember that you will need to use the mirror images for the parrots.

  • To make the mini margaritas, I purchased miniature dollhouse glasses. I first dipped the rim in a little bit of water and then into some sugar. To make the drink, I filled the glass with light green icing.


Read more »

In Labels: , , , , , , , , , , , , , , on .

Movie Cake


In this guide you will be given step-by-step instructions on how to make movie themed, gumpaste decorations for your cake.

This is a great cake for any movie theme. As you can see, I made this as a birthday cake but it would also be great as an anniversary cake, movie night cake, or even an Oscar party.

Make decorating this cake even easier. Complete a cake kit and individual gumpaste decorations now available at my handmade shop.

To make this cake you will need...


12 or 14 inch round cake board
10 inch round cake
Large Circle cookie cutter
Medium sized petal cutter
Large and small star cookie cutter
2 lollipop sticks
Tips #5, 3, and 2
Gray, white, brown, black, and yellow gum paste
White, red, yellow, and black buttercream icing


You do not need an air brush but it will definitely save you time on any cake, especially when you need to make black and red decorations.

Directions: 

Step1
A few days in advance make the filmstrips, clap board, film reel, billboard and stars. 
  • To make the filmstrips cut rectangular shaped pieces of gumpaste and mold them to shape using tissue.  You can use tan gumpaste and once dry you can paint on the black frames.  Another option is to use white gumpaste and paint everything once it dries.
  •   To make the movie reel, roll out black gumpaste leaving it fairly thick and cut out a long strip.  Roll this strip around itself to resemble a rolled up filmstrip.  Next, roll out the gray gum paste and cut out two large circles.  Then, with the petal cutter cut out the holes around the center of the circles (refer to picture above).  Once everything is dry, assemble the movie reel by applying some water to each piece and stick them together.  They will need to dry for at least one more day.
  • To make the clapboard, roll out black gumpaste and cut to shape.  When rolling out the gumpaste, leave it on the thick side so it holds up better once it dries.  When dry, pipe on the white details with white buttercream icing.  Another option is to use white gumpaste, tape off the details you want to leave white (i.e. the stripes) with scotch tape, then airbrush or paint the clapboard black.  When the black color dries you can remove the tape.
  • To make the billboard, roll out a thick piece of white gumpaste and cut a large rectangle to the size you desire.   Place 2 lollipop sticks in the bottom and let dry.  Once the gumpaste is dry, pipe on the details with buttercream icing and tip #2 for the lights and #3 for the words.
  •  To make the stars, roll out yellow gumpaste and cut out the stars with a small and large cookie cutter.

Step 2

Finally it is time to level, tort and fill the cakes.  Place them on your cake board and ice with white buttercream icing.


Step 3

With red buttercream icing and tip #5, pipe on the red carpet.  If you have an airbrush, you can airbrush on the carpet but be sure to make a template so that you do not get red on the rest of the cake. 


 Step 4

As a boarder, place the small stars around the bottom of the cake. 


Step 5

Place your gumpaste decorations on the cake.  Be sure to secure them in place with buttercream icing.
Read more »

In Labels: , , , , , , , , , , , , , , , , , on .

Photobucket


I made these cakes for an Asian themed bridal shower. The guide you will be reading is for the Chinese Lantern Cake only. You will be given step-by-step instructions on how to properly support this cake as well as tips for decorating.

You can purchase the
How to Make a Fortune Cookie Cake separately.

To make the lantern cake you will need...

14 inch, round, silver cake board
4-5 9x9 inch square cakes (number of cakes depends on how high you want the lantern)
2-3 cardboard cake dividers
Pencil Sharpener
Hammer
Rolled Fondant - Black
3-4 gum paste orchids (instructions for flowers not included)

This is all you need to make the flowers. For best results, mix the gum paste with some fondant so it does not dry as quickly. The flower kit is a great investment for any cake decorator. Trust me, you will use this more than once.


Directions:


1) Bake, tort, and level your cakes. To ensure proper support you will need to put 2 cakes on a cardboard cake divider. So, stack the first two cakes on the silver cake board, the next to cakes on a cardboard divider and the last cake on another divider. (See our post on How to Place Dowels in a Cake if you are unsure how to place dowels in a cake.)

***Decorator’s Tip*** Cut and tape wax paper on the bottom of your cardboard dividers so they don’t stick to the cake below it.

2) Place 4 wooden dowels equally around the cake on the silver cake board. Place the 2 cakes on the cardboard divider on top.

3) Sharpen 4 more dowels and put them equally around the cake. This time you will use a hammer to hit the dowel through the cardboard divider and to the silver cake board so be sure to place the dowels so that they will not hit the dowels below them.

4) Place the last cake and divider on top. Then sharpen one last dowel and drive it through the center of all of the cakes until you hit the silver cake board. This will keep the cake from tipping over.

5) Cover the entire cake with white butter cream icing.

6) Cut thin strips of black fondant and place them on the cake to match the picture.

7) Place flowers around the cake.

***Decorator’s Tip*** If you are delivering this cake, it is best to wait until you arrive at your destination to place the flowers on the cake.

Read more »

In Labels: , , , , , , , , , , , , on .

Photobucket
I made these cakes for an Asian themed bridal shower. The guide you would be purchasing will give you instructions on how to make the Fortune Cookie Cake only. The How to Make a Chinese Lantern cake guide was written separately.

To make this cake you will need...
14 inch, round, silver cake board
Two 10 inch, round cakes
White gumpaste
3-4 orchid flowers (instructions for flowers not included)

This is all you need to make the flowers. For best results, mix the gum paste with some fondant so it does not dry as quickly. The flower kit is a great investment for any cake decorator. Trust me, you will use this more than once.


Directions:


Step 1


A few days in advance, roll out white gumpaste and cut a rectangle shape for the fortune.

***Decorator’s Tip*** When cutting rectangle shape, keep the 10 inch cake pan near by in order to make sure your proportions are correct.


Step 2

Bake two 10 inch, round cakes.  Level one of the cakes then fill and stack both cakes on the silver cake board.  When stacking, the top cake should stay rounded and NOT level.

***Decorator’s Tip***  After this step, freeze the cake to make it easier to carve.


Step 3

Cut out a triangle shape out of the cake and trim cake off the top to give the cake a smoother look.  Keep trimming the top and triangle cut out until you are happy with the shape of your fortune cookie.


Step 4

Color the fondant tan (you could also leave the fondant white and airbrush it later).  To get tan I used a combination of brown and ivory.


Step 5

Ice the cake with buttercream icing.  Cover the cake in fondant.

***Decorator’s Tip*** You may need an extra set of hand to help lay the fondant in the cut part of the cake without tearing.


Step 6

Write your message on the gumpaste fortune and place it on the side of the cake.  Then, place your gumpaste flowers around the cake.

***Decorator’s Tip***  If you are transporting this cake, you may want to wait until you arrive at your destination before putting the fortune and flowers on the cake.

Read more »

In Labels: , , , , , , , , , , , , on .

Photobucket

I made this Winnie-the-Pooh cake for my son's first birthday. It was very easy to make but I cannot take credit for this one. I purchased a cake kit complete with instructions, toppers, and even toys for my son. Below is a link to purchase the kit if you are interested in this cake. If you are looking for an easy kit similar to this one, check out the cake kit category at my online shop. There are kits for all ages from Sesame Street to Sports to Hannah Montana. However, not all of these kits will come with instructions. Look under our site's banner on how to order a Custom Cake Guide.


Read more »

In Labels: , , , , , , , , , , , , , , , , on .

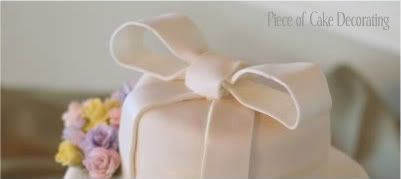
Below you will find step-by-step instructions for creating a gumpaste bow. When working with gumpaste, you should remember to work quickly. It will dry fast which is why decorators like to use it for decorations. If you are a new decorator then try mixing fondant and gum paste. The fondant will dry faster with the gum paste in it but give you time to make the bow before it dries out.


  • Roll the gumpaste out to 1/8 inch thickness. Cut 2 long strips of the same size and 1 strip 2/3 the size of the larger strips. I am not giving exact measurements because they will vary depending on the size of your bow.


  • Make a small accordion fold at each end of the small strip and loop them together. Put a small amount of water on each end and press together. Take a small amount of tissue to place inside the loop so that it holds it's shape.


  • Repeat this process for the 2 larger strips.
  • Once the small loop is hard enough to hold it's own shape, remove the tissue and place the ends of the 2 larger loops inside. Secure with a small amount of water and press. Let dry over night.
Read more »

In Labels: , , , , , , , , on .

Photobucket
This is a great baby shower cake when the parents do not know the sex of the baby.
To make this cake you will need...
12 inch round cake board
10 inch round cake
8 inch round cake
Tips # 3 and 5
Wooden Dowel Rods
2 lollipop Sticks
Sage Green(light moss green) and white buttercream icing
White and sage green gum paste
White pearl dust


Directions:


Step 1:


A few days in advance, make the gum paste bow and stroller.

***Decorator’s Tip*** Click here to purchase a gum paste stroller otherwise follow these instructions. To make the stroller, cut 2 large circles and 4 small circles out of white gum paste. Cut out ¼ of each of the large circles to make the body of the stroller. Once the gum paste dries, sandwich the lollipop stick between the body of the stroller and the wheels. Remember to let some of the sticks hang below the wheels so that you have something to stick into the cake. In order to get the lollipop sticks to stay you will have to wrap the parts touching the stroller in gum paste and wet with water. Once dry you can stick on the sage green details and paint with pearl dust.

Directions to make the gum paste bow can be found here.


Step 2

Bake, level and fill 10 inch and 8 inch cakes. Then, place it on the 12 inch round cake board.Ice the 10 inch cake with sage green buttercream icing.


Step 3

Place 4 wooden dowels into the cake in order to support the top tier.


Step 4

Place the 8 inch cake onto an 8 inch card board cake board. Ice the cake with sage green buttercream icing and place on the center of the 10 inch cake


Step 5

With a sharpened wooden dowel, hammer through the center of the cakes to secure the cakes together. Ice over the exposed dowel.


Step 6

Using tip #5 pipe a boarder around both tiers.


Step 7

Cut out ribbons for the bow and place onto the front of the cake as desired. Next, place the bow on top of the ribbon. Dust with white pearl dust for added shimmer.


Step 8

Using tip # 3, pipe footprints on the sides of both tiers.


Step 9

Place the stroller on top of the cake.

Read more »

In Labels: , , , , , , , , , , , on .

Photobucket


This is a very easy cake to make and will be loved by boys of all ages. Whether you are a cake decorating novice or expert, this is a great cake to make.


To make this cake you will need...

1 Foam board cut to size

Sports themed wrapping paper

Clear cellophane

1 Wilton Ball Pan - bake 1 cake

1 Wilton Wonder Pan or Pampered Chef's Large Glass Measuring Cup- bake 1 cake

1 Bread Pan - bake 2 cakes

Chocolate icing

White, orange, and tan buttercream icing

1 tube of black icing

1 tube of red icing

Tips #3, 5, and 21


Directions:


Step 1:

Cover the cut foam board with sports themed wrapping paper and then clear cellophane.


Step 2:


Make the basketball by placing the half of a ball cake onto the cake board and cover it with orange icing. Using the black icing and tip #5, pipe the lines onto the ball.

***Decorator's Tip*** To ensure accuracy in your piping, first draw the lines on the cake with a toothpick.


Step 3:

  • Make the football by first cutting the cake from the Wilton Wonder Mould (or Pampered Chef) in half and trim off and extra from the top. **Do not throw the trimmings away!**
  • Place the cut sides down with the larger sides facing each other. You will now have something that resembles a football.
  • Use the trimmings to give each end of the football more of a point.
  • Ice the cake with chocolate or brown icing.
  • Using tip #21 or any tip with a flat edge and white buttercream, pipe the large lines on the football. Using tip #5 and white buttercream, pipe on the stitching.


Step 4:

  • To make the baseball bat, place the two bread pan cakes side by side to make one long cake. You can fill these cakes if you wish.
***Decorator's Tip*** Carve the cake before you put it on the cake board.
  • Cut the cake into the shape of a bat. If you are hesitant to do this, you can always draw it out on a piece of paper and use it as a template. This way you will be sure that your bat is symmetric.
  • Ice the bat with tan icing. Using tip #21 and red icing, pipe on the red tape on the bat's handle. Write your message using tip #3 and black icing.

Read more »

In Labels: , , , , , , , , on .

For those of you who have never heard of if, ganache is a chocolate glaze icing. It can be used to cover cakes, thickened to fill truffles, or whipped to fill cakes. Once ganache cools, it become a hard coating on your cake.


Before covering a cake with ganache, take a wire cooling rack and place it in, or on top of, a cookie sheet. This will catch all of the chocolate that drips down. Make sure your cake is as level and smooth as you can get it as ganache can pick up imperfections in the cake.


Ingredients:
2 cups of heavy whipping cream
1 1/4 lbs of bittersweet chocolate


Directions:

1. Chop the chocolate into small pieces (or use small chocolate chips) and place them into a large stainless steel bowl.

2. In a large sauce pan, heat the cream over medium heat. Be sure to stir frequently until it starts to boil. Watch the cream closely as it will want to boil over. Once heated, pour the cream over the chopped chocolate.

3. Stir until the chocolate is completely melted and looks smooth.

4. Cool completely on the kitchen counter before use. Ganache can be stored in the refrigerator but will need to be reheated. To reheat, use a stainless steel bowl over hot, but not boiling, water.

5. Once cooled, place the cake on your wire rack and pour the ganache on top. With a spatula, lightly guide the chocolate down the sides of the cake. Keep doing this until the cake is completely covered with ganache.
Read more »

In Labels: , , , , on .

Photobucket Photobucket


This cake was fairly easy to make but very time consuming. To make this cake you will need...


Wilton Mini Wonder Mold Doll Pan

10 inch Round Cake Pan

12 Wilton Mini Doll Picks

Two 14 inch Silver Cake Boards

Large Star Tip


Directions:


Step 1

Bake 2 10 inch round cakes and 12 mini wonder mold doll cakes. Then, level, tort, and fill the 10 inch cake.


Step 2

Cover the 10 inch cake with ganache icing. Once the cake is covered in ganache, place the cake on one of the silver cake boards and pipe boarder around the bottom of the cake using a large star tip. I placed the cake off center to leave room in front for some of the Barbies.


*Decorator's Tip* To create a two-color boarder, put both of your colors in the bag side by side. When you pipe, the icing will appear stripped.


Step 3

Decorate the cone shaped cakes to look like dresses. This can be done anyway you wish so I will not give step-by-step directions.


Step 4

Place mini doll picks into the top of each dome cake and place cakes randomly on the board.


Step 5
For extra decoration I made royal icing flowers ahead of time and placed them around the cakes.

Read more »

In Labels: , , , , , , , , on .

Having trouble finding instructions on how to decorate a cake? We can help. For a small $5 fee and our money back guarantee we will create a custom cake guide. Your guide will include step-by-step instructions and sketches when needed. Just simply click the "add to cart" button below and be sure to leave your e-mail address at the checkout. Once we have been notified of your purchase, we will e-mail you about your request. Please be prepared to respond with a detailed description and/or a picture of your request. If for any reason we are unable to help you, we will issue a full refund. We look forward to creating a guide for you. And remember, if you ever have any questions about anything on our site, you can e-mail us at kseals@pieceofcakedecorating.com.


Read more »

In Labels: , , , , , , , , , , , , , , , , , , , on .