


Pin It now!

In this guide you will be given resources for stacking cakes and making a gumpaste ribbon as well as learn how to place real ribbon around the sides. You can make decorating a wedding cake even easier by purchasing all gumpaste decorations needed from my handmade shop.
In honor of my friend Donna's 1 year wedding anniversary, I would like to share one of my wedding cakes with you. I did not make Donna's cake, however, I did make this cake for another friend this past June. It was a blast to make and I was honored to play a part in her special day.
To make this cake you will need...
2 14 inch round, 2 inch high cakes
2 10 inch round, 2 inch high cakes
2 6 inch round, 2 inch high cakes
Filling of your choice
About 5 batches of buttercream icing
5-6 lbs of ivory fondant
40 gumpaste roses of various sizes and colors
20 gumpaste leaves
1 ivory gumpaste bow
Ivory ribbon
Piping gel
6, 10, 14 inch round cake dividers
Wooden dowels
18 inch round wooden cake board
Wilton fanci foil
Here are a few items that can save you time and make decorating this cake even easier...
Directions
Step 1
A few weeks in advance make your gumpaste roses, leaves, and bow. For an added pop, add luster or pearl dust to your decorations. Click here for a tutorial on how to make a gumpaste bow.
Also cover your cake board with Wilton Fanci Foil.
***Decorator's Tip*** It is important to use a wooden cake board because your cake will be very heavy and you need to make sure it will be supported.
Step 2
Level, tort and fill all cakes. Each cake should be placed on it's own cake divider and covered in fondant separately. Ice each cake with buttercream icing and then cover with fondant. Click here for tips on how to cover a cake with fondant.
Step 3
Place wooden dowels around the center of the bottom two layers for support. The larger the layer, the more dowels you will need. Be sure to leave the center open because once all the cakes are stacked you will need to drive a sharpened dowel down the center of all 3 layers. Click here for more tips on how to stack cakes.
Step 4
Using a brush and some piping gel, add the ivory ribbon to the cake.
Step 5
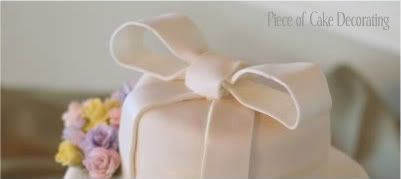
Make 2 ribbons out of fondant and drape them down the front of the cake as pictured. As you can see from my picture, one fondant ribbon is longer than the other. Use piping gel or buttercream icing to hold them in place. Next, place the gumpaste bow on top of the cake.
***Decorator's Tip*** Leave the bow on top of the cake to help you with the placement of the roses in the next step. However, when transporting the cake, it would be a good idea to leave the bow off. Once the cake is at the reception, attach the gumpaste bow with a little bit of buttercream icing.
Step 6
Place the roses on the cake. There is no right or wrong way to do this, just trust your instincts. Once all of the roses are on, add the leaves to fill in the spaces.
That's it! Decorating a wedding cake can feel overwhelming at first but if you just take one tier at a time, it is a lot easier than you think.
If you are looking for some great bridal jewelry, check out Annette Piper Dip.Gem. Handcrafted Jewellery. She also has a great blog called Under the Loupe.
In this guide you will be given resources for stacking cakes and making a gumpaste ribbon as well as learn how to place real ribbon around the sides. You can make decorating a wedding cake even easier by purchasing all gumpaste decorations needed from my handmade shop.
In honor of my friend Donna's 1 year wedding anniversary, I would like to share one of my wedding cakes with you. I did not make Donna's cake, however, I did make this cake for another friend this past June. It was a blast to make and I was honored to play a part in her special day.
To make this cake you will need...
2 14 inch round, 2 inch high cakes
2 10 inch round, 2 inch high cakes
2 6 inch round, 2 inch high cakes
Filling of your choice
About 5 batches of buttercream icing
5-6 lbs of ivory fondant
40 gumpaste roses of various sizes and colors
20 gumpaste leaves
1 ivory gumpaste bow
Ivory ribbon
Piping gel
6, 10, 14 inch round cake dividers
Wooden dowels
18 inch round wooden cake board
Wilton fanci foil
Here are a few items that can save you time and make decorating this cake even easier...
Directions
Step 1
A few weeks in advance make your gumpaste roses, leaves, and bow. For an added pop, add luster or pearl dust to your decorations. Click here for a tutorial on how to make a gumpaste bow.
Also cover your cake board with Wilton Fanci Foil.
***Decorator's Tip*** It is important to use a wooden cake board because your cake will be very heavy and you need to make sure it will be supported.
Step 2
Level, tort and fill all cakes. Each cake should be placed on it's own cake divider and covered in fondant separately. Ice each cake with buttercream icing and then cover with fondant. Click here for tips on how to cover a cake with fondant.
Step 3
Place wooden dowels around the center of the bottom two layers for support. The larger the layer, the more dowels you will need. Be sure to leave the center open because once all the cakes are stacked you will need to drive a sharpened dowel down the center of all 3 layers. Click here for more tips on how to stack cakes.
Step 4
Using a brush and some piping gel, add the ivory ribbon to the cake.
Step 5
Make 2 ribbons out of fondant and drape them down the front of the cake as pictured. As you can see from my picture, one fondant ribbon is longer than the other. Use piping gel or buttercream icing to hold them in place. Next, place the gumpaste bow on top of the cake.
***Decorator's Tip*** Leave the bow on top of the cake to help you with the placement of the roses in the next step. However, when transporting the cake, it would be a good idea to leave the bow off. Once the cake is at the reception, attach the gumpaste bow with a little bit of buttercream icing.
Step 6
Place the roses on the cake. There is no right or wrong way to do this, just trust your instincts. Once all of the roses are on, add the leaves to fill in the spaces.
That's it! Decorating a wedding cake can feel overwhelming at first but if you just take one tier at a time, it is a lot easier than you think.
If you are looking for some great bridal jewelry, check out Annette Piper Dip.Gem. Handcrafted Jewellery. She also has a great blog called Under the Loupe.
____________________________________________________________________________________________

No Responses to "How to Make a Wedding Cake"
Leave a Reply
We would love to hear what you think.