


Pin It now!
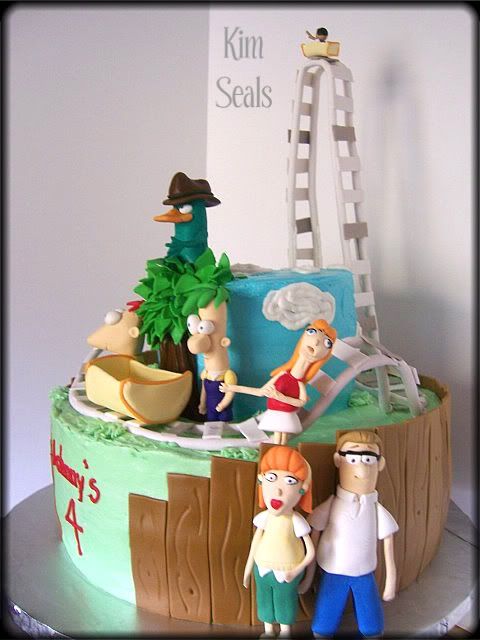
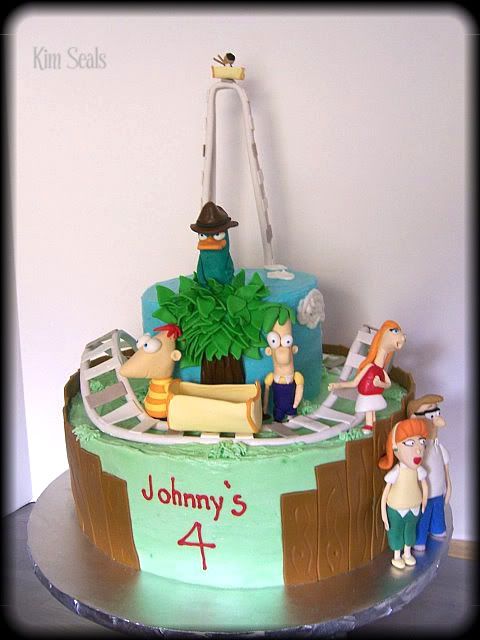 The cake is themed around the Disney cartoon Phineas and Ferb. More specifically, the episode where the brothers build a roller coaster. All the characters were hand made from gumpaste and the cakes are 12 and 6 inch rounds iced in buttercream with fondant details.
Give yourself about a week to let the roller coaster dry. You may be able to get away with making it a few days earlier but I wouldn't risk it. You will need...
clay extruder
flexible cardboard (I used a USPS shipping envelope)
tape
dowels
floral wire (20+ gauge)
cookie sheet and styrofoam
gumpaste (1lb)
(1lb)
Step 1
Before you can begin working with the gumpaste you need to create a "mold" or form for your roller coaster to dry on. This roller coaster was made in two parts and the forms were made according to the pictures below.
You are now ready to make the rails of your roller coaster. This is extremely easy if you have a clay extruder. Place your gumpaste into the extruder and using the largest circle disk, press out your rails. Don't worry if your rail is not long enough. You can hide the seam later with a plank. Once you have 2 rails around your cake pan, spaced 1 inch apart, you can move on to your tall piece.
* Please note: I forgot to take a picture of the gumpaste sitting on the form but, I did not make a full circle. I left a space in the back to place the tall piece of the roller coaster. *
Once the form was secured to the Styrofoam with tape, I used wire to be absolutely sure it would not come off. The rails were made the same as before however this time I inserted a wire about 2-3 inches into each end of the rails and entirely into the Styrofoam. The wire will give this tall piece more support when put on the cake.
**Decorator's Tip** For even more support and food safety, place drinking straws over the exposed wire before putting it on the cake. This piece will not budge!
Step 2
Roll out your gumpaste and cut 1 inch x 1/2 inch rectangles for the beams/slats of the roller coaster. Let them sit for a few minutes to become a little stiff then attach with water or gum glue (a mixture of gumpaste melted in water). Make sure you cover any seams in your rails.
Store in a cool dry place and after a week it should be stiff enough to place on your cake.
Here is another view for you to reference. I was nervous about this roller coaster and a little over booked with cakes so mine actually sat for 3 weeks! My husband swore it would fall apart but it did not budge and was completely hard.
Last month my oldest son turned four and wouldn't you know, he asked for a roller coaster on his cake! Because I am always looking to challenge myself, I was determined to make it edible. After searching the internet for pictures, it was nearly impossible to find a cake with a gumpaste roller coaster. The few I found I wasn't crazy about but I learned enough to create something I loved. In the end it was the easiest part of the entire cake and I am excited to share it with you.
Give yourself about a week to let the roller coaster dry. You may be able to get away with making it a few days earlier but I wouldn't risk it. You will need...
clay extruder
flexible cardboard (I used a USPS shipping envelope)
tape
dowels
floral wire
cookie sheet and styrofoam
gumpaste
Step 1
Before you can begin working with the gumpaste you need to create a "mold" or form for your roller coaster to dry on. This roller coaster was made in two parts and the forms were made according to the pictures below.
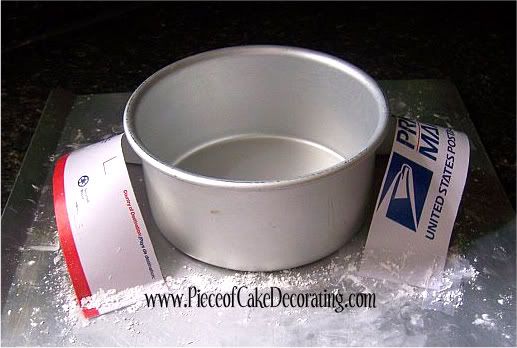 |
| I used a 6 inch cake pan to make sure my roller coaster was the right size. |
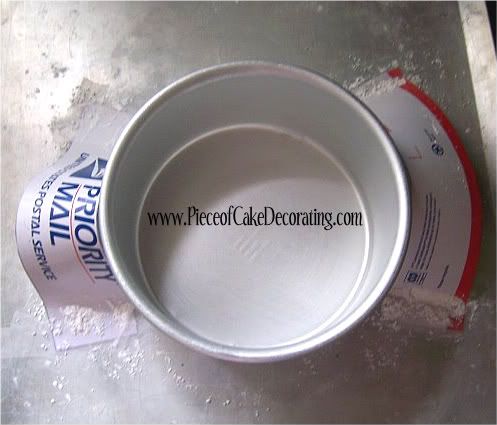 | |
| The powdered sugar is important. The last thing you want is for your gumpaste to stick. |
You are now ready to make the rails of your roller coaster. This is extremely easy if you have a clay extruder. Place your gumpaste into the extruder and using the largest circle disk, press out your rails. Don't worry if your rail is not long enough. You can hide the seam later with a plank. Once you have 2 rails around your cake pan, spaced 1 inch apart, you can move on to your tall piece.
* Please note: I forgot to take a picture of the gumpaste sitting on the form but, I did not make a full circle. I left a space in the back to place the tall piece of the roller coaster. *
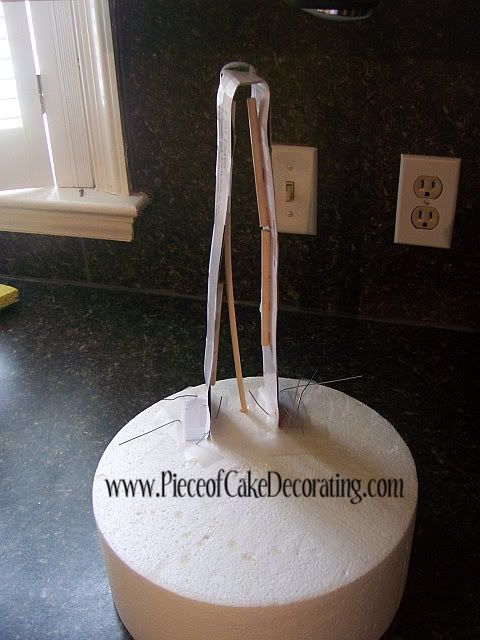 | |
| Dowels were taped to the cardboard for added support. One dowel was stuck into the Styrofoam for stability. |
Once the form was secured to the Styrofoam with tape, I used wire to be absolutely sure it would not come off. The rails were made the same as before however this time I inserted a wire about 2-3 inches into each end of the rails and entirely into the Styrofoam. The wire will give this tall piece more support when put on the cake.
**Decorator's Tip** For even more support and food safety, place drinking straws over the exposed wire before putting it on the cake. This piece will not budge!
Step 2
Roll out your gumpaste and cut 1 inch x 1/2 inch rectangles for the beams/slats of the roller coaster. Let them sit for a few minutes to become a little stiff then attach with water or gum glue (a mixture of gumpaste melted in water). Make sure you cover any seams in your rails.
Store in a cool dry place and after a week it should be stiff enough to place on your cake.
Here is another view for you to reference. I was nervous about this roller coaster and a little over booked with cakes so mine actually sat for 3 weeks! My husband swore it would fall apart but it did not budge and was completely hard.
____________________________________________________________________________________________

No Responses to "How to Make a Gumpaste Roller Coaster"
Leave a Reply
We would love to hear what you think.