


Pin It now!
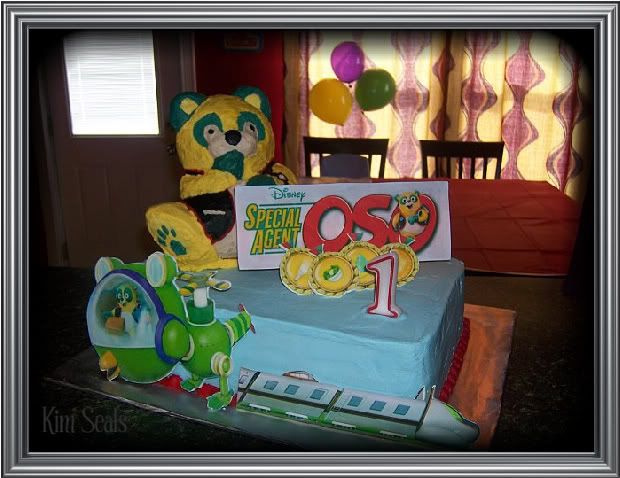
I made this cake for my son's 1st birthday. He just loves Special Agent Oso, making this cake a big hit. In this guide you will learn how to decorate Wilton's Bear Pan to look like Oso. All other decorations are sugar plaques and can be made using my Sugar Plaque Tutorial.
To make this cake you will need...
large cake board
1/2 sheet cake
Wilton Bear Pan cake
Sugar Plaques - sign, 4 Digi Medals, Whirly Bird, Rapi (train)
wooden dowels
cardboard cake divider
Saran Wrap
blue, yellow, blue-green, black, tan, and red buttercream icing
tips #5 (x 4), #32 and #102
Directions:
Step 1
A few days in advance make your sugar plaques.
Step 2
Level, tort and fill your 1/2 sheet cake and place it on the cake board. Then, ice your 1/2 sheet cake with blue buttercream icing.
Step 3
Cut your cardboard cake divider to the shape of the bear's bottom and cover it in Saran Wrap.
Step 4
Decide where you want the bear to sit and place your dowels, cut to size, into the cake for support. I chose the back left corner. Then, hammer a sharpened dowel down the center of the bear and slightly into your cake board. This will keep the bear from falling off.
Step 5
Using tip #5 for each, pipe horizontal lines to fill in the stomach, nose, eyes, ears, hands, and vest...in that order. After each section is finished take time to smooth out the icing. The best way to do this is to put a little powdered sugar on your finger and pat it flat.
***Decorator's Tip*** If you look at Oso's nose you will see a little powdered sugar left behind. I was not worried about this because by the time I finished decorating the cake, it melted into the icing. If for some reason it does not, put a little water on a decorator's brush and touch the sugar with the brush (do not rub) and it will disappear.
Step 6
Using a spatula, cover the rest of the bear with yellow buttercream icing. You can smooth any lumpy areas with your finger and powdered sugar as mentioned above but it does not need to be perfect because Oso is meant to look furry.
***Decorator's Tip*** Use a tapered spatula for those hard to reach spots.
Step 7
Pipe a boarder around the 1/2 sheet cake using red buttercream icing and tip #32.
Step 8
Place your sugar plaques on your cake.
I made this cake for my son's 1st birthday. He just loves Special Agent Oso, making this cake a big hit. In this guide you will learn how to decorate Wilton's Bear Pan to look like Oso. All other decorations are sugar plaques and can be made using my Sugar Plaque Tutorial.
To make this cake you will need...
large cake board
1/2 sheet cake
Wilton Bear Pan cake
Sugar Plaques - sign, 4 Digi Medals, Whirly Bird, Rapi (train)
wooden dowels
cardboard cake divider
Saran Wrap
blue, yellow, blue-green, black, tan, and red buttercream icing
tips #5 (x 4), #32 and #102
Directions:
Step 1
A few days in advance make your sugar plaques.
Step 2
Level, tort and fill your 1/2 sheet cake and place it on the cake board. Then, ice your 1/2 sheet cake with blue buttercream icing.
Step 3
Cut your cardboard cake divider to the shape of the bear's bottom and cover it in Saran Wrap.
Step 4
Decide where you want the bear to sit and place your dowels, cut to size, into the cake for support. I chose the back left corner. Then, hammer a sharpened dowel down the center of the bear and slightly into your cake board. This will keep the bear from falling off.
Step 5

Using tip #5 for each, pipe horizontal lines to fill in the stomach, nose, eyes, ears, hands, and vest...in that order. After each section is finished take time to smooth out the icing. The best way to do this is to put a little powdered sugar on your finger and pat it flat.
***Decorator's Tip*** If you look at Oso's nose you will see a little powdered sugar left behind. I was not worried about this because by the time I finished decorating the cake, it melted into the icing. If for some reason it does not, put a little water on a decorator's brush and touch the sugar with the brush (do not rub) and it will disappear.
Step 6
Using a spatula, cover the rest of the bear with yellow buttercream icing. You can smooth any lumpy areas with your finger and powdered sugar as mentioned above but it does not need to be perfect because Oso is meant to look furry.
***Decorator's Tip*** Use a tapered spatula for those hard to reach spots.
Step 7
Pipe a boarder around the 1/2 sheet cake using red buttercream icing and tip #32.
Step 8
Place your sugar plaques on your cake.
____________________________________________________________________________________________


No Responses to "Disney's Special Agent Oso Cake"
Leave a Reply
We would love to hear what you think.