


Pin It now!
Two 14x11 cakes
Two 13x9 cakes
One 9x9 cake
4 wooden dowels
Large rectangular cake board
Tips # 2, 3 and 5
Red and black fondant
Red gumpaste
Thick Wire
Tan, white, orange, yellow, and black buttercream icing
Blue tinted piping gel
Crushed graham crackers
Rice Krispie Treats
Plastic cacti
Another item that will help decorate this cake is an air brush. You will be able to cover the car in white fondant then airbrush it red. It will save you a great deal of time.
Directions for the "experienced" cake:
Step 1
A few days in advance, make the spoiler out of red gumpaste and place 4 thick wires
into the spoiler as it dries (the longer the better). These wires will hold the spoiler on the
cake.
The size of your spoiler will depend on the size of your cake. Mine was roughly 7 inches long and 2 inches high.
Step 2
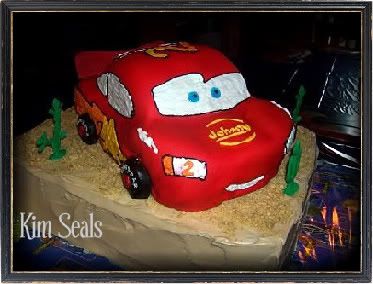
The easiest way to make this cake is to start with the car. Bake, fill, and stack the 2 13x9 cakes. Also bake the 9x9 cake and put these cakes in the freezer for 1 day. Take a large cardboard cake board and cut it to the general shape of the car like the image below.

Step 3
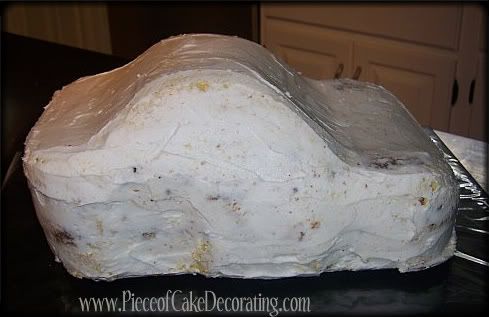
Once the cakes are frozen, use the cut cake board as a guide to carve the shape of the car. Once you have the general shape, place the cake on the cut cake board and add the curves on the hood, trunk, and doors. The trick here is to take it slow and look at the car from all angles. Remember, you can always take off a little more but you can’t put the cake back on once you cut it.
Below are some drawings to help you visualize the shape of the car. The top 2 photos are of the car's body. It is made from the two 9x13 cakes and I have drawn a side view of the car. In the bottom drawing, you can see that the hood is carved from a single layer 9x9 cake and is a rounded triangle shape. Do not carve the hood until you have read step 4.

Step 4
When you are happy with the shape of the car and you have scooped out the wheel wells, it will be time to start the hood. To do this, measure and cut the square cake to size. When you are sure it will fit, place the cake on top of the car’s body and cut it to shape. Your final carved cake should look something like this...

Ice with buttercream icing and cover the cake with fondant.
You can either cover the cake with red fondant or cover the cake with white fondant and airbrush the whole cake red.
Step 5
Use the white buttercream and tip #3 or 5 to pipe on the windows.
****Decorator’s Tip**** Use a toothpick to outline all of the windows and the lightning bolt onto the car.
Step 6
Outline all of the windows with the black icing and tip # 2.
Step 7
Repeat the above two steps to pipe on the large lighting bolts, head lights, tail lights, and the large number on top, using yellow and orange or white buttercream (colors will depend on what you are piping).
***All of these details were done freehand but you can make a mini template to ensure unity.***
Step 8
With tip #2 and black icing, pipe numbers on the sides of the car as well as the passenger side headlight and tail light.
Step 9
With tip #2 and yellow icing, pipe the child’s name to resemble the Rusteeze logo.
Step 10
With tip #2 and blue piping gel pipe on eyes. Be careful, as the piping gel will run if you use too much. Finally, add the pupil on the eyes with a small black dot.
Step 11
The only part that is left of the car is to make the wheels.To do this, cut circles out of Rice Krispie Treats and cover with black fondant. I now make my wheels by attaching two black gumpaste circles together with gumglue. With a gumpaste tool or any straight edge you can add tread marks. As an added bonus, the circle cutter you use to make the wheels acts as a template for the size of your wheel well.
Add a red circle to the center of the wheel and pipe the word Lightyear onto the wheels. Once the car is sitting on the bottom cake you can place the wheels onto the cake.
***Decorator's Tip***
If you are placing your car cake on a cake board instead of a cake, you can build up the cake board with covered pieces of foam to make the car appear to sit on its wheels.
Step 12
Finally, bake, level and fill the 2 14x11 cakes. Place onto the large rectangular cake board and cover with tan icing. Next, sprinkle the crushed graham crackers on top to look like sand. Place 4 dowels into the cake to support the car. The placement of the dowels will depend on the placement of the car. Just be sure to use 2 dowels for the front of the car and two for the back.
Step 13
Place the wheels and spoiler onto the car and put the cacti onto the large cake.
****Decorator’s Tip**** If you are having trouble getting the spoiler to stay up you can take 4 lollipop sticks and place them behind the spoiler for support. Cover these sticks with black or gray buttercream. If you look at the original Lightning McQueen, you will see he has something similar on the back of his spoiler.
Reader photos using this guide...


There are 2 ways to make this cake. Novice directions which use a car cake pan are also available. There, I will discuss how to recreate this 3D car cake with step-by-step instructions and decorating tips. Below, however, the "experienced" instructions which will guide you through the carving process.
To make the "experienced" cake you will need...
To make the "experienced" cake you will need...
Two 14x11 cakes
Two 13x9 cakes
One 9x9 cake
4 wooden dowels
Large rectangular cake board
Tips # 2, 3 and 5
Red and black fondant
Red gumpaste
Thick Wire
Tan, white, orange, yellow, and black buttercream icing
Blue tinted piping gel
Crushed graham crackers
Rice Krispie Treats
Plastic cacti
Another item that will help decorate this cake is an air brush. You will be able to cover the car in white fondant then airbrush it red. It will save you a great deal of time.
Directions for the "experienced" cake:
Step 1
A few days in advance, make the spoiler out of red gumpaste and place 4 thick wires
into the spoiler as it dries (the longer the better). These wires will hold the spoiler on the
cake.
The size of your spoiler will depend on the size of your cake. Mine was roughly 7 inches long and 2 inches high.
Step 2
The easiest way to make this cake is to start with the car. Bake, fill, and stack the 2 13x9 cakes. Also bake the 9x9 cake and put these cakes in the freezer for 1 day. Take a large cardboard cake board and cut it to the general shape of the car like the image below.

Step 3
Once the cakes are frozen, use the cut cake board as a guide to carve the shape of the car. Once you have the general shape, place the cake on the cut cake board and add the curves on the hood, trunk, and doors. The trick here is to take it slow and look at the car from all angles. Remember, you can always take off a little more but you can’t put the cake back on once you cut it.
Below are some drawings to help you visualize the shape of the car. The top 2 photos are of the car's body. It is made from the two 9x13 cakes and I have drawn a side view of the car. In the bottom drawing, you can see that the hood is carved from a single layer 9x9 cake and is a rounded triangle shape. Do not carve the hood until you have read step 4.

Step 4
When you are happy with the shape of the car and you have scooped out the wheel wells, it will be time to start the hood. To do this, measure and cut the square cake to size. When you are sure it will fit, place the cake on top of the car’s body and cut it to shape. Your final carved cake should look something like this...
Ice with buttercream icing and cover the cake with fondant.
You can either cover the cake with red fondant or cover the cake with white fondant and airbrush the whole cake red.
Step 5
Use the white buttercream and tip #3 or 5 to pipe on the windows.
****Decorator’s Tip**** Use a toothpick to outline all of the windows and the lightning bolt onto the car.
Step 6
Outline all of the windows with the black icing and tip # 2.
Step 7
Repeat the above two steps to pipe on the large lighting bolts, head lights, tail lights, and the large number on top, using yellow and orange or white buttercream (colors will depend on what you are piping).
***All of these details were done freehand but you can make a mini template to ensure unity.***
Step 8
With tip #2 and black icing, pipe numbers on the sides of the car as well as the passenger side headlight and tail light.
Step 9
With tip #2 and yellow icing, pipe the child’s name to resemble the Rusteeze logo.
Step 10
With tip #2 and blue piping gel pipe on eyes. Be careful, as the piping gel will run if you use too much. Finally, add the pupil on the eyes with a small black dot.
Step 11
The only part that is left of the car is to make the wheels.
Add a red circle to the center of the wheel and pipe the word Lightyear onto the wheels. Once the car is sitting on the bottom cake you can place the wheels onto the cake.
***Decorator's Tip***
If you are placing your car cake on a cake board instead of a cake, you can build up the cake board with covered pieces of foam to make the car appear to sit on its wheels.
Step 12
Finally, bake, level and fill the 2 14x11 cakes. Place onto the large rectangular cake board and cover with tan icing. Next, sprinkle the crushed graham crackers on top to look like sand. Place 4 dowels into the cake to support the car. The placement of the dowels will depend on the placement of the car. Just be sure to use 2 dowels for the front of the car and two for the back.
Step 13
Place the wheels and spoiler onto the car and put the cacti onto the large cake.
****Decorator’s Tip**** If you are having trouble getting the spoiler to stay up you can take 4 lollipop sticks and place them behind the spoiler for support. Cover these sticks with black or gray buttercream. If you look at the original Lightning McQueen, you will see he has something similar on the back of his spoiler.
Reader photos using this guide...

Kym from Holland

Kym from Holland

Sallie
____________________________________________________________________________________________

October 3, 2011 at 4:36 PM
Amazing :)
November 10, 2011 at 2:40 PM
Great instructions for this cake. This was my first time making anything like this and it turned out great. thank you so much.
February 12, 2012 at 12:19 AM
http://jnyjcakes.blogspot.com/2012/02/mcqueen-car-cake.html
I based my car cake on your tutorial... many thanks!
zen