


Pin It now!
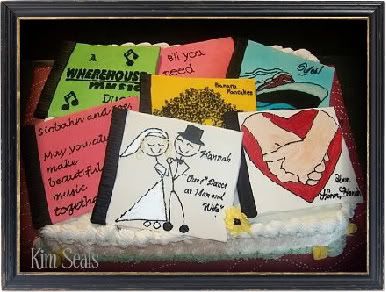
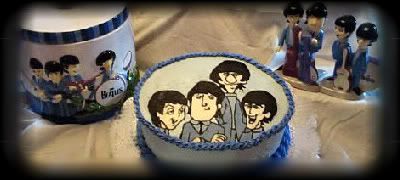
I made this cake for a bridal shower. The couple met in a music store so I created CD covers to tell the story of their relationship. If you follow the CDs around you can see where they met, how he proposed, and their wedding song. There are also filler CDs which include a picture of interlocked hands to represent their marriage, one of the bride's favorite songs, The Beatles' song title "All You Need is Love," and a sweet message.
To make this cake you will need...
1/2 sheet cake
large cake board
white buttercream icing
white gumpaste
black fondant or gumpaste
airbrush kit (optional)
projector (optional)
pre made black icing
tips #2 #3 #5 #68 #35
Other useful items:
Directions:
Step 1
A few days in advance, make your CD cases/covers. First you must roll out white gumpaste and cut out seven 9 1/2'' x 9'' rectangles. Let the gumpaste dry for 1-2 days and flip half way through to speed the drying process. Once the gumpaste is dry, airbrush them your desired colors.
***Important note*** If you are not using an airbrush, make sure to color your gumpaste before you roll and cut it.
There are a few ways to get the pictures onto the gumpaste.
For this cake I used option number 3. It was a lot of work but the images really popped off the cake.
Step 2
To make all of the CDs I used the same process.
1. Place the original picture in the projector.
Step 3

Step 4
Place your CDs on top of the cake. Use a mound of buttercream icing underneath the CDs you want to appear propped up.
***Decorator's Tip*** You may want to practice arranging your gumpaste CDs before you put them on the cake to prevent them from becoming ruined.
For an added touch, add gumpaste or royal icing flowers around the cake.
To make this cake you will need...
1/2 sheet cake
large cake board
white buttercream icing
white gumpaste
black fondant or gumpaste
airbrush kit (optional)
projector (optional)
pre made black icing
tips #2 #3 #5 #68 #35
Other useful items:
Directions:
Step 1
A few days in advance, make your CD cases/covers. First you must roll out white gumpaste and cut out seven 9 1/2'' x 9'' rectangles. Let the gumpaste dry for 1-2 days and flip half way through to speed the drying process. Once the gumpaste is dry, airbrush them your desired colors.


***Important note*** If you are not using an airbrush, make sure to color your gumpaste before you roll and cut it.
There are a few ways to get the pictures onto the gumpaste.
- If you have the skills, you can freehand the pictures.
- Apply an edible image to the gumpaste. Click here to purchase an image.
- Use a projector to paint or pipe your image onto the gumpaste.
For this cake I used option number 3. It was a lot of work but the images really popped off the cake.
Step 2
To make all of the CDs I used the same process.
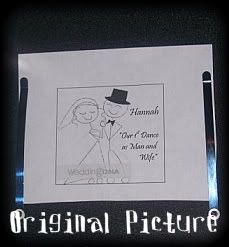
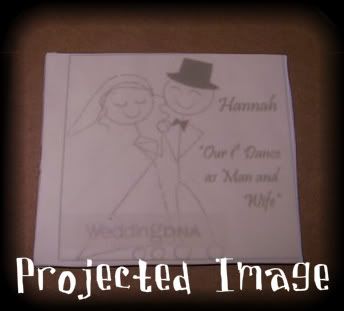
1. Place the original picture in the projector.

2. The image is projected onto the gumpaste. Then, using tips #2 or #3 and the pre made black icing, pipe the outline of the image onto the gumpaste.


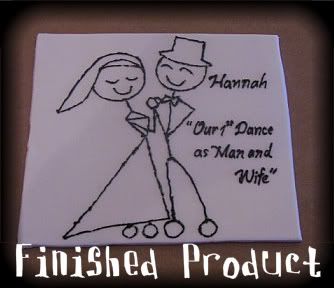
3. If needed, use the edible airbrush ink to paint your pictures. For this CD I painted the grooms hat, tie and shoes with black ink. To make the bride's dress pop, I mixed clear vanilla extract with pearl dust and painted her dress, veil, and shoes. To add a personal touch, I gave the bride blond hair.
***Notes on the CDs*** I did a Google images search to find the images. All of the CD piping was done using a projector. This includes the handwriting. Below is a list of the CDs I made and any important tips for decorating them.
***Notes on the CDs*** I did a Google images search to find the images. All of the CD piping was done using a projector. This includes the handwriting. Below is a list of the CDs I made and any important tips for decorating them.
- Music Store CD - I airbrushed it green and piped the logo onto the CD using black icing and tip #3. Musical notes were also added using black icing and tip #3.
- Filler CD #1 - I airbrushed it a combo of red and pink and piped the words 'All You Need is Love' using tip #3 and black icing.
- Proposal CD - I airbrushed the gumpaste blue and piped the outline of a boat and the word 'Yes!' using black icing and tip #2. The boat was then painted using red, black, and pearl edible ink. To make the water stand out on a blue background, I painted blue piping gel on the bottom half of the CD.
- Message CD- I airbrushed the gumpaste pink and piped the following message using black icing and tip #3: 'Siobhan & Joe, May you always make beautiful music together."
- Filler CD #2- I airbrushed the gumpaste yellow and piped on the original Banana Pancakes CD cover using black icing and tips #2 and #1.
- Wedding Song CD- See above.
- Marriage CD- The gumpaste was left white and the image was piped using black icing and tip #2. I then painted the picture using flesh and red colored edible ink.
Step 3
Level, tort and fill your 1/2 sheet cake. Place the cake on your cake board and ice with white buttercream icing. The sides of the cake should be lightly iced. Next, pipe vertical lines on the sides with tip #68 and a shell boarder around the top with tip #35.
Step 4
Place your CDs on top of the cake. Use a mound of buttercream icing underneath the CDs you want to appear propped up.
***Decorator's Tip*** You may want to practice arranging your gumpaste CDs before you put them on the cake to prevent them from becoming ruined.
For an added touch, add gumpaste or royal icing flowers around the cake.
____________________________________________________________________________________________

January 29, 2010 at 9:09 AM
This one is just AMAZING to me! GORGEOUS!!!