Solution Graphics

Foodbuzz
Ask an Expert - Visit my Virtual Office at LivePerson
Showing posts with label instructions. Show all posts

Sugar plaques can be made a number of ways but the easiest is to use an edible image.  Below you will find the steps taken to make Emerald City in the Wizard of Oz cake pictured above.

You will need...


white gumpaste
edible image(s)
Exacto Knife
piping gel
decorator's brush
2 wooden dowels (optional)
white candy metls (optional)


Directions:

Step 1


Using a Exacto Knife, cut out your image and remove it from the backing paper.


Step 2

Roll out you gumpaste to at least 1/4 thick.  You can make it thicker but it will take longer to dry.

***Decorator's Tip*** It is important to use white gumpaste because it will not take away from the color of your image. Gumpaste will also harden faster than fondant.


Step 3

Place your rolled out gumpaste on a cake board or cookie sheet.  This will ensure your image does not tare or become distorted.  Then, with a brush, cover the back of your image with piping gel.

***Decorator's Tip*** Make sure you apply the piping gel as close to the edge as you can.


Once your image is covered, place it on the gumpaste and cut it out using your Exacto Knife.

***Decorator's Tip*** Notice how I have left a strip of gumpaste hanging below the image.  This is an optional step.  It was done because Emerald City will be standing up on the cake and I wanted the sugar plaque to sit in the cake a bit so it would survive delivery.


Step 4 (optional)


After a day or two, the gumpaste will be dry enough to add dowels to the back.  To do this you melt white candy melts and coat the top of your dowels.  Place the dowels on the back of your image at the appropriate height.  For extra security, add a little more chocolate over the dowels and let dry.


You are now ready to place your plaque(s) on your cake!
Read more »

In Labels: , , , , , on .

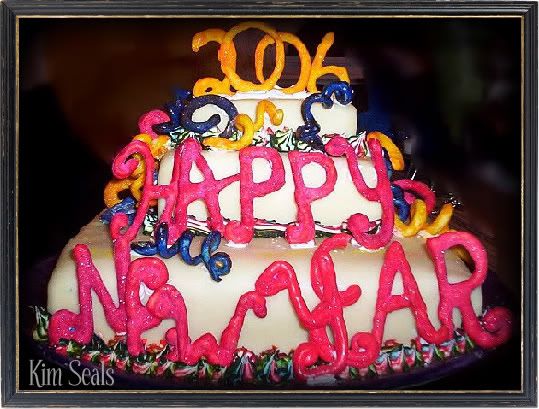
Happy New Year Cake

In this guide, I will discuss how to make a striped buttercream boarder, gumpaste streamers, and royal icing letters.

As you can probably tell, I made this cake for a New Year's Eve party in 2006. It was the second cake I have ever decorated. Everything you see was self taught and I had not taken any classes at this time.


To make this cake you will need...

3 square cakes (each layer should be 2 inches smaller than the one below...ie 4, 6, and 8 inches will work great)
1 large cake board
square cake dividers in sizes that match the size of your cakes (ie 4, 6, and 8 inches)
wooden dowels
white buttercream icing
white fondant (optional)
red, yellow, and blue gumpaste
red and yellow royal icing
red and blue icing colors
tips #2 or 3 (optional) #5, and #21


Directions:


Step 1

A few days in advance, make the gumpaste streamers and royal icing letters.

To make the streamers, roll out pieces of gumpaste to look like long, skinny, tube shapes. Just like when you played with Play-dough as a kid. To get a curly effect, wrap the gumpaste around a wooden dowel and let dry. The coiled pieces were made by curling the gumpaste on a flat surface. All gumpaste pieces should dry for at least 24 hours on wax paper.

***Decorator's Tip*** Before you go to bed, flip your pieces and they will dry faster. Be careful, they may stick to the wax paper.

To make the letters and numbers you do not have to have perfect piping skills. Write the words Happy New Year and 2006 on a piece of paper. Lay wax or parchment paper over top and trace using royal icing and tip #5. Let them dry over night.

***Decorator's Tip*** You can also print the letters and numbers off the computer. For added decoration, pipe over each letter/number again using tip #2 or 3. The royal icing will need to harden slightly for this to work.


Step 2

Place each cake on the appropriate cake divider. Level, tort, and fill each cake. Then, ice the cakes with white buttercream icing. At this point you can either leave your cakes iced in buttercream or you can cover them in fondant.


Step 3

Stack your cakes. If you are nervous about traveling with this cake, hammer a sharpened dowel through the center of all 3 tiers.


Step 4

Pipe your boarder using tip #21. I made stars around each tier. You have 2 options to get a striped effect.
  1. You can fill your piping bag half with red and half with blue icing but make sure it is evenly divided.
  2. Paint a thick stripe of red coloring on the left side of your piping bag and a thick stripe of blue coloring on the right side. Fill the bag with white buttercream icing and pipe your boarder.

Step 5

Place your decorations around the cake. To help them stay you can use a dot of buttercream icing. If your cake is covered in fondant, royal icing will hold the best.
Read more »

In Labels: , , , , , , on .

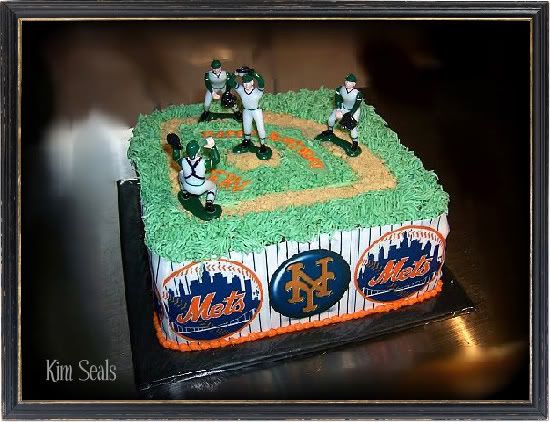
Baseball Field Cake

This guide will give you step-by-step instructions on how to place the edible image on the side of the cake and how to decorate the top to look like a baseball field.

If you are having a Playoff or World Series party, here is a great and easy idea for a baseball cake. I made this cake for a Mets fan and used an edible image on the sides.

Please note that if you are interested in using an edible image as I have here, I am unable to sell pictures of any copyrighted material. This means that I cannot sell images of team logos. If you are still interested, I can create a pinstripe with or without the team name.

To make this cake you will need...

2 Square cakes the size of your choice
1 Square cake board approximately 2-4 inches larger than the cake
White and Green buttercream icing (you will also need a small amount of icing in the team's color)
Tip #233 a.k.a. the grass tip
Tip # 2, 3 and 5
2 edible transfer images
Crushed animal crackers
Baseball player toppers


Directions


Step 1

Level, tort and fill your cakes. Place them in the center of your cake board and ice the sides with white buttercream icing. Once covered, place your edible image on the side of the cake.


***Decorator's tip*** By using white on the sides, you will not change the color of your image once the paper melts into your icing. If you have ordered this image from us, you will need to trim the picture to fit the size of your cake. Also spray the side of the cake lightly so the paper will melt into the icing, leaving a seamless transition. All other instructions will be included in your shipment.


Step 2

With green icing, ice a small area on top of the cake so the animal cracker crumbs have something to stick to. Then, using tip # 3, pipe a barrier for the crushed animal crackers around the base lines as well as a hill in the middle for a pitcher's mound. Then crush the animal crackers and place them on the pitchers mound and in your marked off area.


***Decorator's Tip***
It is important to decorate in this order so that any loose crumbs won't ruin your cake.


Step 3

Using tip # 233, pipe the grass on top of the cake. Then using tip #5, pipe a boarder in your team's colors ; I have used orange. Then use that same color and tip #2 or 3 to pipe your message on top. Finally, place the baseball players on top.
Read more »

In Labels: , , , , , , , , , , , , , on .

Jack-o-lantern Cake


Here is a super easy Halloween Pumpkin cake. In this guide you will learn how to stack the cakes and decorate in order to recreate this Jack-o-lantern. If you are looking to challenge yourself, cover the cake in orange fondant.

To make this cake you will need...

2 cakes baked in a bunt pan
Orange, green and black buttercream icing
Small paper or plastic cup
Round cake board


Directions

Step 1

Make sure the tops and the bottoms of the cakes are flat so the cake doesn't tip when it is decorated. Place the cakes on the cake board then fill and cover with orange buttercream icing.

***Decorator's Tip***
Place the bottom cake on the cake board so the smaller part is down and the larger part is up. The top cake has the large part on the bottom and the small part facing up. There is really only 1 way to do this so the cake looks like a pumpkin.

Step 2

Cover the small cup with green buttercream icing and place on top of the cake.


Step 3

Using black buttercream icing (or a tube of black) and tip # 3 or 4, pipe the face.

***Decorator's Tip***
If you don't trust yourself piping free hand, first draw the face with a toothpick.

That's it, 3 simple steps and you have a Jack-o-Lantern Cake. Now that you have extra time on your hands, you should check out a great blog for the crafter at heart. Destination Handmade has a little bit for everyone.
Read more »

In Labels: , , , , , , , , , , on .

Margaritaville/Beach Cake

In this guide you will be given step-by-step instructions on how to decorate this beach/Margaritaville themed cake. I will also give tips on how to make edible sand and water.

This cake was made for a group birthday party and the theme was Jimmy Buffet's Margaritaville. In this cake guide you will learn techniques like making sand and making the water look more realistic.

To make this cake you will need:


12 or 14 inch cake board
2 10 inch round cakes
Blue buttercream icing
Royal icing tropical flowers (instructions not included but click to purchase)
Graham Crackers or Nilla Wafers
Blue icing coloring
Piping gel
Tips #2 and 19
Toy palm trees
Toy or handmade paper parrots (instructions included)
Margaritaville sign (instructions included)
Mini margaritas (instructions included)
Mini beach towel
Mini surf board


Directions:


Step 1:


Level, tort and fill your cakes then place them on the cake board. Ice the cakes with light blue buttercream icing. In order to make the beach look hilly, ice mounds on the top half of the cake.


Step 2:

Ground up the Nilla Wafers using a food processor or a Zip Lock bag and a rolling pin. Then, place the crumbled wafers on the top of the cake to make sand.


Step 3:

Color the piping gel blue and spread it on the other half of the cake as pictured. To get the water to look wavy, spread it so that the piping gel is not smooth.


***Decorator's Tip*** For an added detail, put a small amount of light blue icing on a tooth pick and run it through the "water." This will make it look like the top of your waves has foam.


Step 4:

Using tip #19, pipe on your boarder along the edge of the water on top of the cake. Then, place the royal icing flowers around the bottom of the cake as a boarder.


Step 5:

Place your trees, surfboard, and other accessories on the cake. Finally, write your message in the water with light blue icing and tip #3.


Instructions for paper parrots, sign, and mini margaritas:

  • The paper parrots and sign were very easy to make. Save these pictures to your desktop and open them in any picture program that allows you to resize images. Paint will work just fine. Next, print and cut out your pictures. Finally, tape them to a toothpick. If you want to hide the toothpick just put the same picture on the other side but remember that you will need to use the mirror images for the parrots.

  • To make the mini margaritas, I purchased miniature dollhouse glasses. I first dipped the rim in a little bit of water and then into some sugar. To make the drink, I filled the glass with light green icing.


Read more »

In Labels: , , , , , , , , , , , , , , on .


Cake dowels are needed to give support to a cake. Without them, a stacked cake can fall or the filling will ooze out the sides when the cake settles. Your dowels can be made of wood or plastic and they are easy to put in a cake. Just follow these step...

  1. Place the first tier on your cake board. You will probably need 4-5 dowels for this layer (more dowels will be needed if you cake is more than 3 tiers high) and they will be placed in a circle around the center of the cake. Take one dowel and place it in the cake. Measure the height and mark it with a marker. Remove the dowel and cut to size. Wooden dowels cut best with a hedge trimmer but a bread knife will also work. A knife is the easiest way to cut a plastic dowel. Place the cut dowel back in the cake and repeat these steps for the remaining dowel in this tier.
  2. Place the next tier on top. With each tier, you will need less dowels. The wooden dowels for this tier will need to be sharpened with a pencil sharpener so that they go through the cardboard divider. Repeat the steps above but use a hammer to drive the wooden dowel to the bottom cake board. If using plastic dowels, you will not be able to go to the bottom of the cake. You can also choose not to sharpen and hammer the wooden dowel but it will not be as stable.
  3. Keep repeating these steps until you get to the top tier. Once you are on the top tier, sharpen your wooden dowel and hammer it down the center of your cake, all the way to the bottom cake board. This is an important step because it will keep your cake from tipping over.

A few extra notes about dowels...

  • You will need fewer dowels if you are using plastic.
  • If you choose to sharpen and hammer the dowels for each of the higher tiers, make sure you place them in a way that they will not hit the dowels below them.
  • If you are still confused, check out this video tutorial on How to Stacking Cakes.
Read more »

In Labels: , , , , , , , , , on .

Movie Cake


In this guide you will be given step-by-step instructions on how to make movie themed, gumpaste decorations for your cake.

This is a great cake for any movie theme. As you can see, I made this as a birthday cake but it would also be great as an anniversary cake, movie night cake, or even an Oscar party.

Make decorating this cake even easier. Complete a cake kit and individual gumpaste decorations now available at my handmade shop.

To make this cake you will need...


12 or 14 inch round cake board
10 inch round cake
Large Circle cookie cutter
Medium sized petal cutter
Large and small star cookie cutter
2 lollipop sticks
Tips #5, 3, and 2
Gray, white, brown, black, and yellow gum paste
White, red, yellow, and black buttercream icing


You do not need an air brush but it will definitely save you time on any cake, especially when you need to make black and red decorations.

Directions: 

Step1
A few days in advance make the filmstrips, clap board, film reel, billboard and stars. 
  • To make the filmstrips cut rectangular shaped pieces of gumpaste and mold them to shape using tissue.  You can use tan gumpaste and once dry you can paint on the black frames.  Another option is to use white gumpaste and paint everything once it dries.
  •   To make the movie reel, roll out black gumpaste leaving it fairly thick and cut out a long strip.  Roll this strip around itself to resemble a rolled up filmstrip.  Next, roll out the gray gum paste and cut out two large circles.  Then, with the petal cutter cut out the holes around the center of the circles (refer to picture above).  Once everything is dry, assemble the movie reel by applying some water to each piece and stick them together.  They will need to dry for at least one more day.
  • To make the clapboard, roll out black gumpaste and cut to shape.  When rolling out the gumpaste, leave it on the thick side so it holds up better once it dries.  When dry, pipe on the white details with white buttercream icing.  Another option is to use white gumpaste, tape off the details you want to leave white (i.e. the stripes) with scotch tape, then airbrush or paint the clapboard black.  When the black color dries you can remove the tape.
  • To make the billboard, roll out a thick piece of white gumpaste and cut a large rectangle to the size you desire.   Place 2 lollipop sticks in the bottom and let dry.  Once the gumpaste is dry, pipe on the details with buttercream icing and tip #2 for the lights and #3 for the words.
  •  To make the stars, roll out yellow gumpaste and cut out the stars with a small and large cookie cutter.

Step 2

Finally it is time to level, tort and fill the cakes.  Place them on your cake board and ice with white buttercream icing.


Step 3

With red buttercream icing and tip #5, pipe on the red carpet.  If you have an airbrush, you can airbrush on the carpet but be sure to make a template so that you do not get red on the rest of the cake. 


 Step 4

As a boarder, place the small stars around the bottom of the cake. 


Step 5

Place your gumpaste decorations on the cake.  Be sure to secure them in place with buttercream icing.
Read more »

In Labels: , , , , , , , , , , , , , , , , , on .

Photobucket

I made this Winnie-the-Pooh cake for my son's first birthday. It was very easy to make but I cannot take credit for this one. I purchased a cake kit complete with instructions, toppers, and even toys for my son. Below is a link to purchase the kit if you are interested in this cake. If you are looking for an easy kit similar to this one, check out the cake kit category at my online shop. There are kits for all ages from Sesame Street to Sports to Hannah Montana. However, not all of these kits will come with instructions. Look under our site's banner on how to order a Custom Cake Guide.


Read more »

In Labels: , , , , , , , , , , , , , , , , on .

Having trouble finding instructions on how to decorate a cake? We can help. For a small $5 fee and our money back guarantee we will create a custom cake guide. Your guide will include step-by-step instructions and sketches when needed. Just simply click the "add to cart" button below and be sure to leave your e-mail address at the checkout. Once we have been notified of your purchase, we will e-mail you about your request. Please be prepared to respond with a detailed description and/or a picture of your request. If for any reason we are unable to help you, we will issue a full refund. We look forward to creating a guide for you. And remember, if you ever have any questions about anything on our site, you can e-mail us at kseals@pieceofcakedecorating.com.


Read more »

In Labels: , , , , , , , , , , , , , , , , , , , on .