Solution Graphics

Foodbuzz
Ask an Expert - Visit my Virtual Office at LivePerson
Showing posts with label easy. Show all posts


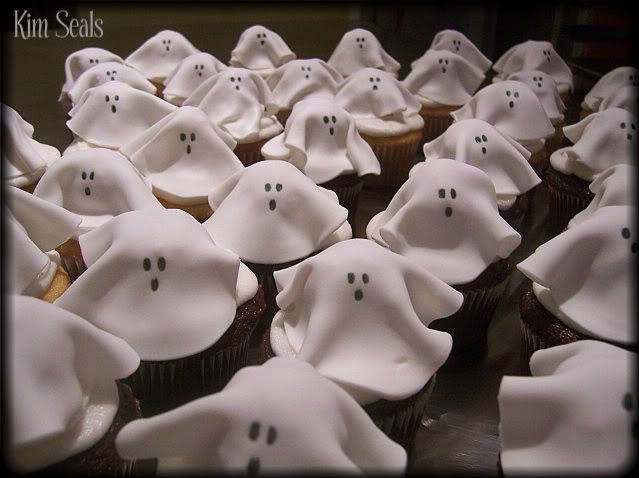
Here is an extremely easy but very cute cupcake idea for any of your child's parties this Halloween.  Make it even more fun and decorate with your son or daughter!  I made these with my son and he was so proud to share these with his class.

Supplies

Cupcakes
Buttercream Icing
Doughnut Holes (Munchkins)
White Fondant
Black Edible Ink Marker


Directions

Step 1


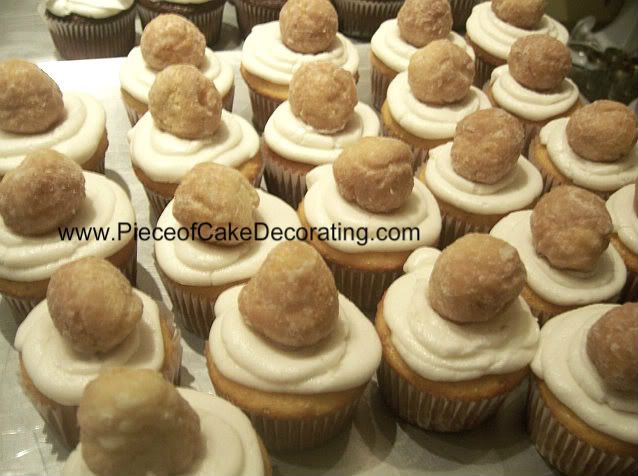
Bake your cupcakes and ice them any way you wish.  I used a large round tip and made a swirl design in case you were able to see the icing under the ghost.  Next, place a doughnut hole on each cupcake.

Step 2


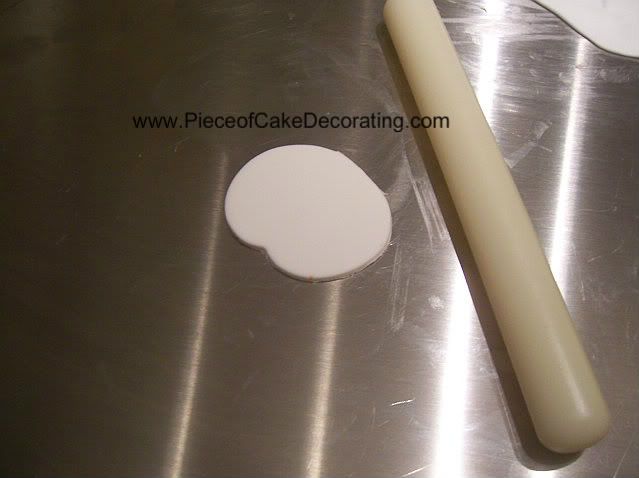
Roll out your fondant and cut out a large circle.  I didn't have a circle large enough so I used my pumpkin cutter and cut off the stem.  It doesn't really matter.  It is the size you want, not the shape.  Then, roll the "circle" out thin enough and large enough to fit over the doughnut hole.  Just make sure it isn't so thin that you see the doughnut underneath.

Step 3

Place your rolled out "circle" on top of your doughnut hole and use the black edible ink marker to draw a ghost face.

That's it!
Read more »

In Labels: , , , , , on .

Baseball Field Cake

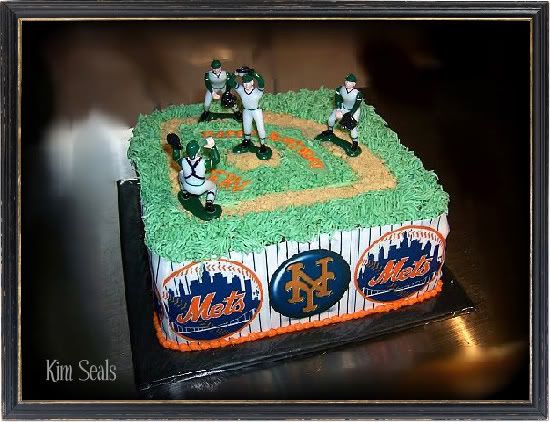
This guide will give you step-by-step instructions on how to place the edible image on the side of the cake and how to decorate the top to look like a baseball field.

If you are having a Playoff or World Series party, here is a great and easy idea for a baseball cake. I made this cake for a Mets fan and used an edible image on the sides.

Please note that if you are interested in using an edible image as I have here, I am unable to sell pictures of any copyrighted material. This means that I cannot sell images of team logos. If you are still interested, I can create a pinstripe with or without the team name.

To make this cake you will need...

2 Square cakes the size of your choice
1 Square cake board approximately 2-4 inches larger than the cake
White and Green buttercream icing (you will also need a small amount of icing in the team's color)
Tip #233 a.k.a. the grass tip
Tip # 2, 3 and 5
2 edible transfer images
Crushed animal crackers
Baseball player toppers


Directions


Step 1

Level, tort and fill your cakes. Place them in the center of your cake board and ice the sides with white buttercream icing. Once covered, place your edible image on the side of the cake.


***Decorator's tip*** By using white on the sides, you will not change the color of your image once the paper melts into your icing. If you have ordered this image from us, you will need to trim the picture to fit the size of your cake. Also spray the side of the cake lightly so the paper will melt into the icing, leaving a seamless transition. All other instructions will be included in your shipment.


Step 2

With green icing, ice a small area on top of the cake so the animal cracker crumbs have something to stick to. Then, using tip # 3, pipe a barrier for the crushed animal crackers around the base lines as well as a hill in the middle for a pitcher's mound. Then crush the animal crackers and place them on the pitchers mound and in your marked off area.


***Decorator's Tip***
It is important to decorate in this order so that any loose crumbs won't ruin your cake.


Step 3

Using tip # 233, pipe the grass on top of the cake. Then using tip #5, pipe a boarder in your team's colors ; I have used orange. Then use that same color and tip #2 or 3 to pipe your message on top. Finally, place the baseball players on top.

Read more »

In Labels: , , , , , , , , , , , , , on .

Jack-o-lantern Cake


Here is a super easy Halloween Pumpkin cake. In this guide you will learn how to stack the cakes and decorate in order to recreate this Jack-o-lantern. If you are looking to challenge yourself, cover the cake in orange fondant.

To make this cake you will need...

2 cakes baked in a bunt pan
Orange, green and black buttercream icing
Small paper or plastic cup
Round cake board


Directions

Step 1

Make sure the tops and the bottoms of the cakes are flat so the cake doesn't tip when it is decorated. Place the cakes on the cake board then fill and cover with orange buttercream icing.

***Decorator's Tip***
Place the bottom cake on the cake board so the smaller part is down and the larger part is up. The top cake has the large part on the bottom and the small part facing up. There is really only 1 way to do this so the cake looks like a pumpkin.

Step 2

Cover the small cup with green buttercream icing and place on top of the cake.


Step 3

Using black buttercream icing (or a tube of black) and tip # 3 or 4, pipe the face.

***Decorator's Tip***
If you don't trust yourself piping free hand, first draw the face with a toothpick.

That's it, 3 simple steps and you have a Jack-o-Lantern Cake. Now that you have extra time on your hands, you should check out a great blog for the crafter at heart. Destination Handmade has a little bit for everyone.
Read more »

In Labels: , , , , , , , , , , on .

Today I came across a blog, Sweet Little Memories, that talked about a soap scented like coffee and chocolate. The baker in me immediately thought about cake and I began to search for a taste to put with this scent. I came across this very easy recipe for a coffee/chocolate cake called Wake Up Coffee Cake. It sounds delicious!

Wake up coffee cake (recipe from CakeCentral.com)

Ingredients

1 cup of sugar

instant coffee to taste

3 cups of flour

3 eggs

4 tsp baking powder

2 cups of water


Instructions

    1. Melt chocolate
    2. Mix the water and coffee together
    3. Combine flour eggs sugar and coffee together. Mix well
    4. Add baking powder and mix
    5. Bake for 25-35 minutes
The more instant coffee you put in the stronger it will be.
Read more »

In Labels: , , , , , on .

Image Idea 1Image Idea 2Image Idea 3


Today I came across a blog about decoupage art. It is called Handmade by Decoupage Art. Seeing this site gave me a new ideas for our edible photo images. Our images can easily be cut using a sharp knife and applied to cake as decoupage art. They are easily attached using a small amount of water and can be applied to either buttercream or fondant icings. Above I have given you ideas found on the Lucks Food Decorating Company Website.
Read more »

In Labels: , , , , , , , , , on .

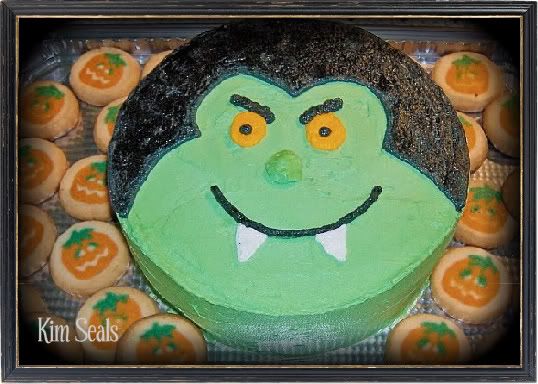
Vampire Cake

In this guide you will be given step-by-step instructions on how to decorate this cute vampire cake.

I know it seems early but Halloween will be here before you know it. If you are planning a party this year, don't forget the cake! Between HBO's True Blood and the Twilight series, Vampires are all the rage right now. Here is an easy vampire cake that just about anyone can do.

To make this cake you will need...

2 10 inch round cakes
Green, black, yellow/gold and white buttercream icing
4 Tips # 5

Recommended products: It is very difficult to make true black. When I only need a small amount like this, I always buy pre-made black icing.


***Decorator's tip*** If you do not have four #5 tips, do not worry. You will get the same effect using tips #4 or 6. If you do not want to use a tip at all, just cut the end of the piping bag to size. It will work just as well but your lines will not be as tight. This techniques works best for piping the eyes and nose because of their shape.


Directions:


Step 1

Level, tort and fill the cakes. They can be placed on a 12 or 14 inch cake board. In this picture, the cake is placed on a large cake board with Pillsbury Pumpkin Sugar Cookies scattered around for added decoration. Ice the cake with your green buttercream icing.


Step 2

Using a toothpick, outline the vampire's hair. Next, using tip #5 and black buttercream icing, pipe the outline of the hair and fill in with tight lines.


***Decorator's Tip*** To smooth out the striped effect you get from filling in an outline using a piping bag, simply put a little cornstarch on your finger and gently pat it flat. Most of the cornstarch will fade into the icing but the excess can be brushed away with a decorating brush.


Publish Post

Step 3

Using tip # 5 and yellow icing, pipe the eyes on the cake. Add the pupils using the extra black icing.


Step 4

Using tip # 5 and green icing, pipe the nose. Next, add the mouth and eyebrows with the left over black icing and the teeth (tip #5) with white icing.
Read more »

In Labels: , , , , , , , , , , , on .

Photobucket

I made this Winnie-the-Pooh cake for my son's first birthday. It was very easy to make but I cannot take credit for this one. I purchased a cake kit complete with instructions, toppers, and even toys for my son. Below is a link to purchase the kit if you are interested in this cake. If you are looking for an easy kit similar to this one, check out the cake kit category at my online shop. There are kits for all ages from Sesame Street to Sports to Hannah Montana. However, not all of these kits will come with instructions. Look under our site's banner on how to order a Custom Cake Guide.


Read more »

In Labels: , , , , , , , , , , , , , , , , on .

There are many different fondant recipes out there but this one is my favorite. It is not overly sweet and easy to work with. The best part about marshmallow fondant is that if it starts to become difficult to work with you just need to pop it into the microwave for a few seconds and it will regain it's elasticity; not to mention it is VERY easy to make.
To make this recipe you will need...
16 oz white mini marshmallows
2 tbs water
2 lbs powdered sugar (approx. 8 cups) (YOU WILL NOT NEED ALL OF THE SUGAR)


Directions:
1. Melt marshmallows and water in a double boiler or microwave. Heat until melted.
2. Place half of the sugar in a bowl. Make a well in the middle. Pour melted marshmallow in and mix.
3. Add remaining sugar and continue kneading. (add more powdered sugar in tablespoons as you are kneading. Mixture should not be sticky)
**Decorator's Tip** Spray your hands with cooking spray to prevent the mixture from sticking to you.
4. Wrap in plastic wrap and place in an airtight container overnight. The next day it will be stiff. To loosen it up, place the fondant in the microwave for 5 second intervals.
Read more »

In Labels: , , , , , , on .