Solution Graphics

Foodbuzz
Ask an Expert - Visit my Virtual Office at LivePerson
Showing posts with label guide. Show all posts


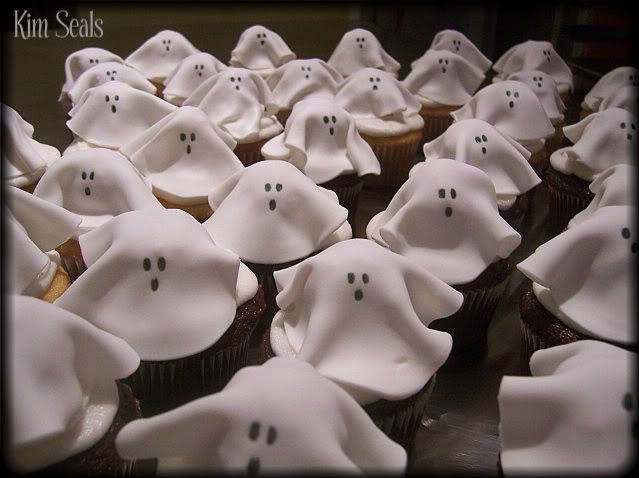
Here is an extremely easy but very cute cupcake idea for any of your child's parties this Halloween.  Make it even more fun and decorate with your son or daughter!  I made these with my son and he was so proud to share these with his class.

Supplies

Cupcakes
Buttercream Icing
Doughnut Holes (Munchkins)
White Fondant
Black Edible Ink Marker


Directions

Step 1


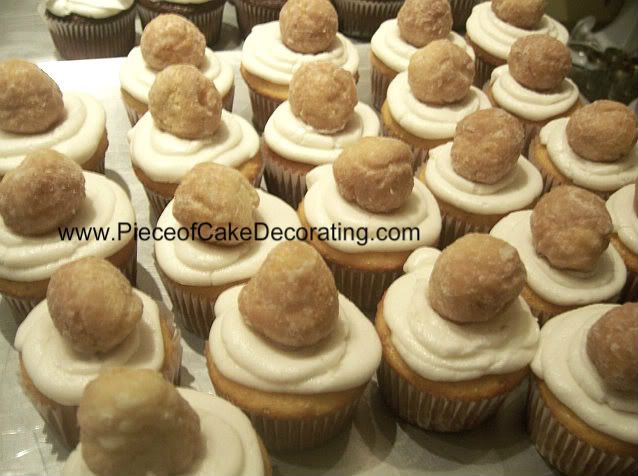
Bake your cupcakes and ice them any way you wish.  I used a large round tip and made a swirl design in case you were able to see the icing under the ghost.  Next, place a doughnut hole on each cupcake.

Step 2


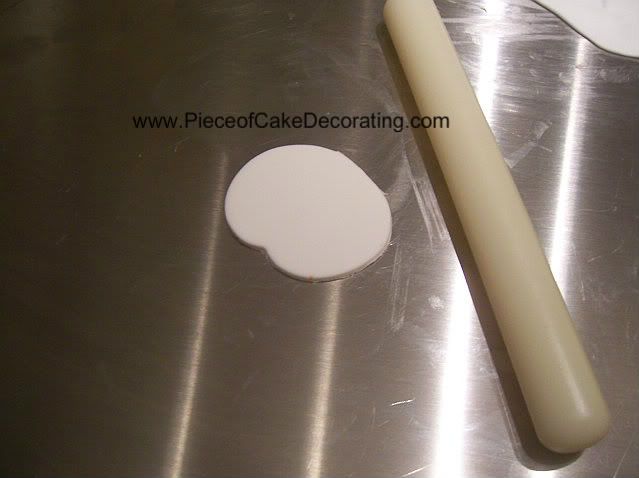
Roll out your fondant and cut out a large circle.  I didn't have a circle large enough so I used my pumpkin cutter and cut off the stem.  It doesn't really matter.  It is the size you want, not the shape.  Then, roll the "circle" out thin enough and large enough to fit over the doughnut hole.  Just make sure it isn't so thin that you see the doughnut underneath.

Step 3

Place your rolled out "circle" on top of your doughnut hole and use the black edible ink marker to draw a ghost face.

That's it!
Read more »

In Labels: , , , , , on .


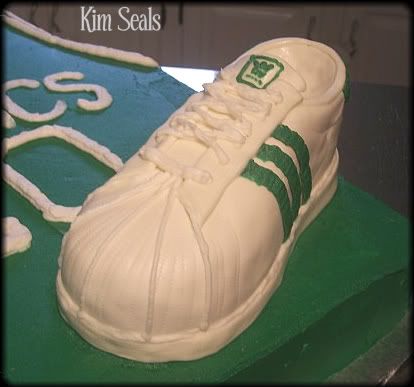
In this guide you will learn how to make a cake look like an Adidas shoe however, you are not limited to this type of shoe.  By learning the general techniques used, you can apply them to any style sneaker or shoe you like.

To make this cake you will need...

2 cakes from a small oval cake pan
cardboard cake board shaped like a shoe
1 batch of buttercream icing (white and green)
1/2 batch of  marshmallow fondant
gumpaste quilting tool
pizza cutter
decorator's brush & water
tips #1, #2, #3, and #102


Directions:

Step 1

Use a template to cut your cardboard cake board in the shape of a shoe.


To use this picture as a template, follow these steps.
1. Right click on the picture and select "copy image."
2. Open Paint or Microsoft Word on your computer and paste it on the page.  You can do this by clicking on your work area with the mouse and then pressing CTRL-V.  You can also choose the "paste" option under the "edit" tab at the top.
3.  Re-size your photo to suite your needs.


Step 2

1 day in advance, level, tort, and fill your cakes.  Once you are finished, use your shoe shaped cake board to cut a shoe shape.

***Important*** You must now freeze your cake.  You might be able to get away with a few hours of freezing but for best results, I recommend freezing over night.  This will give you more control when you carve your cake in the next step.

Step 3

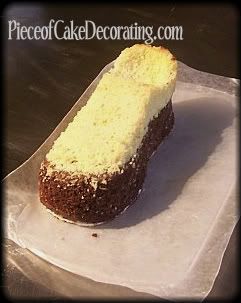
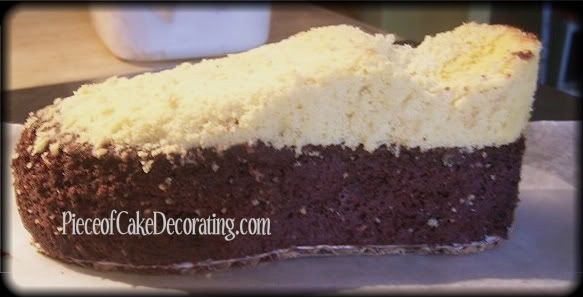
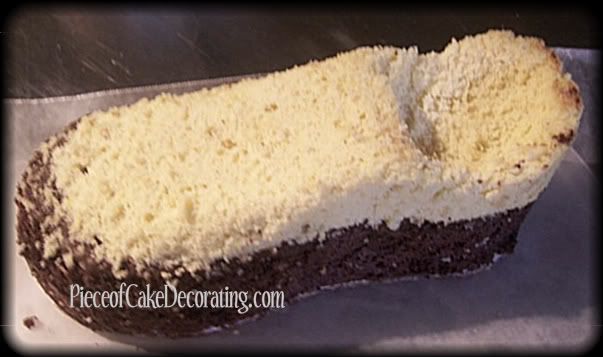
You are now ready to carve your cake.  This shoe has a gradual slope from the top of the shoe to the toe.  To get the right proportions, I started at the toe.  Once I was happy with the shape and thickness, I gradually carved up.  By taking a little off at a time I gave myself more control and lessened the risk of taking off too much cake.

Step 4

Once I was happy with the slope of the shoe I rounded off the edges.  Then, using a small spoon, I scooped out a circle to help give the appearance that the shoe was empty.  Here are a few pictures to help give you visualize the shape you are going for.


Step 5

If you are finding that your cake is very delicate you may want to freeze it again for at least a few hours otherwise you are ready to ice your cake.

Step 6

Cover your cake with fondant.  Be careful with the top of the shoe, it may tear.

Step 7

You are ready to work on the details.  Here is the first picture again so you don't have to scroll up and down.


For best results, complete the details in this order.  Unless otherwise stated, all cutting was done with a pizza cutter and attached with a decorator's brush and water..

  1.  Roll out your fondant and cut a small strip to go around the top of the shoe.
  2. Roll out your fondant and cut out the tongue.  I drew the shape on a piece of paper first to make sure I got the right size, then I used it as a template and cut the shape out with an Exact-o Knife.  Use a small ball of napkin to hold the tongue up until it firms up in the fridge.
  3. Cut two strips to run down the slope of the shoe.  The end of each strip should be cut on opposite angles as in the picture.  After attaching it to the cake, make 6 small holes on each strip for the laces.
  4. Roll out your fondant again and cut a very long strip to go around the bottom of the shoe.
  5. Using the gumpaste quilting tool, add the stitching details to the shoe.  This included the ridges on the toe of the shoe.
  6. With tip #102 and dark green icing, pipe the stripes on the sides of the shoe.
  7. With tip #1 and dark green icing, pipe the Adidas symbol on the tongue of the shoe.
  8. Using tip #2 and dark green icing, pipe the green details on the back of the shoe (sorry I don't have a picture)
  9. Using tip #1 and white icing, pipe the Adidas symbol on the green details you just added.
  10. Using tip #3, pipe your laces.

That should do it.  Another option is to use fondant for the all of the details.  I chose to use buttercream because I feel I work faster with it.  A third option is to use royal icing.  Once your details harden, you won't risk smudging your work.

If you found this tutorial helpful and want to share your cake with us, e-mail a picture to photos@pieceofcakedecorating.com.
    Read more »

    In Labels: , , on .


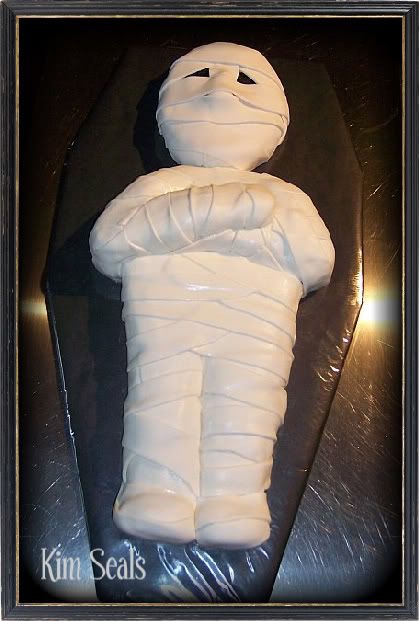
    My passion for cake decorating started with a simple Halloween Jack-o-Lantern cake for a friends costume party so I always get excited when this time of year rolls around.  This mummy cake was made for last year's party and it was a huge hit.

    In this guide you will learn how to carve a cake to look like a mummy as well as how to wrap your mummy cake with fondant strips.

    To make this cake you will need...

    Foam-Core board
    Wilton Fanci-Foil or black wrapping paper and clear cellophane
    1 oval cake
    1 13x9 cake
    1-2 mini wonder mold cakes
    2 batches of buttercream icing
    3 batches of fondant
    Wilton's Fondant Ribbon Cutter (optional)
    black buttercream icing
    any round tip


    Directions:

    Step 1

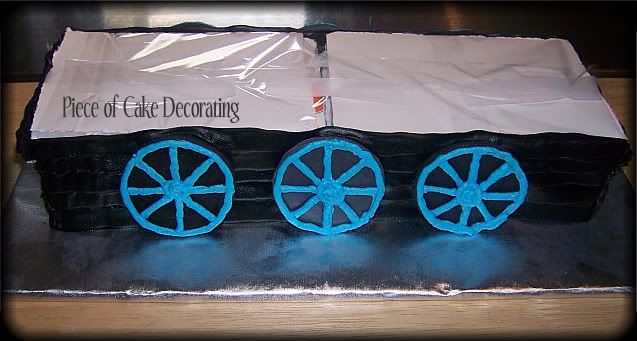
    Cut a piece of Foam-Core in the shape of a coffin to create your cake board.  Then, either cover it with Wilton Fanci Foil or black wrapping paper.   If you use black wrapping paper you will then need to cover the board again with clear cellophane.

    Step 2

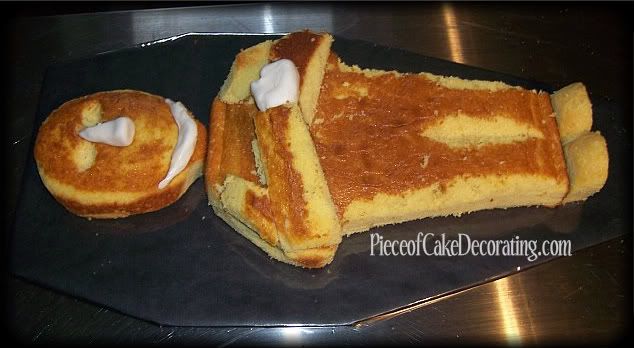
    There is no need to level, tort, and fill any of these cakes.  In fact, you will make your job easier if you don't.  So, your next step is to cut the 13x9 cake into the shape of the body.

    ***Decorator's Tip*** A paper template will help make sure your body is symmetrical and make carving so much easier.

    As you can see from this picture, I rounded the edges a bit, cut a slit for the legs and used the extra pieces to shape the arms and shoulders. (Don't worry about the hands just yet.)

    ***Decorator's Tip*** Cut your cake frozen to reduce the amount of crumbs and get more control over the amount of cake you are carving off. 

    Next, round off the edges of the oval cake to create the head and trim some cake off one end to make a neck. (Don't worry about the nose and chin just yet.)  Then, using a small spoon, scoop out indents for the eye sockets.  Depending how your cake baked, you may need to carve off a little cake to create cheek bones.  I did not have to here.

    Finally, depending on the size of your legs, cut a mini wonder mold cake in half and trim a bit off the edges to create the feet.  If your legs come out larger than mine, you may need to use 2 mini cakes (1 per foot) to keep things proportional.


    Step 3

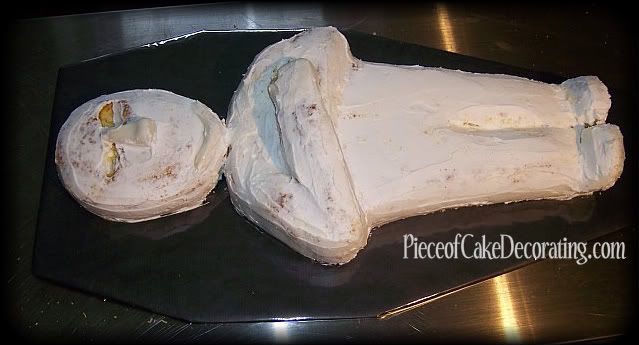
    Using the picture above as a guide and your carved cakes for proportions, make a nose, chin, and hand out of fondant or gumpaste and attach it to the face with a small amount of buttercream.


    Step 4


    Cover your entire cake and fondant features with buttercream icing.  Then, fill in the eyes with black icing and a round tip.


    Step 5

    Roll out your fondant between 1/8 and 1/4 inch thickness and cut into long strips.  Wilton's Fondant Ribbon Cutter will make this job very easy.


    Step 6

    Wrap the mummy with your strips of fondant making sure not to leave any cake showing.  Tuck the edges of your fondant strips under the cake with a gumpaste tool, decorator's brush, or fork.

    ***Decorator's Tip*** To help accent the slit cut for the legs, wrap each leg individually with shorter strips.


    Reader photos using this guide...

      Jacob


    Lucy
    Read more »

    In Labels: , , , on .


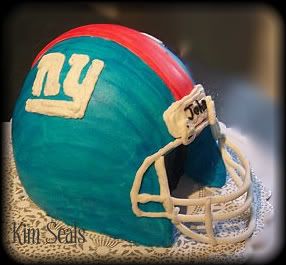
    What better way to celebrate opening day of football than with an NFL helmet cake?  In this guide you will learn how to carve and decorate a cake to look like a helmet.

    This was my first attempt at making a helmet cake so you will find sections written in red.  These sections will note changes I plan to make the next time around.  Sometimes showing you my mistakes can be more helpful than just giving you a "perfect" cake so I wanted to make sure to include them.

    To make this cake you will need...

    1/2 Ball cake (6-8 inches in diameter depending on the size of your cake)
    6 or 8 inch round cake, 2 layers (size should be equal to the diameter of your 1/2 ball cake)
    10 inch round cake board
    buttercream icing
    fondant tinted the colors of your football team (you can also airbrush or hand paint the cake if needed)
    black tinted fondant or black edible paint
    decorator's brushes
    white gumpaste
    tube of black icing (optional)
    tips #2 (optional) and #3 (optional)


    Directions:


    Step 1


    A few days in advance, make your gumpaste mask.  To do this, I rolled out long pieces of gumpaste and dried them on a large pitcher built up with napkins.  I used wax paper for easy removal and a template to help make the shape.   

    I am not completely happy with the end result of this mask.  I am still looking for a new method and would love to hear your ideas in my comment section.  


    Step 2

    Level, tort and fill the round cakes.  You should also level off the 1/2 ball cake and  then stack all three with the round cakes on the bottom and the 1/2 ball cake on top.

    Step 3

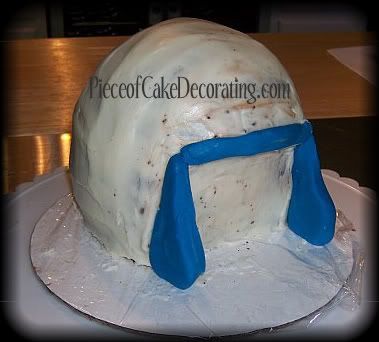
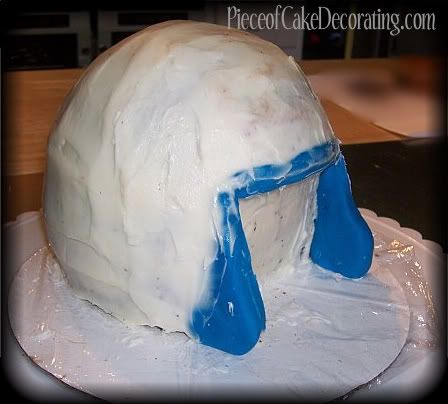
    Using the pictures below as a guide, carve out the section of the mask for the face and round off the back. 


    Next time I carve this cake I will round off the bottom front edge a little more.  If you look at the completed cake, it looks a little too flat.

    ***Decorator's Tip*** Remember that when carving, it is always best to work with a frozen cake and take a little off at a time.  You can always take more off but can't put any back on!

    Step 4

    Ice the entire cake with buttercream icing.


    Step 5


    Using fondant, any color, make the front pieces of the mask and build out the top a bit more to make the final helmet feel empty.
     
    Just like the carving, the side pieces of fondant should be curved up a bit more than I have here.


    Then, add a little more buttercream icing to the seams so your helmet is smooth when covered in fondant. 


    Step 6

    Cover your cake in fondant and add a stripe down the back if necessary.  To make the stripe stick, use a decorator's brush and apply a small amount of water down the center of the helmet.


    Step 7


    Either pipe on your team's logo with tip #3 or cut it out of fondant and place it on the cake.  I have piped the NY Giants logo on the helmet using a template.  Click here for more information on piping with a template.


    Step 8


    Paint the fondant "inside" the helmet black.  You could also use black tinted fondant.  Place your gumpaste face mask on the front of the cake and pipe on the details using tip #3.

    ***Decorator's Tip*** Personalize the cake by adding a name to the front mask plate.  Here I have used a tube of black icing and tip #2 


    Happy Decorating!

    If you found this guide helpful, I would love to see your finished product.  You can e-mail your pictures to photos@pieceofcakedecorating.com and I will share them with my readers!
    Read more »

    In Labels: , , , , on .


    I have told you in the past about a great Thomas the Tank Engine tutorial and a few weeks ago I had a chance to try it.  Thomas is a bit overwhelming when it comes to the amount of detail he requires so next time there will be a few things I do differently and I now realize I over looked.  One being that the red base should stick out further than the rest of the train.  Wendy's tutorial is amazing and it especially helped when I was making Thomas' face.  She taught me techniques that I will use in future projects.  I really love her tip about piping the icing onto the cake.  It really does give you so much more control.

    That being said, there are a few things I did differently and made the process a little bit easier for me.

    1. I made the base using blocks and foam core.  By raising Thomas up onto a stand, it made the cake look more like the toy.  Next time I will make the base bigger and use a Styrofoam block.  The outside of the base was covered with black icing to make it look like part of the cake and the wheels were stuck to the sides.  It is also important to note that Thomas was glued down and two dowels were used for extra support through his largest section.
    2. After the cakes cooled, I leveled, stacked, and filled my cakes.  I froze them that way to save time later.
    3. To help me carve the section for Thomas' face, I created the front platform and placed his face into position.  I then took my piping bag and traced around his face with icing.  When the face was removed, I was left with an outline to help me get the correct size, shape and position. (Sorry I didn't take a picture)
    4. I also baked extra cake in case I didn't have enough to get the right shape.  I am very glad I did this because I definitely needed it.

    Things I will do different next time....

    1. I will scale down the size.  He was way too big for me.  I would rather put him on top of another cake that looked liked railroad tracks then make something this big.  He felt like he was going to fall over!
    2. The red base will stick out further than the rest of him.
    3. The base will be made out of Styrofoam and the board that Thomas is sitting on will be foam core.

    Thank you Wendy for all of the hard work you put into your tutorial.
    Read more »

    In Labels: , , on .


    Are you looking for a cake idea that is simple and sentimental?  This just might be what you are looking for.

     
    As you can see in this picture, my boys are using edible markers (purchased from my craft store) to draw a picture for their Pop on edible icing sheets.  When they were done, I used my cake pan to trace a circle around the best section of their artwork and cut it out using scissors.  Then, I iced my cake and put the picture on top.  To clean up any rough edges, I piped around the top and bottom of the cake.  The end result was a simple cake that came from the heart.

    ***Decorator's Tip*** The icing under the image should be white so the colors of your picture are not altered.

    Click to purchase your 'Kids Decorate!' kit from my sister site, www.KimsCake.com.
    Read more »

    In Labels: , , , , , , on .


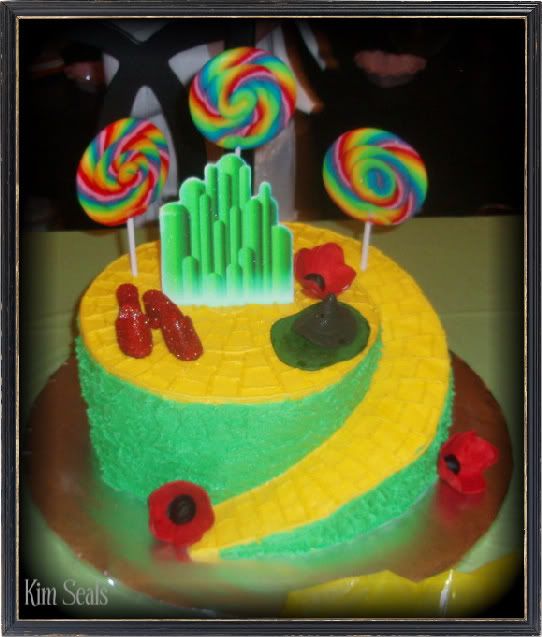
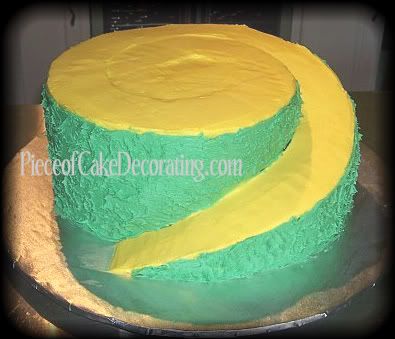
    Here is another take on a Wizard of Oz cake.  In this guide you will learn how to carve a spiraling yellow brick road into a 10 inch round cake. 

    To make this cake you will need....

    two 10 inch round cakes
    8 inch round cake divider
    12 inch cake board
    yellow and green buttercream icing
    tips # 789 and #2
    3 lollipops
    gumpaste ruby slippers
    gumpaste melted witch
    3 gumpaste poppies
    small Emerald City sugar plaque

    Directions:

    Step 1

    A few days in advance, make the gumpaste decorations listed above.  These helpful tutorials will help you...

    How to Make Edible Image Sugar Plaques
    How to Make Gumpaste Ruby Slippers


    Step 2

    Level, tort and fill your 10 inch round cake then place it on your cake board.  Freeze your cake for a few hours or overnight.

    ***Decorator's Tip***  Freezing is not necessary but it will help reduce the crumbs when it is time to carve.


    Step 3

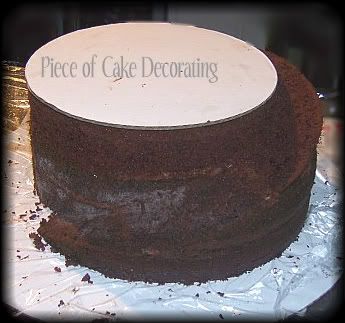
    Using your 8 inch cake divider as a guide, carve your path down the side of the cake.


    Step 4


    Ice the sides of your cake with the green buttercream icing then take your spatula and tap it around the icing to create the grass effect.

    Next, using tip #789 and yellow buttercream icing, pipe the yellow brick road onto your cake.  This will give you the spiral shape you are looking for.  With tip #2 and yellow buttercream icing, pipe the bricks onto your road.


    Step 5

    Place your gumpaste decorations onto the cake and enjoy!
    Read more »

    In Labels: , , , on .


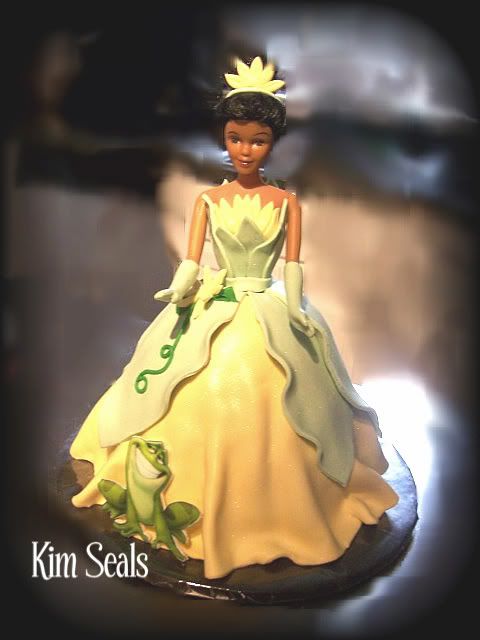
    In this guide you will be given step-by-step instructions on how to make Tiana from Disney's 'The Princess and the Frog.'  Specifically, you will see how to lay the fondant to look like a dress.

    To make this cake you will need...

    1 covered, 10 inch cake board
    Wilton Wonder Mold Pan or Pampered Chef's 4 cup, glass     measuring cup
    large Wilton, Ethnic Doll Pick
    buttercup yellow and sage green fondant
    1 batch of buttercream icing
    1/4 cup dark green buttercream icing or a tube of pre-made green icing
    edible image plaque of the frog
    small and medium daisy cutters
    tips #2 and #67


    Directions:

    Step 1

    A few days in advance, cover your cake board and make your edible image plaque of the frog.  Because it is a trademarked image, I cannot sell these plaques but if you have an edible printer, you can read my Sugar Plaque Tutorial and make your own.


    Step 2

    Bake your cake according to the pan's instructions.  Place the cake in the center of your cake board and ice with buttercream icing.


     Step 3

    Cover your cake with the buttercup yellow fondant.  Make sure to bunch it at the bottom as I have here to give the appearance of a flowing skirt.


    Step 4


    Roll out the sage green fondant and cut out 5-6 large petal shaped pieces.  To make a petal template, draw your shape on a piece of paper, cut it out and place it on the fondant to cut your shapes with an Exact-o Knife or pizza cutter.


    Notice in the pictures how the petals are arranged.  They are attached using a little bit of water.  Pieces of napkin where used to prop up parts of the dress until the fondant set.


    Step 5

    Dress your doll pick.  The first thing that should be done when dressing your doll is make the gloves.  This takes a bit of patience.  Roll out a thin piece of sage green fondant and wrap it around one of the hands and lower arm.  Flatten the fondant the best you can without tearing a hole.  Using scissors, cut around the finger tips.  To give the appearance of fingers, make indents between each finger using a toothpick.  Repeat on the other hand.

    If you look at the original picture you will notice that the yellow part of her dress, covering her bust, looks like daisy petals.  Roll out the buttercup yellow fondant and cut out 3 medium and 2 small daisies using your daisy cutters.  Cut one of the small daisies in half for the tiara and use the remaining small petal to decorate her dress in the last step.  The medium flowers are used to cover Tiana's bust line.  They can be attached with a little bit of water.

    ***Decorator's Tip***  Let the tiara petals sit in a slightly curved position until you are done decorating so that the fondant can dry a little.

    Next, using the same method for making large petal shapes in step 4, make 5 medium and 3 small petal shapes for the rest of her dress.  Use the pictures below to help you with placement.  They can also be attached using a bit of water.

    **Please note that even though the pictures show the doll pick in the cake, I do not insert it until the next step.  It may not make a difference but it was easier for me to do it this way.**


    Step 6

    Stick your doll pick into the cake.  Cut a small strip of green fondant to make a belt and cover he transition between the cake and doll pick.

    Step 7

    Make the tiara by rolling out a small snake of sage green fondant to resemble a headband.  Place the headband on the doll's head and attach the 1/2 daisy using a small amount of water.

    Step 8

    Pipe the curly stem and leaves on the dress using tips # 2 and #67 respectively.  Attach the flower using a dot of green icing.  Finally, secure the frog plaque in place using a small amount of green icing.


    ***Decorator's Tip*** To make the dress pop, dust it with pearl luster dust.


    Reader photos using this guide...

    Sallie
    Read more »

    In Labels: , , , , , on .


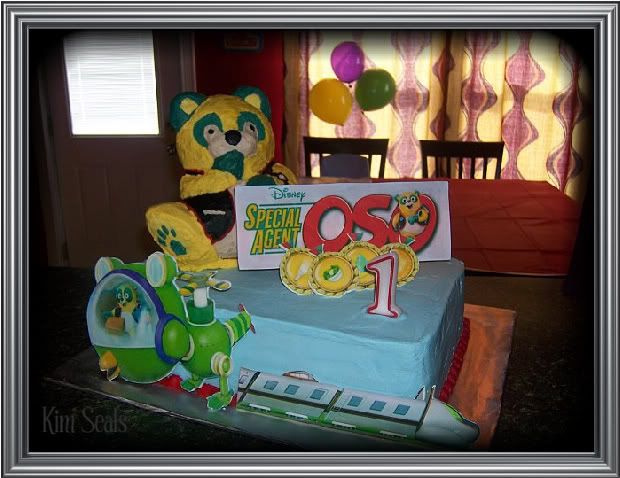
    I made this cake for my son's 1st birthday.  He just loves Special Agent Oso, making this cake a big hit.  In this guide you will learn how to decorate Wilton's Bear Pan to look like Oso.  All other decorations are sugar plaques and can be made using my Sugar Plaque Tutorial.

    To make this cake you will need...


    large cake board
    1/2 sheet cake
    Wilton Bear Pan cake
    Sugar Plaques - sign, 4 Digi Medals, Whirly Bird, Rapi (train)
    wooden dowels
    cardboard cake divider
    Saran Wrap
    blue, yellow, blue-green, black, tan, and red buttercream icing
    tips #5 (x 4), #32 and #102


    Directions:

    Step 1

    A few days in advance make your sugar plaques.


    Step 2

    Level, tort and fill your 1/2 sheet cake and place it on the cake board.  Then, ice your 1/2 sheet cake with blue buttercream icing.


    Step 3

    Cut your cardboard cake divider to the shape of the bear's bottom and cover it in Saran Wrap.


    Step 4

    Decide where you want the bear to sit and place your dowels, cut to size, into the cake for support.  I chose the back left corner.  Then, hammer a sharpened dowel down the center of the bear and slightly into your cake board.  This will keep the bear from falling off.


    Step 5


    Using tip #5 for each, pipe horizontal lines to fill in the stomach, nose, eyes, ears, hands, and vest...in that order.  After each section is finished take time to smooth out the icing.  The best way to do this is to put a little powdered sugar on your finger and pat it flat.
    ***Decorator's Tip*** If you look at Oso's nose you will see a little powdered sugar left behind.  I was not worried about this because by the time I finished decorating the cake, it melted into the icing.  If for some reason it does not, put a little water on a decorator's brush and touch the sugar with the brush (do not rub) and it will disappear.


    Step 6

    Using a spatula, cover the rest of the bear with yellow buttercream icing.  You can smooth any lumpy areas with your finger and powdered sugar as mentioned above but it does not need to be perfect because Oso is meant to look furry.


    ***Decorator's Tip*** Use a tapered spatula for those hard to reach spots.


    Step 7

    Pipe a boarder around the 1/2 sheet cake using red buttercream icing and tip #32.


    Step 8

    Place your sugar plaques on your cake.
    Read more »

    In Labels: , , , , , on .

    Photobucket
    There are 2 ways to make this cake. Novice directions which use a car cake pan are also available. There, I will discuss how to recreate this 3D car cake with step-by-step instructions and decorating tips. Below, however,  the "experienced" instructions which will guide you through the carving process.


    To make the "experienced" cake you will need...

    Two 14x11 cakes
    Two 13x9 cakes
    One 9x9 cake
    4 wooden dowels
    Large rectangular cake board
    Tips # 2, 3 and 5
    Red and black fondant
    Red gumpaste
    Thick Wire
    Tan, white, orange, yellow, and black buttercream icing
    Blue tinted piping gel
    Crushed graham crackers
    Rice Krispie Treats
    Plastic cacti


    Another item that will help decorate this cake is an air brush. You will be able to cover the car in white fondant then airbrush it red. It will save you a great deal of time.


    Directions for the "experienced" cake:


    Step 1

    A few days in advance, make the spoiler out of red gumpaste and place 4 thick wires
    into the spoiler as it dries (the longer the better). These wires will hold the spoiler on the
    cake.

    The size of your spoiler will depend on the size of your cake.  Mine was roughly 7 inches long and 2 inches high.

    Step 2


    The easiest way to make this cake is to start with the car.  Bake, fill, and stack the 2 13x9 cakes.  Also bake the 9x9 cake and put these cakes in the freezer for 1 day.  Take a large cardboard cake board and cut it to the general shape of the car like the image below.


    Step 3

    Once the cakes are frozen, use the cut cake board as a guide to carve the shape of the car.  Once you have the general shape, place the cake on the cut cake board and add the curves on the hood, trunk, and doors.  The trick here is to take it slow and look at the car from all angles.  Remember, you can always take off a little more but you can’t put the cake back on once you cut it.

    Below are some drawings to help you visualize the shape of the car.  The top 2 photos are of the car's body.  It is made from the two 9x13 cakes and I have drawn a side view of the car.  In the bottom drawing, you can see that the hood is carved from a single layer 9x9 cake and is a rounded triangle shape.  Do not carve the hood until you have read step 4.


    Step 4

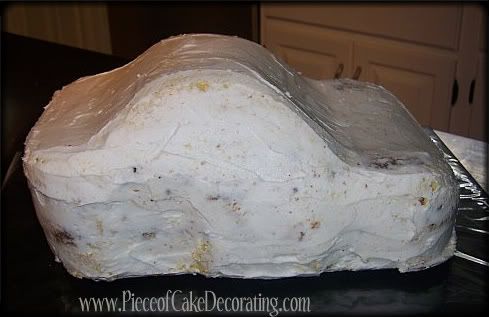
    When you are happy with the shape of the car and you have scooped out the wheel wells, it will be time to start the hood.  To do this, measure and cut the square cake to size.  When you are sure it will fit, place the cake on top of the car’s body and cut it to shape.  Your final carved cake should look something like this...

    Ice with buttercream icing and cover the cake with fondant.


    You can either cover the cake with red fondant or cover the cake with white fondant and airbrush the whole cake red.


    Step 5

    Use the white buttercream and tip #3 or 5 to pipe on the windows. 

    ****Decorator’s Tip**** Use a toothpick to outline all of the windows and the lightning bolt onto the car.


    Step 6

    Outline all of the windows with the black icing and tip # 2.


    Step 7

    Repeat the above two steps to pipe on the large lighting bolts, head lights, tail lights, and the large number on top, using yellow and orange or white buttercream (colors will depend on what you are piping).

    ***All of these details were done freehand but you can make a mini template to ensure unity.***


    Step 8

    With tip #2 and black icing, pipe numbers on the sides of the car as well as the passenger side headlight and tail light.


    Step 9

    With tip #2 and yellow icing, pipe the child’s name to resemble the Rusteeze logo.


    Step 10

    With tip #2 and blue piping gel pipe on eyes. Be careful, as the piping gel will run if you use too much. Finally, add the pupil on the eyes with a small black dot.


    Step 11

    The only part that is left of the car is to make the wheels. To do this, cut circles out of Rice Krispie Treats and cover with black fondant. I now make my wheels by attaching two black gumpaste circles together with gumglue.  With a gumpaste tool or any straight edge you can add tread marks. As an added bonus, the circle cutter you use to make the wheels acts as a template for the size of your wheel well.

    Add a red circle to the center of the wheel and pipe the word Lightyear onto the wheels. Once the car is sitting on the bottom cake you can place the wheels onto the cake.

    ***Decorator's Tip***

    If you are placing your car cake on a cake board instead of a cake, you can build up the cake board with covered pieces of foam to make the car appear to sit on its wheels.


    Step 12

    Finally, bake, level and fill the 2 14x11 cakes. Place onto the large rectangular cake board and cover with tan icing. Next, sprinkle the crushed graham crackers on top to look like sand. Place 4 dowels into the cake to support the car. The placement of the dowels will depend on the placement of the car. Just be sure to use 2 dowels for the front of the car and two for the back.


    Step 13

    Place the wheels and spoiler onto the car and put the cacti onto the large cake.

    ****Decorator’s Tip**** If you are having trouble getting the spoiler to stay up you can take 4 lollipop sticks and place them behind the spoiler for support. Cover these sticks with black or gray buttercream. If you look at the original Lightning McQueen, you will see he has something similar on the back of his spoiler.


    Reader photos using this guide...

    Kym from Holland

    Kym from Holland

     Sallie

    Read more »

    In Labels: , , , , , , , on .