


Pin It now!
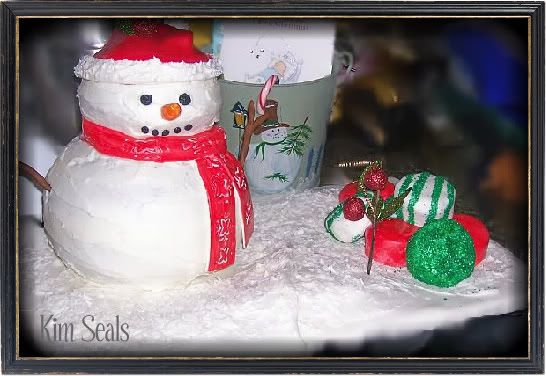
This cute snowman is one of my favorite holiday/winter cakes. In this guide you will learn how to make a snowman completely out of cake. I will also cover how to make his gumpaste Christmas hat and scarf. If you have the right cake pans, it is very easy to make.
To make this cake you will need...
Betty Crocker Bake 'n Fill Cake Pan (or a large and small Wilton Ball Pan)
2 large half ball cakes and 2 small ball inserts (when you read the directions, this will make sense)
7-8 cupcakes
large rectangular cake board or foam board
plastic shopping bags
small dowel or lollipop stick
1 large sharpened dowel
plastic wrap
tip #5
fondant icing
gumpaste (brown and orange)
white buttercream icing
1 tube of pre-made black icing
coconut shavings
Directions
Step 1
A few days in advance make the brown stick arms and orange nose out of gumpaste. Before the nose dries be sure to stick a small dowel or lollipop stick in the back.
***Decorator's Tip*** You can use colored gumpaste to make these pieces or use white gumpaste and airbrush the color on.
Step 2
To make the hills on the cake board, crumble up the plastic bags and tape them down on the cake board. Then cover the entire board with plastic wrap and ice with white buttercream icing. Finally, sprinkle the coconut shavings around the board to give the effect of fallen snow.
***Decorator's Tip*** Be sure to leave the area where the snowman will sit completely flat. If he is tilting just a little he could fall over.
Step 3
Bake 2 half ball cakes and 2 small half ball inserts. With the Betty Crocker Pan you have a small ball baking inside a large ball. The small ball is supposed to act as a filler for the large ball and it is baked this way so that all of the cake cooks evenly.
You will need to use the small inserts for the body so that the cake has proper support. The 2 extra inserts you bake will become the head of the snowman.
Step 4
Place all of the ball halves together to make 1 large and 1 small ball and ice with white buttercream icing.
The easiest way to ice a ball cake is to ice the bottom first, place it on the board, then ice the top. Follow these steps for both the large and small cakes. Once the cakes are iced and stacked, immediately hammer a sharpened dowel through the center of the snowman.
***Decorator's Tip*** For added support, trim off a small amount of cake from the top of the large ball and the bottom of the small ball. Also try to slightly hammer the dowel into the cake board.
Step 5
Decorate the snowman.
To make the scarf, roll out red fondant and cut a long rectangle and two small rectangles. These smaller rectangles will be the small hanging pieces of the scarf and should be placed on first. Pleat one end of the small rectangles and place them off to one side of the snowman. Next, take the long rectangle piece and wrap it around the neck of the snowman. Make sure to leave the seam in the back.
***Decorator's tip*** The imprints on the cake were made using the fondant decorative punch set like the one below but do not press all the way through the fondant.
To make the hat, roll out red fondant and cut a large semi-circle. Fold the semi-circle to make a cone shape and place it on the snowman's head. To make the fluffy white rim, ice with buttercream icing then, lightly press your spatula into the icing and pull away. You can also add a ball to the tip of your hat with buttercream icing.
To make the face, pipe on the eyes and mouth using the black tube of icing and tip #5. Finally, add the nose and arms to the cake.
Step 5
Make the presents.
Ice the cupcakes and cover them in fondant. To decorate you can cover them in colored fondant or airbrush white fondant to the desired color.
To get the stripes on my presents I brushed stripes of water onto the fondant and rolled them in green decorating sugar.
Finally, stack the presents to your liking.
____________________________________________________________________________________________


No Responses to "How to Make a Snowman Cake"
Leave a Reply
We would love to hear what you think.