


Pin It now!
3D Wilton Cruiser Pan
Large rectangular cake board
Tips # 2, 3 and 5
Red and black fondant
Red gumpaste
Thick Wire
Tan, white, orange, yellow, and black buttercream icing
Blue tinted piping gel
Crushed graham crackers
Rice Krispie Treats
Plastic cacti
Another item that will help decorate this cake is an airbrush. You will be able to cover the car in white fondant then airbrush it red. It will save you a great deal of time.
Directions for the "novice" cake:
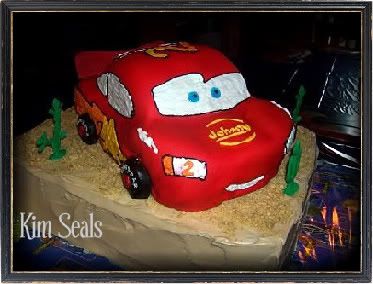
****Please keep in mind that by using the cake mold listed above, your cake may not look exactly like Lightning McQueen because, while this mold gives you a car shape, it is not his exact shape.****
Step 1
A few days in advance, make the spoiler out of red gumpaste and place 4 thick wires
into the spoiler as it dries (the longer the better). These wires will hold the spoiler on the
cake.
Step 2
Bake the 3D Cruiser cake and freeze. To get the cake to look more like Lightning McQueen, you will need to trim cake off the top and possibly the hood to give it more of a curve.
Step 3
Once you are happy with the shape of the cake, ice the entire car with buttercream icing.
Step 4
Cover the cake with fondant. You can either cover the cake with red fondant or cover the cake with white fondant and airbrush the whole cake red.
Step 5
Use the white buttercream and tip #3 or 5 to pipe on the windows.
****Decorator’s Tip**** Use a toothpick to outline all of the windows and the lightning bolt onto the car.
Step 6
Outline all of the windows with the black icing and tip # 2.
Step 7
Repeat the above two steps to pipe on the large lighting bolts, head lights, tail lights, and the large number on top, using yellow and orange or white buttercream (colors will depend on what you are piping).
Step 8
With tip #2 and black icing, pipe numbers on the sides of the car as well as the passenger side headlight and tail light.
Step 9
With tip #2 and yellow icing, pipe the child’s name to resemble the Rusteeze logo.
Step 10
With tip #2 and blue piping gel pipe on eyes. Be careful, as the piping gel will run if you use too much. Finally, add the pupil on the eyes with a small black dot.
Step 11
The only part that is left of the car is to make the wheels. To do this, cut circles out of Rice Krispie Treats and cover with black fondant. You can also cover with white fondant and airbrush them black. Add a red circle to the center of the wheel and pipe the word Lightyear onto the wheels. Once the car is sitting on the bottom cake you can place the wheels onto the cake. The exact size of the wheels will vary depending on the size of your wheel well. My wheels fit so snugly that I was able to place them into the well and they did not fall.
Step 12
Finally, bake, level and fill the 2 14x11 cakes. Place onto the large rectangular cake board and cover with tan icing. Next, sprinkle the crushed graham crackers on top to look like sand. Place 4 dowels into the cake to support the car. The placement of the dowels will depend on the placement of the car. Just be sure to use 2 dowels for the front of the car and two for the back.
Step 13
Place the wheels and spoiler onto the car and put the cacti onto the large cake.
****Decorator’s Tip**** If you are having trouble getting the spoiler to stay up you can take 4 lollipop sticks and place them behind the spoiler for support. Cover these sticks with black or gray buttercream. If you look at the original Lightning McQueen, you will see he has something similar on the back of his spoiler.

There are 2 ways to make this cake. Below you will find my "novice" instructions, which uses a car shaped cake pan. If you are looking to carve your Lightning McQueen cake, "experienced" instructions are also available here.
To make the "novice" cake you will need...
To make the "novice" cake you will need...
3D Wilton Cruiser Pan
Large rectangular cake board
Tips # 2, 3 and 5
Red and black fondant
Red gumpaste
Thick Wire
Tan, white, orange, yellow, and black buttercream icing
Blue tinted piping gel
Crushed graham crackers
Rice Krispie Treats
Plastic cacti
Another item that will help decorate this cake is an airbrush. You will be able to cover the car in white fondant then airbrush it red. It will save you a great deal of time.
Directions for the "novice" cake:
****Please keep in mind that by using the cake mold listed above, your cake may not look exactly like Lightning McQueen because, while this mold gives you a car shape, it is not his exact shape.****
Step 1
A few days in advance, make the spoiler out of red gumpaste and place 4 thick wires
into the spoiler as it dries (the longer the better). These wires will hold the spoiler on the
cake.
Step 2
Bake the 3D Cruiser cake and freeze. To get the cake to look more like Lightning McQueen, you will need to trim cake off the top and possibly the hood to give it more of a curve.
Step 3
Once you are happy with the shape of the cake, ice the entire car with buttercream icing.
Step 4
Cover the cake with fondant. You can either cover the cake with red fondant or cover the cake with white fondant and airbrush the whole cake red.
Step 5
Use the white buttercream and tip #3 or 5 to pipe on the windows.
****Decorator’s Tip**** Use a toothpick to outline all of the windows and the lightning bolt onto the car.
Step 6
Outline all of the windows with the black icing and tip # 2.
Step 7
Repeat the above two steps to pipe on the large lighting bolts, head lights, tail lights, and the large number on top, using yellow and orange or white buttercream (colors will depend on what you are piping).
Step 8
With tip #2 and black icing, pipe numbers on the sides of the car as well as the passenger side headlight and tail light.
Step 9
With tip #2 and yellow icing, pipe the child’s name to resemble the Rusteeze logo.
Step 10
With tip #2 and blue piping gel pipe on eyes. Be careful, as the piping gel will run if you use too much. Finally, add the pupil on the eyes with a small black dot.
Step 11
The only part that is left of the car is to make the wheels. To do this, cut circles out of Rice Krispie Treats and cover with black fondant. You can also cover with white fondant and airbrush them black. Add a red circle to the center of the wheel and pipe the word Lightyear onto the wheels. Once the car is sitting on the bottom cake you can place the wheels onto the cake. The exact size of the wheels will vary depending on the size of your wheel well. My wheels fit so snugly that I was able to place them into the well and they did not fall.
Step 12
Finally, bake, level and fill the 2 14x11 cakes. Place onto the large rectangular cake board and cover with tan icing. Next, sprinkle the crushed graham crackers on top to look like sand. Place 4 dowels into the cake to support the car. The placement of the dowels will depend on the placement of the car. Just be sure to use 2 dowels for the front of the car and two for the back.
Step 13
Place the wheels and spoiler onto the car and put the cacti onto the large cake.
****Decorator’s Tip**** If you are having trouble getting the spoiler to stay up you can take 4 lollipop sticks and place them behind the spoiler for support. Cover these sticks with black or gray buttercream. If you look at the original Lightning McQueen, you will see he has something similar on the back of his spoiler.
____________________________________________________________________________________________


January 27, 2010 at 8:37 PM
This would have been great for my son last year. Do you happen to have a Thomas the Train tutorial?
January 28, 2010 at 7:39 AM
Unfortunately I do not have a Thomas tutorial but I will be posting about a blog I found that is dedicated to exactly that. Stay tuned! :)
March 7, 2010 at 2:53 PM
Thanks for the great information. Here is another site for you to check out for more cake info
http://startingacakebusiness.com/
February 1, 2011 at 11:53 AM
This is a valuable blog for my customers who are looking for creative ways to decorate. I sell sprinkles online. I will be sure to refer your blog in future!
February 14, 2011 at 7:55 AM
Thanks Carmelina....Let me know when your site is up and running. I'd love to check it out!
February 19, 2011 at 10:14 PM
Where are the instructions for the carving way? I couldn't find them.
February 20, 2011 at 9:21 AM
All my guides for Kid Cakes can be found at the link below but I am also adding a link to the carving instructions right now.
http://www.pieceofcakedecorating.com/2009/02/kid-cakes.html
FYI..the drop down menu at the top has options for Cake Guides classified by Kid Cakes, Adult Cakes, and Special Occasion Cakes.
August 1, 2011 at 11:19 PM
you are so talented!! you just make wonderful looking cakes.. will keep you website on favorites for up coming parties
August 11, 2011 at 5:32 PM
Thank you so much. Always glad to have new readers!