


Pin It now!
To make 1 book you will need...
1 covered cake board
fondant (1 batch)
buttercream icing (2 batches)
piping bags
tip # 3
cardboard cake divider (optional)
fondant ribbon cutter (optional)
gumpaste tools(optional)
To stack the books you will also need thin foam board and wooden dowels.
Directions:
Step 1
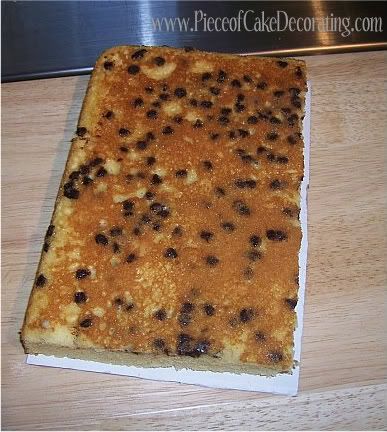
Level, tort and stack your cakes. Then, trim the edges to get the desired size of your book. The graduation books are the size of a 2 stacked 1/4 sheet cakes while the baby shower books are made from a 1/2 sheet cake cut into 3rds. Two of the thirds were stacked to make 1 book.
Step 2
Ice your cake and let set in the fridge for 30-45 minutes. Of course chilling your cake is completely optional but I have found it is much easier to fondant a cake when the icing has been given time to crust.
Step 3
 Roll out your fondant and cut to size. Only you will know how large to cut your fondant. Measure the height of one side and the width of the top then add 1/2 an inch (you want your fondant to hang off the edge a bit just like the cover of a hard covered book). Add 1 inch to the width of the top of the cake for your second measurement. I know that sounds confusing so here is an example...Lets say the book measures 4 inches tall, 10 inches wide and 12 inches long. My cut piece of fondant will be 14 1/2 inches (4+10+1/2) X 13 inches (12+1) and will hang off the cake a 1/2 inch all the way around.
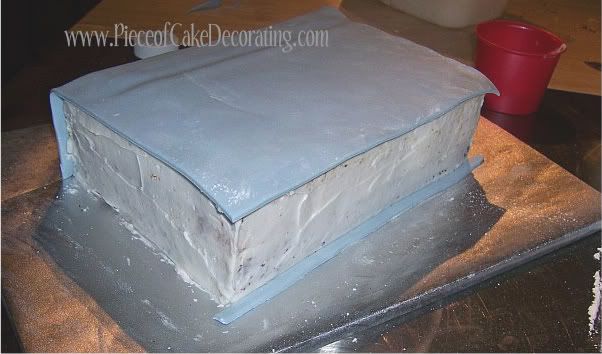
The best way to lay the fondant on your cake is to let the fondant stiffen up a bit. Then, lay the fondant on a cardboard cake divider and ease it onto the cake as pictured. To make the back cover, cut 1/2 inch strips and lay around the edges of the cake. A fondant ribbon cutter (see supply list) makes this job even easier.
Step 4

Use your buttercream icing to make the pages by piping lines across the remaining sides of the cake. In this picture I used tip #104 but for and even more realistic look use tip #3. You can see the difference in detail if you look at the books in the very first picture.
Step 5
Use a gumpaste tool or the back of a small decorating brush to make the details on the binding. Finally, customize your cake with the decorating details of your choosing.
Stacking Books
If you are making a stack of books, make sure you dowel your cake. You should also use thin foam board as opposed to card board cake dividers so the book can be supported and won't bend. Notice in the picture below that the board my cake is sitting on is a 1/2 inch larger on 3 of the sides. This was done to give the appearance of a back cover. Later, the edges will be covered in fondant.

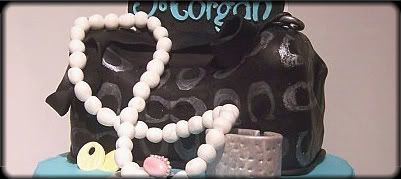
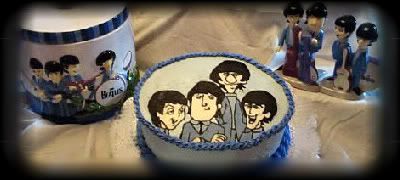
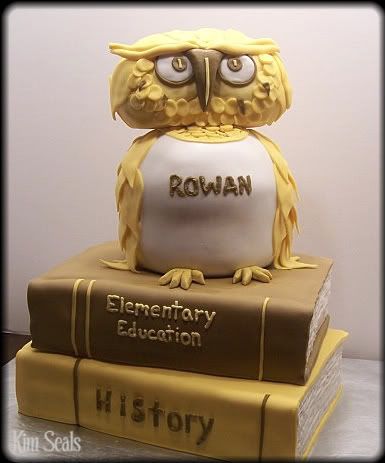
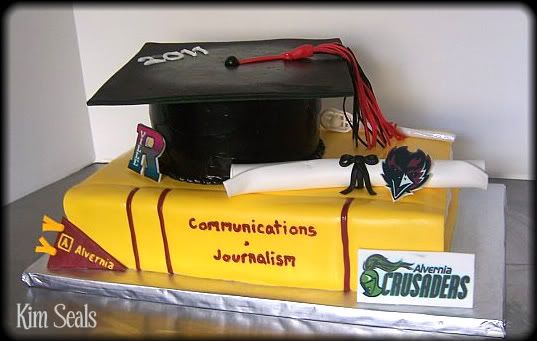
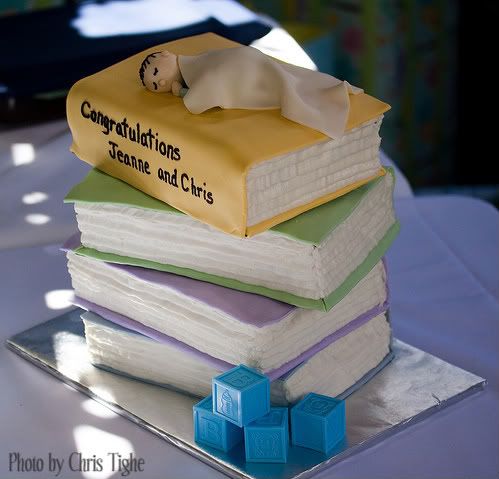
Maybe it is because of the slew of graduation cakes I made last month but book cakes are one of my favorite cakes to make these days. Check out some examples of graduation and baby shower book cakes I have made then, scroll down for a tutorial on how make and stack these cakes.
To make 1 book you will need...
1 covered cake board
fondant (1 batch)
buttercream icing (2 batches)
piping bags
tip # 3
cardboard cake divider (optional)
fondant ribbon cutter (optional)
gumpaste tools(optional)
To stack the books you will also need thin foam board and wooden dowels.
Directions:
Step 1
Level, tort and stack your cakes. Then, trim the edges to get the desired size of your book. The graduation books are the size of a 2 stacked 1/4 sheet cakes while the baby shower books are made from a 1/2 sheet cake cut into 3rds. Two of the thirds were stacked to make 1 book.
Step 2
Ice your cake and let set in the fridge for 30-45 minutes. Of course chilling your cake is completely optional but I have found it is much easier to fondant a cake when the icing has been given time to crust.
Step 3
The best way to lay the fondant on your cake is to let the fondant stiffen up a bit. Then, lay the fondant on a cardboard cake divider and ease it onto the cake as pictured. To make the back cover, cut 1/2 inch strips and lay around the edges of the cake. A fondant ribbon cutter (see supply list) makes this job even easier.
Step 4
Use your buttercream icing to make the pages by piping lines across the remaining sides of the cake. In this picture I used tip #104 but for and even more realistic look use tip #3. You can see the difference in detail if you look at the books in the very first picture.
Step 5
Use a gumpaste tool or the back of a small decorating brush to make the details on the binding. Finally, customize your cake with the decorating details of your choosing.
Stacking Books
If you are making a stack of books, make sure you dowel your cake. You should also use thin foam board as opposed to card board cake dividers so the book can be supported and won't bend. Notice in the picture below that the board my cake is sitting on is a 1/2 inch larger on 3 of the sides. This was done to give the appearance of a back cover. Later, the edges will be covered in fondant.
____________________________________________________________________________________________

July 20, 2011 at 9:14 AM
The book cake is awesome! Thank you for sharing it with us all. :)
August 11, 2011 at 5:37 PM
You are very welcome. I love making tutorials that can be hard to find on the internet.
Speaking of which, I hope to have a Baseball Cap Cake tutorial up soon!
December 31, 2011 at 10:48 AM
Thank you so much for the tutorial! I want to suprise my sister because she just graduated from university and I think she will absolutely love this lovely and sophisticated cakesurprise!
Than you so much again!
January 17, 2012 at 2:45 PM
Do you have any recommendations on the dimensions one should use to make the cake look like books? Also, any good cake recipes to withstand all the stacking? Cant wait to make these!!!
January 23, 2012 at 10:23 AM
The larger cakes are made from a 1/4 sheet pan. As long as the length is longer than the width it will work. To be honest, most of the time I just eyeball it.
As far as recipes, any will work great. Just make sure you use dowel supports under each tier and you will be fine. They are so much fun, and easy to make! Happy decorating!
March 3, 2012 at 3:36 PM
thank you so much you have taken all the worry out of trying to make a book cake, i loved your tutorial, i could not figure out how to do the bottom page, wow you made it look so easy, thanks again x
May 17, 2012 at 3:18 PM
This has been the best instruction and website i have found on how to make a book cake.
Thank you so much
August 20, 2012 at 6:31 PM
Thank you SO SO MUCH for this tutorial you certainly made it easy to understand, and made my little girl a very happy girl (she wanted a tinkerbell book cake). I have to mention your outstanding owl book cake, hes very handsome. I would love a tutorial how to make him.
October 9, 2012 at 6:41 PM
hi where can i get foam cake boards as i have never heard of these.
October 14, 2012 at 8:17 AM
The foamboard is a thick white board (usually 3/4 inch or 1/2 inch in thickness). I find mine by the poster board in AC Moore or Michaels. If you use it as a cake board, you will have to cover it with Wilton Fanci Foil or a similar product. Hope that helps!