


Pin It now!
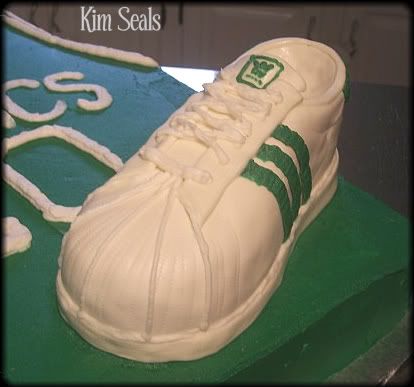
In this guide you will learn how to make a cake look like an Adidas shoe however, you are not limited to this type of shoe. By learning the general techniques used, you can apply them to any style sneaker or shoe you like.
To make this cake you will need...
2 cakes from a small oval cake pan
cardboard cake board shaped like a shoe
1 batch of buttercream icing (white and green)
1/2 batch of marshmallow fondant
gumpaste quilting tool
pizza cutter
decorator's brush & water
tips #1, #2, #3, and #102
Directions:
Step 1
Use a template to cut your cardboard cake board in the shape of a shoe.

To use this picture as a template, follow these steps.
1. Right click on the picture and select "copy image."
2. Open Paint or Microsoft Word on your computer and paste it on the page. You can do this by clicking on your work area with the mouse and then pressing CTRL-V. You can also choose the "paste" option under the "edit" tab at the top.
3. Re-size your photo to suite your needs.
Step 2
1 day in advance, level, tort, and fill your cakes. Once you are finished, use your shoe shaped cake board to cut a shoe shape.
***Important*** You must now freeze your cake. You might be able to get away with a few hours of freezing but for best results, I recommend freezing over night. This will give you more control when you carve your cake in the next step.
Step 3
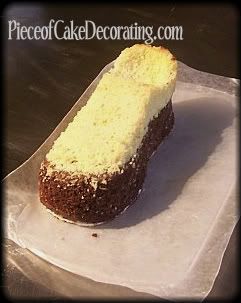
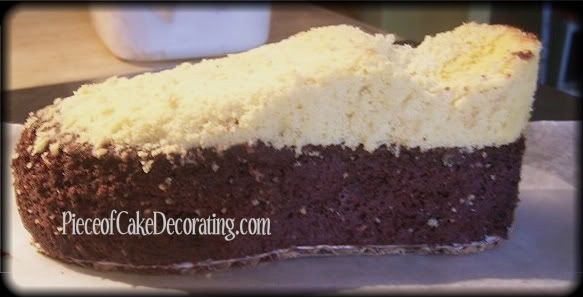
You are now ready to carve your cake. This shoe has a gradual slope from the top of the shoe to the toe. To get the right proportions, I started at the toe. Once I was happy with the shape and thickness, I gradually carved up. By taking a little off at a time I gave myself more control and lessened the risk of taking off too much cake.
Step 4
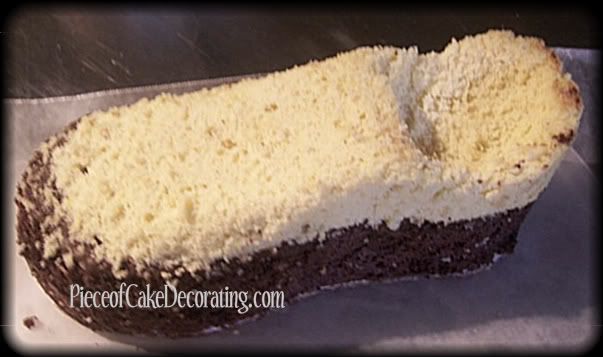
Once I was happy with the slope of the shoe I rounded off the edges. Then, using a small spoon, I scooped out a circle to help give the appearance that the shoe was empty. Here are a few pictures to help give you visualize the shape you are going for.
Step 5
If you are finding that your cake is very delicate you may want to freeze it again for at least a few hours otherwise you are ready to ice your cake.
Step 6
Cover your cake with fondant. Be careful with the top of the shoe, it may tear.
Step 7
You are ready to work on the details. Here is the first picture again so you don't have to scroll up and down.
For best results, complete the details in this order. Unless otherwise stated, all cutting was done with a pizza cutter and attached with a decorator's brush and water..
That should do it. Another option is to use fondant for the all of the details. I chose to use buttercream because I feel I work faster with it. A third option is to use royal icing. Once your details harden, you won't risk smudging your work.
If you found this tutorial helpful and want to share your cake with us, e-mail a picture to photos@pieceofcakedecorating.com.

In this guide you will learn how to make a cake look like an Adidas shoe however, you are not limited to this type of shoe. By learning the general techniques used, you can apply them to any style sneaker or shoe you like.
To make this cake you will need...
2 cakes from a small oval cake pan
cardboard cake board shaped like a shoe
1 batch of buttercream icing (white and green)
1/2 batch of marshmallow fondant
gumpaste quilting tool
pizza cutter
decorator's brush & water
tips #1, #2, #3, and #102
Directions:
Step 1
Use a template to cut your cardboard cake board in the shape of a shoe.

To use this picture as a template, follow these steps.
1. Right click on the picture and select "copy image."
2. Open Paint or Microsoft Word on your computer and paste it on the page. You can do this by clicking on your work area with the mouse and then pressing CTRL-V. You can also choose the "paste" option under the "edit" tab at the top.
3. Re-size your photo to suite your needs.
Step 2
1 day in advance, level, tort, and fill your cakes. Once you are finished, use your shoe shaped cake board to cut a shoe shape.
***Important*** You must now freeze your cake. You might be able to get away with a few hours of freezing but for best results, I recommend freezing over night. This will give you more control when you carve your cake in the next step.
Step 3
You are now ready to carve your cake. This shoe has a gradual slope from the top of the shoe to the toe. To get the right proportions, I started at the toe. Once I was happy with the shape and thickness, I gradually carved up. By taking a little off at a time I gave myself more control and lessened the risk of taking off too much cake.
Step 4
Once I was happy with the slope of the shoe I rounded off the edges. Then, using a small spoon, I scooped out a circle to help give the appearance that the shoe was empty. Here are a few pictures to help give you visualize the shape you are going for.
Step 5
If you are finding that your cake is very delicate you may want to freeze it again for at least a few hours otherwise you are ready to ice your cake.
Step 6
Cover your cake with fondant. Be careful with the top of the shoe, it may tear.
Step 7
You are ready to work on the details. Here is the first picture again so you don't have to scroll up and down.
For best results, complete the details in this order. Unless otherwise stated, all cutting was done with a pizza cutter and attached with a decorator's brush and water..
- Roll out your fondant and cut a small strip to go around the top of the shoe.
- Roll out your fondant and cut out the tongue. I drew the shape on a piece of paper first to make sure I got the right size, then I used it as a template and cut the shape out with an Exact-o Knife. Use a small ball of napkin to hold the tongue up until it firms up in the fridge.
- Cut two strips to run down the slope of the shoe. The end of each strip should be cut on opposite angles as in the picture. After attaching it to the cake, make 6 small holes on each strip for the laces.
- Roll out your fondant again and cut a very long strip to go around the bottom of the shoe.
- Using the gumpaste quilting tool, add the stitching details to the shoe. This included the ridges on the toe of the shoe.
- With tip #102 and dark green icing, pipe the stripes on the sides of the shoe.
- With tip #1 and dark green icing, pipe the Adidas symbol on the tongue of the shoe.
- Using tip #2 and dark green icing, pipe the green details on the back of the shoe (sorry I don't have a picture)
- Using tip #1 and white icing, pipe the Adidas symbol on the green details you just added.
- Using tip #3, pipe your laces.
That should do it. Another option is to use fondant for the all of the details. I chose to use buttercream because I feel I work faster with it. A third option is to use royal icing. Once your details harden, you won't risk smudging your work.
If you found this tutorial helpful and want to share your cake with us, e-mail a picture to photos@pieceofcakedecorating.com.
____________________________________________________________________________________________


December 14, 2010 at 2:58 PM
Hi
This is very good, it must have taken a lot of practice. I have done a few courses myself but I must say it is very difficult. A very good explanation and the detail is good.
I will definitely try this one.
You can take a look at my blog to see a few of my creations. www.babycakeideas.com
December 15, 2010 at 1:26 PM
Thank you Stephanie for your kind words. I have checked out your site and your cakes and ideas are great!
April 27, 2012 at 3:04 PM
this is very helpful i will make it for my son.
July 29, 2012 at 12:36 PM
thank you for sharing your knowledge on this. have you tried making a ladies wedge shoe/sandal cake?
October 14, 2012 at 8:27 AM
Wilma - Not yet but I like that idea!