


Pin It now!
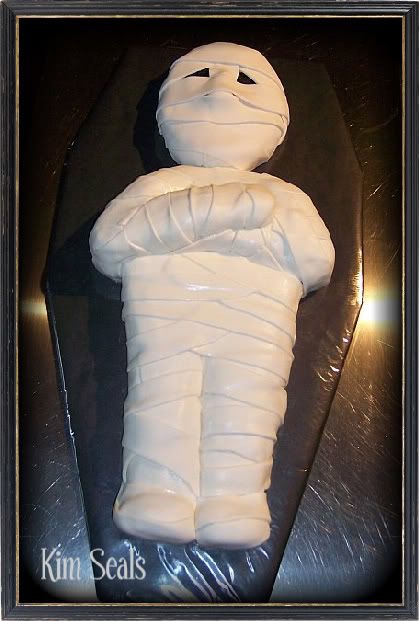
My passion for cake decorating started with a simple Halloween Jack-o-Lantern cake for a friends costume party so I always get excited when this time of year rolls around. This mummy cake was made for last year's party and it was a huge hit.
In this guide you will learn how to carve a cake to look like a mummy as well as how to wrap your mummy cake with fondant strips.
To make this cake you will need...
Foam-Core board
Wilton Fanci-Foil or black wrapping paper and clear cellophane
1 oval cake
1 13x9 cake
1-2 mini wonder mold cakes
2 batches of buttercream icing
3 batches of fondant
Wilton's Fondant Ribbon Cutter (optional)
black buttercream icing
any round tip
Directions:
Step 1
Cut a piece of Foam-Core in the shape of a coffin to create your cake board. Then, either cover it with Wilton Fanci Foil or black wrapping paper. If you use black wrapping paper you will then need to cover the board again with clear cellophane.
Step 2
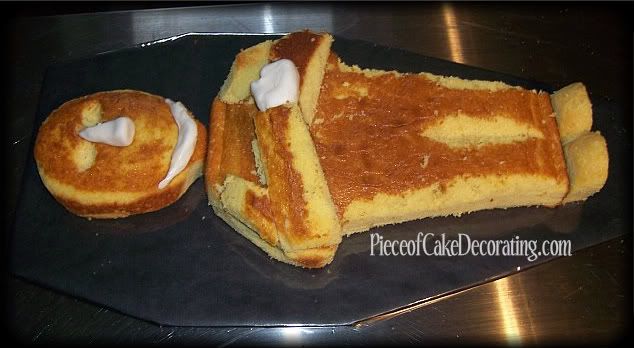 There is no need to level, tort, and fill any of these cakes. In fact, you will make your job easier if you don't. So, your next step is to cut the 13x9 cake into the shape of the body.
***Decorator's Tip*** A paper template will help make sure your body is symmetrical and make carving so much easier.
As you can see from this picture, I rounded the edges a bit, cut a slit for the legs and used the extra pieces to shape the arms and shoulders. (Don't worry about the hands just yet.)
***Decorator's Tip*** Cut your cake frozen to reduce the amount of crumbs and get more control over the amount of cake you are carving off.
Next, round off the edges of the oval cake to create the head and trim some cake off one end to make a neck. (Don't worry about the nose and chin just yet.) Then, using a small spoon, scoop out indents for the eye sockets. Depending how your cake baked, you may need to carve off a little cake to create cheek bones. I did not have to here.
Finally, depending on the size of your legs, cut a mini wonder mold cake in half and trim a bit off the edges to create the feet. If your legs come out larger than mine, you may need to use 2 mini cakes (1 per foot) to keep things proportional.
Step 3
Using the picture above as a guide and your carved cakes for proportions, make a nose, chin, and hand out of fondant or gumpaste and attach it to the face with a small amount of buttercream.
Step 4
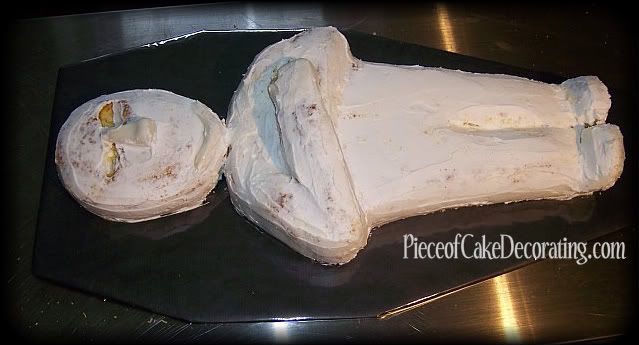
Cover your entire cake and fondant features with buttercream icing. Then, fill in the eyes with black icing and a round tip.
Step 5
Roll out your fondant between 1/8 and 1/4 inch thickness and cut into long strips. Wilton's Fondant Ribbon Cutter will make this job very easy.
Step 6
Wrap the mummy with your strips of fondant making sure not to leave any cake showing. Tuck the edges of your fondant strips under the cake with a gumpaste tool, decorator's brush, or fork.
***Decorator's Tip*** To help accent the slit cut for the legs, wrap each leg individually with shorter strips.
Reader photos using this guide...


My passion for cake decorating started with a simple Halloween Jack-o-Lantern cake for a friends costume party so I always get excited when this time of year rolls around. This mummy cake was made for last year's party and it was a huge hit.
In this guide you will learn how to carve a cake to look like a mummy as well as how to wrap your mummy cake with fondant strips.
To make this cake you will need...
Foam-Core board
Wilton Fanci-Foil or black wrapping paper and clear cellophane
1 oval cake
1 13x9 cake
1-2 mini wonder mold cakes
2 batches of buttercream icing
3 batches of fondant
Wilton's Fondant Ribbon Cutter (optional)
black buttercream icing
any round tip
Directions:
Step 1
Cut a piece of Foam-Core in the shape of a coffin to create your cake board. Then, either cover it with Wilton Fanci Foil or black wrapping paper. If you use black wrapping paper you will then need to cover the board again with clear cellophane.
Step 2
***Decorator's Tip*** A paper template will help make sure your body is symmetrical and make carving so much easier.
As you can see from this picture, I rounded the edges a bit, cut a slit for the legs and used the extra pieces to shape the arms and shoulders. (Don't worry about the hands just yet.)
***Decorator's Tip*** Cut your cake frozen to reduce the amount of crumbs and get more control over the amount of cake you are carving off.
Next, round off the edges of the oval cake to create the head and trim some cake off one end to make a neck. (Don't worry about the nose and chin just yet.) Then, using a small spoon, scoop out indents for the eye sockets. Depending how your cake baked, you may need to carve off a little cake to create cheek bones. I did not have to here.
Finally, depending on the size of your legs, cut a mini wonder mold cake in half and trim a bit off the edges to create the feet. If your legs come out larger than mine, you may need to use 2 mini cakes (1 per foot) to keep things proportional.
Step 3
Using the picture above as a guide and your carved cakes for proportions, make a nose, chin, and hand out of fondant or gumpaste and attach it to the face with a small amount of buttercream.
Step 4
Cover your entire cake and fondant features with buttercream icing. Then, fill in the eyes with black icing and a round tip.
Step 5
Roll out your fondant between 1/8 and 1/4 inch thickness and cut into long strips. Wilton's Fondant Ribbon Cutter
Step 6
Wrap the mummy with your strips of fondant making sure not to leave any cake showing. Tuck the edges of your fondant strips under the cake with a gumpaste tool, decorator's brush, or fork.
***Decorator's Tip*** To help accent the slit cut for the legs, wrap each leg individually with shorter strips.
Reader photos using this guide...

Jacob

Lucy

Lucy
____________________________________________________________________________________________


October 8, 2010 at 2:25 PM
well were all not as good as you are at shaping cake as i did it once to make a love heart and it turend out looking a bit like an oval but it did taste nice!!
October 8, 2010 at 3:35 PM
It takes practice so keep at it. These guides are meant to share tricks I've learned. I cannot make anything symmetrical without using a template. That's how I managed to get the shape of this cake.
October 23, 2010 at 6:16 PM
Wonderful!!! Soooooooooooooo talented!
October 26, 2010 at 12:22 AM
Is there a template for the body of the mummy?
October 26, 2010 at 7:19 AM
Unfortunately no, there is not a template. The body is so large it would be too difficult to print out. However, it is easy to make on your own.
1. Tape sheets of paper together to make the size of the cake you will be cutting.
2. Draw a rough sketch of the body.
3. Fold the drawing in half and cut the side of your drawing that you are happiest with. (This will help make sure your body is symmetrical.)
4. Unfold the paper and make adjustments if needed.
Hopefully this helps for now. I will have a tutorial on making templates with step-by-step pictures up soon.
Happy Halloween!
September 30, 2011 at 12:01 AM
I am doing this for my friends halloween themes birthday party but i am upping the size i am using 2 13X9 and a 8in round pan for the head hopefully it comes out as nice as yours (which is amazing)
October 18, 2011 at 6:25 PM
Thank you! Good luck!
PS. A reader has used this tutorial and their cake came out great! I hope to have the pictures posted tomorrow.
August 14, 2012 at 8:24 AM
I know it's not Halloween but my five-year old wanted me to do a mummy cake for his Dad's birthday.
I used your tutorial and it worked out really well. Thank you so much.