


Pin It now!
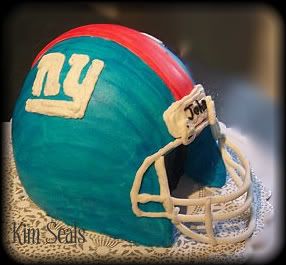
What better way to celebrate opening day of football than with an NFL helmet cake? In this guide you will learn how to carve and decorate a cake to look like a helmet.
This was my first attempt at making a helmet cake so you will find sections written in red. These sections will note changes I plan to make the next time around. Sometimes showing you my mistakes can be more helpful than just giving you a "perfect" cake so I wanted to make sure to include them.
To make this cake you will need...
1/2 Ball cake (6-8 inches in diameter depending on the size of your cake)
6 or 8 inch round cake, 2 layers (size should be equal to the diameter of your 1/2 ball cake)
10 inch round cake board
buttercream icing
fondant tinted the colors of your football team (you can also airbrush or hand paint the cake if needed)
black tinted fondant or black edible paint
decorator's brushes
white gumpaste
tube of black icing (optional)
tips #2 (optional) and #3 (optional)
Directions:
Step 1

A few days in advance, make your gumpaste mask. To do this, I rolled out long pieces of gumpaste and dried them on a large pitcher built up with napkins. I used wax paper for easy removal and a template to help make the shape.
Step 2
Level, tort and fill the round cakes. You should also level off the 1/2 ball cake and then stack all three with the round cakes on the bottom and the 1/2 ball cake on top.
Step 3
Using the pictures below as a guide, carve out the section of the mask for the face and round off the back.


Next time I carve this cake I will round off the bottom front edge a little more. If you look at the completed cake, it looks a little too flat.
***Decorator's Tip*** Remember that when carving, it is always best to work with a frozen cake and take a little off at a time. You can always take more off but can't put any back on!
Step 4
Ice the entire cake with buttercream icing.
Step 5
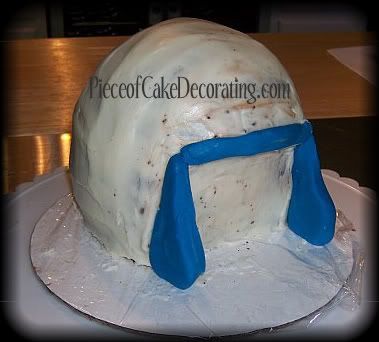
Using fondant, any color, make the front pieces of the mask and build out the top a bit more to make the final helmet feel empty.
Just like the carving, the side pieces of fondant should be curved up a bit more than I have here.
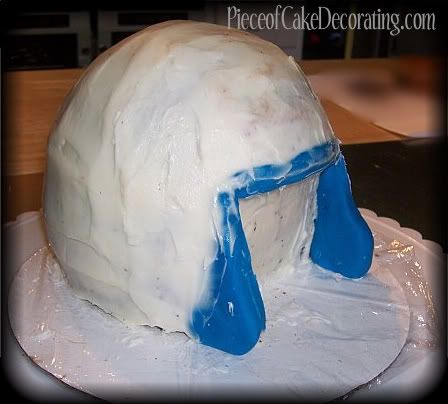
Then, add a little more buttercream icing to the seams so your helmet is smooth when covered in fondant.
Step 6
Cover your cake in fondant and add a stripe down the back if necessary. To make the stripe stick, use a decorator's brush and apply a small amount of water down the center of the helmet.
Step 7

Either pipe on your team's logo with tip #3 or cut it out of fondant and place it on the cake. I have piped the NY Giants logo on the helmet using a template. Click here for more information on piping with a template.
Step 8

Paint the fondant "inside" the helmet black. You could also use black tinted fondant. Place your gumpaste face mask on the front of the cake and pipe on the details using tip #3.
***Decorator's Tip*** Personalize the cake by adding a name to the front mask plate. Here I have used a tube of black icing and tip #2
Happy Decorating!
If you found this guide helpful, I would love to see your finished product. You can e-mail your pictures to photos@pieceofcakedecorating.com and I will share them with my readers!
What better way to celebrate opening day of football than with an NFL helmet cake? In this guide you will learn how to carve and decorate a cake to look like a helmet.
This was my first attempt at making a helmet cake so you will find sections written in red. These sections will note changes I plan to make the next time around. Sometimes showing you my mistakes can be more helpful than just giving you a "perfect" cake so I wanted to make sure to include them.
To make this cake you will need...
1/2 Ball cake (6-8 inches in diameter depending on the size of your cake)
6 or 8 inch round cake, 2 layers (size should be equal to the diameter of your 1/2 ball cake)
10 inch round cake board
buttercream icing
fondant tinted the colors of your football team (you can also airbrush or hand paint the cake if needed)
black tinted fondant or black edible paint
decorator's brushes
white gumpaste
tube of black icing (optional)
tips #2 (optional) and #3 (optional)
Directions:
Step 1
A few days in advance, make your gumpaste mask. To do this, I rolled out long pieces of gumpaste and dried them on a large pitcher built up with napkins. I used wax paper for easy removal and a template to help make the shape.
I am not completely happy with the end result of this mask. I am still looking for a new method and would love to hear your ideas in my comment section.
Step 2
Level, tort and fill the round cakes. You should also level off the 1/2 ball cake and then stack all three with the round cakes on the bottom and the 1/2 ball cake on top.
Step 3
Using the pictures below as a guide, carve out the section of the mask for the face and round off the back.
Next time I carve this cake I will round off the bottom front edge a little more. If you look at the completed cake, it looks a little too flat.
***Decorator's Tip*** Remember that when carving, it is always best to work with a frozen cake and take a little off at a time. You can always take more off but can't put any back on!
Step 4
Ice the entire cake with buttercream icing.
Step 5
Using fondant, any color, make the front pieces of the mask and build out the top a bit more to make the final helmet feel empty.
Just like the carving, the side pieces of fondant should be curved up a bit more than I have here.
Then, add a little more buttercream icing to the seams so your helmet is smooth when covered in fondant.
Step 6
Cover your cake in fondant and add a stripe down the back if necessary. To make the stripe stick, use a decorator's brush and apply a small amount of water down the center of the helmet.
Step 7
Either pipe on your team's logo with tip #3 or cut it out of fondant and place it on the cake. I have piped the NY Giants logo on the helmet using a template. Click here for more information on piping with a template.
Step 8
Paint the fondant "inside" the helmet black. You could also use black tinted fondant. Place your gumpaste face mask on the front of the cake and pipe on the details using tip #3.
***Decorator's Tip*** Personalize the cake by adding a name to the front mask plate. Here I have used a tube of black icing and tip #2
Happy Decorating!
If you found this guide helpful, I would love to see your finished product. You can e-mail your pictures to photos@pieceofcakedecorating.com and I will share them with my readers!
____________________________________________________________________________________________


September 7, 2011 at 1:10 AM
Great tutorial!! I'm looking for ideas to make a Chargers Helmet Cake!!!
Yaneri
October 29, 2011 at 12:12 AM
You say to use 6-8 inch round cake pan. What did you use in this picture? It seems like its a nice size. I have the wilton ball pan but it is only 6 inches in diameter so does that mean I would need to use a 6 inch round pan? If not is there an 8 inch ball pan? Thanks.
November 9, 2011 at 4:11 PM
All pans are different. A 6 inch round pan will work perfectly. That is what I used in the tutorial. It is actually a pretty small cake.
November 12, 2011 at 12:45 AM
I haven't seen an 8 inch ball pan but what I used was a restaurant quality metal mixing bowl. worked just fine. To see a pic of the final project go to www.facebook.com/jennsedibleart and look through the Flickr tab on the left side of the page.
February 13, 2012 at 9:51 PM
Fat Daddio has an 8" 1/2 ball pan (see Amazon.com).
September 29, 2012 at 11:08 PM
I'm attempting one of these tonight. I'm planning on using tootsie roll candy for the mask. I'm going to microwave them and roll them out etc.
October 14, 2012 at 8:24 AM
That is a great idea! I'd love to see how it turns out.