


Pin It now!
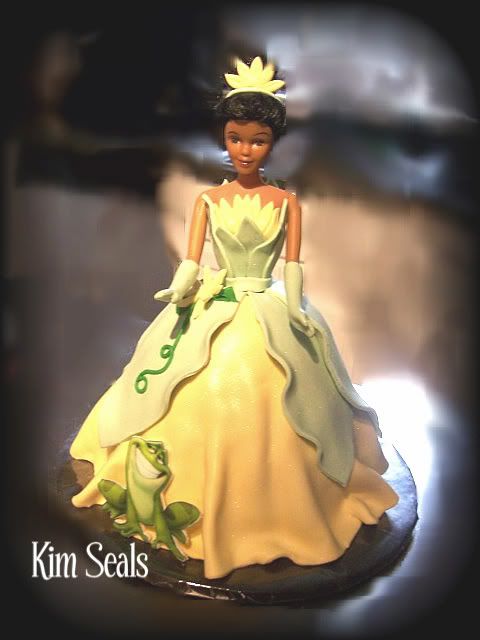

In this guide you will be given step-by-step instructions on how to make Tiana from Disney's 'The Princess and the Frog.' Specifically, you will see how to lay the fondant to look like a dress.
To make this cake you will need...
1 covered, 10 inch cake board
Wilton Wonder Mold Pan or Pampered Chef's 4 cup, glass measuring cup
large Wilton, Ethnic Doll Pick
buttercup yellow and sage green fondant
1 batch of buttercream icing
1/4 cup dark green buttercream icing or a tube of pre-made green icing
edible image plaque of the frog
small and medium daisy cutters
tips #2 and #67
Directions:
Step 1
A few days in advance, cover your cake board and make your edible image plaque of the frog. Because it is a trademarked image, I cannot sell these plaques but if you have an edible printer, you can read my Sugar Plaque Tutorial and make your own.
Step 2
Bake your cake according to the pan's instructions. Place the cake in the center of your cake board and ice with buttercream icing.

Step 3
Cover your cake with the buttercup yellow fondant. Make sure to bunch it at the bottom as I have here to give the appearance of a flowing skirt.
Step 4

Roll out the sage green fondant and cut out 5-6 large petal shaped pieces. To make a petal template, draw your shape on a piece of paper, cut it out and place it on the fondant to cut your shapes with an Exact-o Knife or pizza cutter.
Notice in the pictures how the petals are arranged. They are attached using a little bit of water. Pieces of napkin where used to prop up parts of the dress until the fondant set.
Step 5
Dress your doll pick. The first thing that should be done when dressing your doll is make the gloves. This takes a bit of patience. Roll out a thin piece of sage green fondant and wrap it around one of the hands and lower arm. Flatten the fondant the best you can without tearing a hole. Using scissors, cut around the finger tips. To give the appearance of fingers, make indents between each finger using a toothpick. Repeat on the other hand.
If you look at the original picture you will notice that the yellow part of her dress, covering her bust, looks like daisy petals. Roll out the buttercup yellow fondant and cut out 3 medium and 2 small daisies using your daisy cutters. Cut one of the small daisies in half for the tiara and use the remaining small petal to decorate her dress in the last step. The medium flowers are used to cover Tiana's bust line. They can be attached with a little bit of water.
***Decorator's Tip*** Let the tiara petals sit in a slightly curved position until you are done decorating so that the fondant can dry a little.
Next, using the same method for making large petal shapes in step 4, make 5 medium and 3 small petal shapes for the rest of her dress. Use the pictures below to help you with placement. They can also be attached using a bit of water.
**Please note that even though the pictures show the doll pick in the cake, I do not insert it until the next step. It may not make a difference but it was easier for me to do it this way.**

Step 6
Stick your doll pick into the cake. Cut a small strip of green fondant to make a belt and cover he transition between the cake and doll pick.
Step 7
Make the tiara by rolling out a small snake of sage green fondant to resemble a headband. Place the headband on the doll's head and attach the 1/2 daisy using a small amount of water.
Step 8
Pipe the curly stem and leaves on the dress using tips # 2 and #67 respectively. Attach the flower using a dot of green icing. Finally, secure the frog plaque in place using a small amount of green icing.
***Decorator's Tip*** To make the dress pop, dust it with pearl luster dust.
Reader photos using this guide...


In this guide you will be given step-by-step instructions on how to make Tiana from Disney's 'The Princess and the Frog.' Specifically, you will see how to lay the fondant to look like a dress.
To make this cake you will need...
1 covered, 10 inch cake board
Wilton Wonder Mold Pan
large Wilton, Ethnic Doll Pick
buttercup yellow and sage green fondant
1 batch of buttercream icing
1/4 cup dark green buttercream icing or a tube of pre-made green icing
edible image plaque of the frog
small and medium daisy cutters
tips #2 and #67
Directions:
Step 1
A few days in advance, cover your cake board and make your edible image plaque of the frog. Because it is a trademarked image, I cannot sell these plaques but if you have an edible printer, you can read my Sugar Plaque Tutorial and make your own.
Step 2
Bake your cake according to the pan's instructions. Place the cake in the center of your cake board and ice with buttercream icing.
Step 3
Cover your cake with the buttercup yellow fondant. Make sure to bunch it at the bottom as I have here to give the appearance of a flowing skirt.
Step 4
Roll out the sage green fondant and cut out 5-6 large petal shaped pieces. To make a petal template, draw your shape on a piece of paper, cut it out and place it on the fondant to cut your shapes with an Exact-o Knife or pizza cutter.
Notice in the pictures how the petals are arranged. They are attached using a little bit of water. Pieces of napkin where used to prop up parts of the dress until the fondant set.
Step 5
Dress your doll pick. The first thing that should be done when dressing your doll is make the gloves. This takes a bit of patience. Roll out a thin piece of sage green fondant and wrap it around one of the hands and lower arm. Flatten the fondant the best you can without tearing a hole. Using scissors, cut around the finger tips. To give the appearance of fingers, make indents between each finger using a toothpick. Repeat on the other hand.
If you look at the original picture you will notice that the yellow part of her dress, covering her bust, looks like daisy petals. Roll out the buttercup yellow fondant and cut out 3 medium and 2 small daisies using your daisy cutters. Cut one of the small daisies in half for the tiara and use the remaining small petal to decorate her dress in the last step. The medium flowers are used to cover Tiana's bust line. They can be attached with a little bit of water.
***Decorator's Tip*** Let the tiara petals sit in a slightly curved position until you are done decorating so that the fondant can dry a little.
Next, using the same method for making large petal shapes in step 4, make 5 medium and 3 small petal shapes for the rest of her dress. Use the pictures below to help you with placement. They can also be attached using a bit of water.
**Please note that even though the pictures show the doll pick in the cake, I do not insert it until the next step. It may not make a difference but it was easier for me to do it this way.**
Step 6
Stick your doll pick into the cake. Cut a small strip of green fondant to make a belt and cover he transition between the cake and doll pick.
Step 7
Make the tiara by rolling out a small snake of sage green fondant to resemble a headband. Place the headband on the doll's head and attach the 1/2 daisy using a small amount of water.
Step 8
Pipe the curly stem and leaves on the dress using tips # 2 and #67 respectively. Attach the flower using a dot of green icing. Finally, secure the frog plaque in place using a small amount of green icing.
***Decorator's Tip*** To make the dress pop, dust it with pearl luster dust.
Reader photos using this guide...

Sallie
____________________________________________________________________________________________


May 20, 2010 at 1:32 PM
Omigosh! That is amazing!!!!! You can make my kids' cakes ANYTIME! :o)
http://nomieecoware.blogspot.com
May 21, 2010 at 4:36 PM
This is great! I am making this exact cake next week and this tutorial will come in handy!!
May 21, 2010 at 7:30 PM
Thanks Ladies!
Shena-I love hearing when people use my tutorials. Thank you.