


Pin It now!
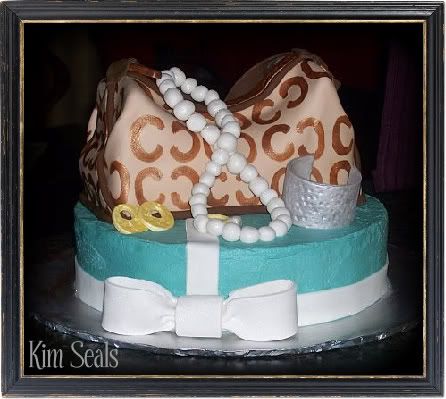
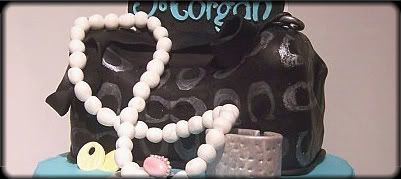
This was my first purse cake and I had so much fun making it. In this guide I will give you step-by-step instructions on how to make the Coach bag, jewelry, and round Tiffany's Box pictured above. If you want to make a larger purse than I have, follow the same steps with a 1/2 or full sized sheet cake.
You can now make decorating this cake even easier by purchasing the gumpaste jewelry from my handmade shop.
To make this cake you will need...
14-18 inch round cake board
10 inch round cake
1/4 sheet cake
1/4 sheet cake, cake divider
wooden dowels
Tiffany blue buttercream icing
tan, brown and white fondant
white gumpaste
silver, gold and pearl luster dust
any decorating tip
small circle cookie cutter
brown food coloring
clear extract (any flavor)
piping gel
silver cake crystals
decorator's brush
jewelry wire
toothpicks
Directions:
Step 1
A few days in advance, make the gumpaste jewelry and bow. To make the gumpaste bow follow my Gumpaste Bow Tutorial. Once the bow has dried, cover it with pearl luster dust.
To make the pearl necklace, make small balls with white gumpaste and string them on jewelry wire before they dry. Once the gumpaste beads are dry, brush on pearl luster dust.
To make the earrings, roll out a small amount of white gumpaste. Using a small circle cookie cutter, cut out two earrings. Then, with the back side of any decorating tip, cut out a smaller circle towards the top of the larger circle. The back of a decorator's brush can be used to make the small dents in the gumpaste. When the earrings are dry, brush them with gold luster dust.
***Decorator's Tip*** You can make a paint out of the luster dust by adding a small amount of clear extract (any flavor) to the powder. This is what I have done here and it makes the color darker.
To make the bracelet, roll out white gumpaste and cut a large strip. Use a drinking glass or paper towel roll to help shape the bracelet. Again, the back of the decorator's brush can be used to make the small dents in the gumpaste. Once the bracelet is dry, paint it with the sliver luster dust and clear extract mixture mentioned above.
Use white gumpaste to make the ring. The band was painted with gold luster dust and the diamond was covered in silver cake crystals. Clear piping gel helped the crystals to stick to the gumpaste without melting them.
Step 2
Level, tort and fill your 10 inch round cake. Once your cake is placed in the center of your cake board, cover it in Tiffany blue buttercream icing.
***Decorator's Tip*** To achieve the Tiffany blue color I used a combination of blue, yellow, and green food coloring. I used a lot of blue, a fair amount of yellow and a very small amount of green. Add a small amount of each at a time because once the color is added you cannot go back.
Step 3
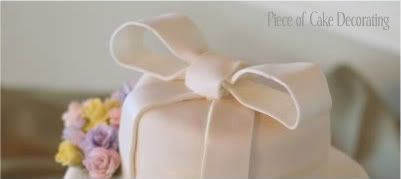
 Roll out white fondant and cut it into 1 inch strips to make the ribbon on the box. The fondant ribbon going over the top of the cake is approximately 16 inches long. Your length will vary depending on the height of your cake. The fondant ribbon going around the cake is approximately 32 inches long. I made it a little longer than the circumference of the circle to be sure I had enough. Notice the fondant ribbon going across the top is slightly off center. This is characteristic of a Tiffany's box. Finally, brush the ribbon with pearl luster dust to match the bow.
***Decorator's Tip*** Wilton's Fondant Ribbon Cutter makes this step very easy!
Step 4
Place 4 wooden dowels, cut to size, around the center of the cake. These will be used to support the purse so the best placement is between where the 4 corners will fall and the center of the cake.
Step 5 - time to make the purse!

Cut the 1/4 sheet cake into 3rds. Level, fill and stack these cakes on a cake divider cut to the same size (made from the 1/4 sheet cake divider).
Step 6

Carve a valley in the center of the cake. The trick here is to remember that the more exaggerated the cut, the more it will show once it is covered in fondant. Take a little off at a time until you are happy with the result.
Step 7
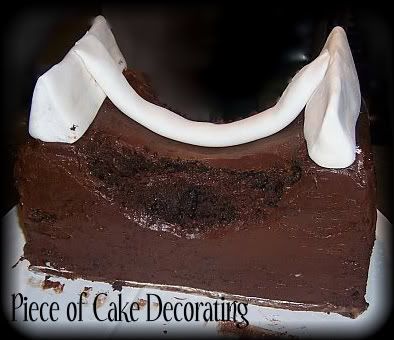 Mold two peaks and a long snake (the zipper) out of white fondant an place them as I have in the picture. Modeling chocolate will also work well here. I have made the cake this way because the fondant will not collapse under the weight of the tan fondant that I will cover the cake in later. It was my fear that using all cake would cause the purse to smoosh down once it was covered in fondant.
Once the fondant was placed on the cake I realized that I was not happy with the shape of the purse so I trimmed more cake off on a curved angle on both sides of the cake.
Step 8
Cover the rest of the cake in icing. This will help smooth it out and prevent the spaces from showing in the tan fondant.

Step 9

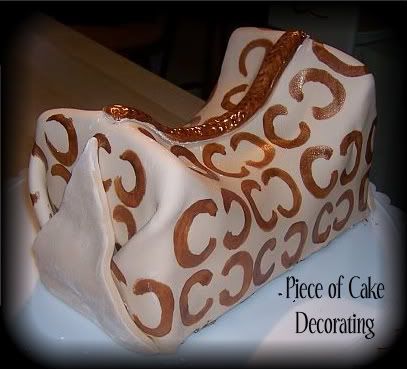
Cover the cake in tan fondant. As you lay the fondant across the cake, make sure you ease it into place. Move across the cake from left to right. If you just lay the fondant down you risk tearing it at the peaks. The left and right sides were pinched at the corners and trimmed to form triangle folds. They were then secured into place with a little water and toothpicks while I moved on to the next step. They will be removed later.
Step 10
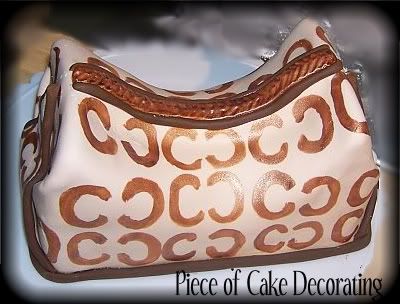
To make the zipper, roll out a long snake using tan fondant. Flatten it slightly and cut to size. Secure it to the cake with water. Now is also a good time to make the rings to hold the strap and the zipper pull.
Step 11
Mix gold luster dust and brown food coloring to make bronzed colored paint. Paint the Coach C's all over the cake, the zipper parts, and the strap rings bronze.
Step 12
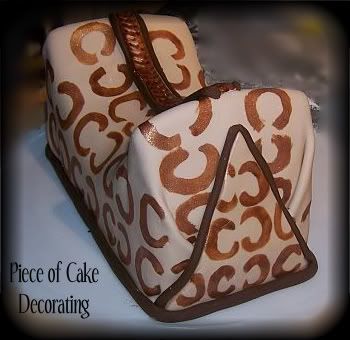
Roll out more tan fondant and cut out two large triangle pieces for the sides. Remove the toothpicks and secure into place by brushing the back side of the triangle with water.
Paint the Coach C's on the triangle pieces.
Step 13
Make a very long, thin snake out of brown fondant. This will be used as trim along the zipper, around the triangle pieces, and around the bottom of the cake. Attach the trim in that order.
Step 14
Place the purse on top of the 10 inch round cake. I did not dowel this cake because I felt the size and height were going to keep the cake pretty stable and my assumption was correct. The cake traveled fully assembled and made it safely.
Step 15
Make the strap by rolling out brown fondant and cutting a 3/4 inch strip. Thread it through both both rings as pictured and secure to the cake with piping gel. I am showing you the back side of the strap.
I have used piping gel this time because it holds faster.
Step 16
Using piping gel, attach the zipper pull and drape the pearl necklace down the front of the bag. Then, arrange the jewelry as desired and attach the bow with piping gel.
Phew! That's it, your cake is ready to eat. :) However, after all that work, I would make sure people stare at it for awhile.
This was my first purse cake and I had so much fun making it. In this guide I will give you step-by-step instructions on how to make the Coach bag, jewelry, and round Tiffany's Box pictured above. If you want to make a larger purse than I have, follow the same steps with a 1/2 or full sized sheet cake.
You can now make decorating this cake even easier by purchasing the gumpaste jewelry from my handmade shop.
To make this cake you will need...
14-18 inch round cake board
10 inch round cake
1/4 sheet cake
1/4 sheet cake, cake divider
wooden dowels
Tiffany blue buttercream icing
tan, brown and white fondant
white gumpaste
silver, gold and pearl luster dust
any decorating tip
small circle cookie cutter
brown food coloring
clear extract (any flavor)
piping gel
silver cake crystals
decorator's brush
jewelry wire
toothpicks
Directions:
Step 1
A few days in advance, make the gumpaste jewelry and bow. To make the gumpaste bow follow my Gumpaste Bow Tutorial. Once the bow has dried, cover it with pearl luster dust.
To make the pearl necklace, make small balls with white gumpaste and string them on jewelry wire before they dry. Once the gumpaste beads are dry, brush on pearl luster dust.
To make the earrings, roll out a small amount of white gumpaste. Using a small circle cookie cutter, cut out two earrings. Then, with the back side of any decorating tip, cut out a smaller circle towards the top of the larger circle. The back of a decorator's brush can be used to make the small dents in the gumpaste. When the earrings are dry, brush them with gold luster dust.
***Decorator's Tip*** You can make a paint out of the luster dust by adding a small amount of clear extract (any flavor) to the powder. This is what I have done here and it makes the color darker.
To make the bracelet, roll out white gumpaste and cut a large strip. Use a drinking glass or paper towel roll to help shape the bracelet. Again, the back of the decorator's brush can be used to make the small dents in the gumpaste. Once the bracelet is dry, paint it with the sliver luster dust and clear extract mixture mentioned above.
Use white gumpaste to make the ring. The band was painted with gold luster dust and the diamond was covered in silver cake crystals. Clear piping gel helped the crystals to stick to the gumpaste without melting them.
Step 2
Level, tort and fill your 10 inch round cake. Once your cake is placed in the center of your cake board, cover it in Tiffany blue buttercream icing.
***Decorator's Tip*** To achieve the Tiffany blue color I used a combination of blue, yellow, and green food coloring. I used a lot of blue, a fair amount of yellow and a very small amount of green. Add a small amount of each at a time because once the color is added you cannot go back.
Step 3
***Decorator's Tip*** Wilton's Fondant Ribbon Cutter makes this step very easy!
Step 4
Place 4 wooden dowels, cut to size, around the center of the cake. These will be used to support the purse so the best placement is between where the 4 corners will fall and the center of the cake.
Step 5 - time to make the purse!
Cut the 1/4 sheet cake into 3rds. Level, fill and stack these cakes on a cake divider cut to the same size (made from the 1/4 sheet cake divider).
Step 6
Carve a valley in the center of the cake. The trick here is to remember that the more exaggerated the cut, the more it will show once it is covered in fondant. Take a little off at a time until you are happy with the result.
Step 7
Mold two peaks and a long snake (the zipper) out of white fondant an place them as I have in the picture. Modeling chocolate will also work well here. I have made the cake this way because the fondant will not collapse under the weight of the tan fondant that I will cover the cake in later. It was my fear that using all cake would cause the purse to smoosh down once it was covered in fondant.Once the fondant was placed on the cake I realized that I was not happy with the shape of the purse so I trimmed more cake off on a curved angle on both sides of the cake.
Step 8
Cover the rest of the cake in icing. This will help smooth it out and prevent the spaces from showing in the tan fondant.
Step 9
Cover the cake in tan fondant. As you lay the fondant across the cake, make sure you ease it into place. Move across the cake from left to right. If you just lay the fondant down you risk tearing it at the peaks. The left and right sides were pinched at the corners and trimmed to form triangle folds. They were then secured into place with a little water and toothpicks while I moved on to the next step. They will be removed later.
Step 10
To make the zipper, roll out a long snake using tan fondant. Flatten it slightly and cut to size. Secure it to the cake with water. Now is also a good time to make the rings to hold the strap and the zipper pull.
Step 11
Mix gold luster dust and brown food coloring to make bronzed colored paint. Paint the Coach C's all over the cake, the zipper parts, and the strap rings bronze.
Step 12
Roll out more tan fondant and cut out two large triangle pieces for the sides. Remove the toothpicks and secure into place by brushing the back side of the triangle with water.
Paint the Coach C's on the triangle pieces.
Step 13
Make a very long, thin snake out of brown fondant. This will be used as trim along the zipper, around the triangle pieces, and around the bottom of the cake. Attach the trim in that order.
Step 14
Place the purse on top of the 10 inch round cake. I did not dowel this cake because I felt the size and height were going to keep the cake pretty stable and my assumption was correct. The cake traveled fully assembled and made it safely.
Step 15
Make the strap by rolling out brown fondant and cutting a 3/4 inch strip. Thread it through both both rings as pictured and secure to the cake with piping gel. I am showing you the back side of the strap.
I have used piping gel this time because it holds faster.
Step 16
Using piping gel, attach the zipper pull and drape the pearl necklace down the front of the bag. Then, arrange the jewelry as desired and attach the bow with piping gel.
Phew! That's it, your cake is ready to eat. :) However, after all that work, I would make sure people stare at it for awhile.
____________________________________________________________________________________________

April 1, 2010 at 12:11 PM
This is amazing Kim! Tre Chic! :)
April 13, 2010 at 11:22 AM
i haven't stopped over in a bit to say "hi" so i'm popping ova now to see what's new in your part of blogashere... omg i LOVE this cake it is amazing, so not that i don't know the answer but how did it taste? lol
holla back,
shelley :)
April 13, 2010 at 12:47 PM
Thanks girls!
Shelly- The bottom was vanilla cake with vanilla icing and the bag was chocolate cake with chocolate icing. The customer said it tasted great :)
May 7, 2010 at 3:51 PM
this is totally adorable...I think it's far past my cake decorating skills though...LOL
May 7, 2010 at 5:35 PM
Thanks JillyAn. Take one step at a time and your skills will be there before you know it.
February 13, 2012 at 11:27 PM
think it was good
January 17, 2013 at 9:10 AM
This cake is amazing and your instructions very precise and helpful. I am hoping to make a handbag cake for my daughter and I feel after seeing these instructions that I will give it a try.