


Pin It now!
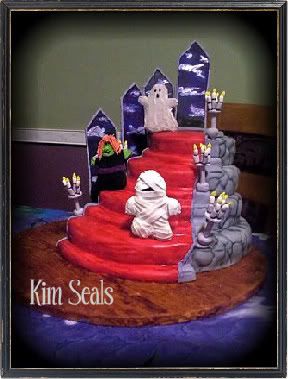
Here is one more Halloween cake. I got this haunted house idea from an old Wilton Yearbook. I could not find the directions on their website for you but basically it is a 3 tier cake where the tiers are lined up towards the back. To get the stone look I covered the cakes in gray fondant and using a gumpaste tool, I indented the fondant to look like stone. To give the stone a more realistic look, I brushed black coloring into the cracks. Also, the cake board was covered in brown fondant. After the board was covered, I used a gumpaste tool to make each board and add a woodgrain effect. Finally, I painted it with brown coloring to give it the glossy finish.
***Decorator's Tip*** After you paint a small section of the wood floor, run your finger through the paint. This will push the color into the cracks and give it a more realistic look. It is a messy technique but definitely worth it.
The steps were made with red fondant. The extra steps were made with a rectangular piece of fondant before it was covered in red. The candles were made of gumpaste, Tic-Tacs, and royal icing. Finally, the windows were made from Wilton Color Flow while the people where made with cookies and royal icing. If you would like more help with this cake don't hesitate to e-mail (kseals@pieceofcakedecorating.com) your questions or ask in our forums.
This cake is a lot of work but definitely worth the wow factor. Here is the cake I am making this year. Much simpler but very creepy. You can find instructions to this cake on Wilton's website.
____________________________________________________________________________________________

October 18, 2009 at 10:05 AM
Oh my goodness I love your site. I saw that You left a comment on mine and I was going to reply back to say thanks. And I see all your cakes. They are soo cool. Well maybe you should see my other blog. http://sjsmommy.blogspot.com, its my baking site.