


Pin It now!
In this guide I will discuss how to stack and support this cake as well as give you step-by-step directions for decorating.
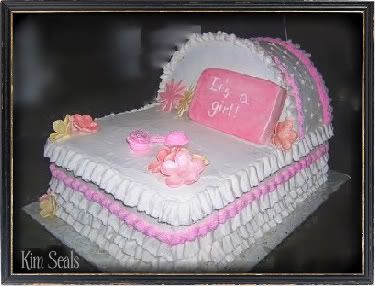
This is a great baby shower cake and can be altered to suit a boy, girl, or unknown gender baby. The hardest part of this whole cake, not counting the gumpaste decorations, is constructing a support system so the head of the cake does not fall over. If gumpaste is not your thing, you can purchase these handmade items here.
To make this cake you will need...
3 11x9 inch cakes
1 1/2 10 inch round cakes
1 10 inch round cake divider
5-6 wooden dowels
1 11 x 9 inch cake divider
1 14 x 12 inch cake board
Wilton Tips # 3, 21, 127
White and pink buttercream icing
Gumpaste pillow and flowers
2 Small rattle favors
Directions:
Step 1
Level all cakes. Stack and fill the first two rectangle cakes on the cake board. Evenly place 4 small dowels in these cakes for support. Put the 3rd rectangle cake on your cardboard divider and place it on top.
***Decorator's tip*** You may need to trim the cake divider.
Step 2
Cut the round cakes and cake dividers in half. Stack and fill the cake halves between the two 1/2 circle cake dividers. Place these cakes on the cake as seen in the pictures below. Then take 4 sharpened dowels cut to size and place them on either side of the half circles accordingly.
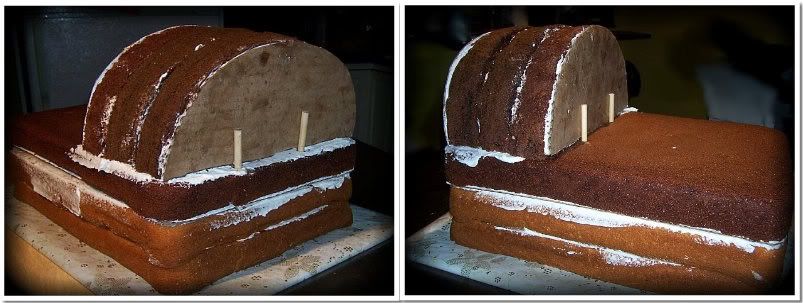 ***Decorator's Tip*** You will need a hammer to drive the dowels through the rectangular cake board.
Step 3
Just as in the picture below, ice the cake with white buttercream icing. You do not need to be as need or use as much icing on the bottom two layers because you will be adding a ruffle.

Step 4
Using tip # 127 and white buttercream icing, add a ruffle on the bottom 2 layers and around the edges of the 1/2 circles.
Step 5
Using tip # 21 and pink buttercream icing, add a boarder on the flat edge of the ruffles. With tip # 3 and white buttercream icing, add small dots on the shade of the bassinet.
Step 6
Place gumpaste decorations and rattles on the cake. Using tip # 3 and white buttercream icing, write your message on the pillow.
In this guide I will discuss how to stack and support this cake as well as give you step-by-step directions for decorating.
This is a great baby shower cake and can be altered to suit a boy, girl, or unknown gender baby. The hardest part of this whole cake, not counting the gumpaste decorations, is constructing a support system so the head of the cake does not fall over. If gumpaste is not your thing, you can purchase these handmade items here.
To make this cake you will need...
3 11x9 inch cakes
1 1/2 10 inch round cakes
1 10 inch round cake divider
5-6 wooden dowels
1 11 x 9 inch cake divider
1 14 x 12 inch cake board
Wilton Tips # 3, 21, 127
White and pink buttercream icing
Gumpaste pillow and flowers
2 Small rattle favors
Directions:
Step 1
Level all cakes. Stack and fill the first two rectangle cakes on the cake board. Evenly place 4 small dowels in these cakes for support. Put the 3rd rectangle cake on your cardboard divider and place it on top.
***Decorator's tip*** You may need to trim the cake divider.
Step 2
Cut the round cakes and cake dividers in half. Stack and fill the cake halves between the two 1/2 circle cake dividers. Place these cakes on the cake as seen in the pictures below. Then take 4 sharpened dowels cut to size and place them on either side of the half circles accordingly.
Step 3
Just as in the picture below, ice the cake with white buttercream icing. You do not need to be as need or use as much icing on the bottom two layers because you will be adding a ruffle.
Using tip # 127 and white buttercream icing, add a ruffle on the bottom 2 layers and around the edges of the 1/2 circles.
Step 5
Using tip # 21 and pink buttercream icing, add a boarder on the flat edge of the ruffles. With tip # 3 and white buttercream icing, add small dots on the shade of the bassinet.
Step 6
Place gumpaste decorations and rattles on the cake. Using tip # 3 and white buttercream icing, write your message on the pillow.
____________________________________________________________________________________________


October 24, 2009 at 11:23 AM
I think this is absolutely beautiful and hope to 'dare; to make it one day.
October 25, 2009 at 9:51 AM
Good luck to you! Feel free to e-mail me if you have any questions.
October 31, 2009 at 6:30 PM
Nice post - baby shower cake pictures ..Keep Posting
Ron
baby shower cake pictures
April 30, 2010 at 8:01 PM
So how do you cut a cake like this?
April 30, 2010 at 10:56 PM
Latashasmiles, It really isn't that hard. If you look at the construction pictures, you first take off the top, peel off one of the cake boards and cut. Then you remove the dowels and cut the bottom. Just remember there is a cake board 1/3 of the way down and you'll be fine.
January 21, 2011 at 1:17 PM
Beautiful cake! Thanks for posting the very helpful instructions.
February 13, 2012 at 12:44 AM
I used your guide to make this beautiiful cake mine was 2 half sheet cakes instead of the 3 11x9. Which was a huge cake. Got hundreds of compliments it turn out absolutely beautiful
February 21, 2013 at 10:14 AM
Cake is beautiful. Thanks for the tutorial. Kathy