


Pin It now!


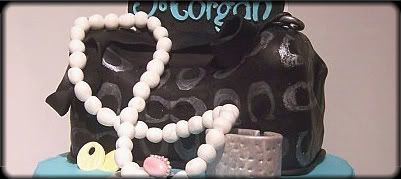
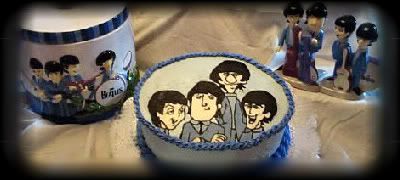
These are just a few examples of what you can do with a frozen buttercream transfer. It is simple to use and is a great way to get a picture on your cake without using an edible ink printer. As you can see with these cakes, the picture can either cover the entire top of the cake (Beatles Cake) or can be used as an accent (castle and Eagles cakes). It is really your preference, just make sure to plan ahead. After making your buttercream transfer icing, follow these simple steps to make a frozen buttercream transfer.
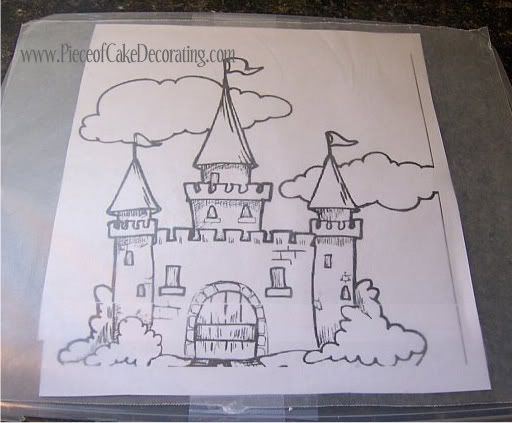
Find, copy, or print out a picture. Keep in mind that your final product will be a mirror image so, it is best to use the mirror image setting on your printer (especially when including letters). Once you have your picture, tape it to a stiff, movable surface like a cake board. Then, tape a piece of wax paper over your picture.
Step 2
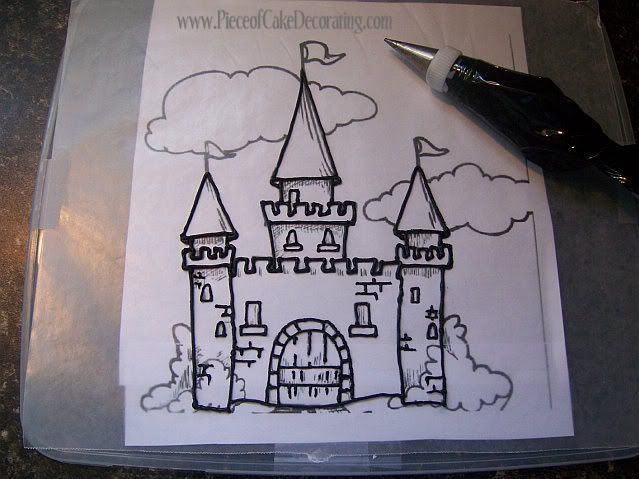 Pipe all of the outlines on your image with black icing and a small round tip (#2 or #1 depending how thin you need your outline). You can color your transfer icing black but I prefer to use a tube of black Wilton icing because it is very hard to get a true black.
***Notice how any detail I want to show in the final image is black (ie bricks on the castle) and I ignored those I was not interested in like the bushes and shadow lines. ***
Step 3
Now you need to start thinking of your picture in layers. For example, when making a face, you should fill in the colored part of the eyes, then the white parts, then the mouth, then the whole face. I say this because, when filling in the white part of the eye, you will not only pipe into the empty space but over top of the colored part as well. The same goes for the entire face. When filling in this area, you will cover the eyes, nose and mouth. If you do not fill in these features first, you will not see them in your final product. In other words, the first layer of your picture is the front of the picture. The last layer will be the part of the transfer that is laying on the cake.
With that being said, you can now start coloring your icing and piping it onto your picture. Round tips work best. The size will vary depending on the amount of space you need to cover. Fill in with straight lines, as close together as you can. If you are still confused as to what order to pipe in, here is how I made the castle...
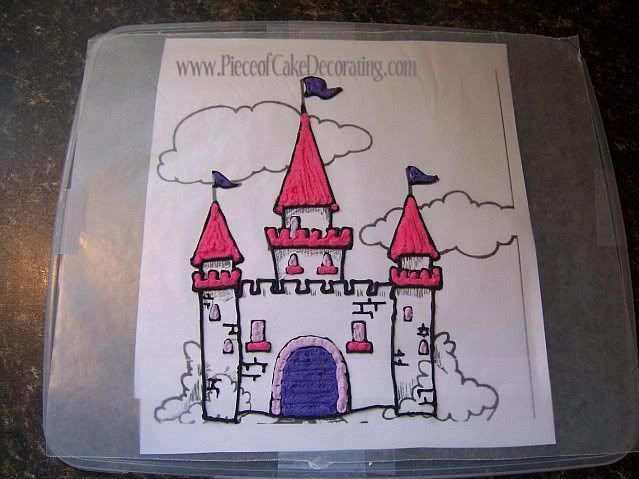
First fill in all the small pink and purple details like the tower peaks, windows, sills, door, and flags.

Then cover the entire large area of the castle with light pink icing. The door and windows should be covered too. I didn't cover the ENTIRE castle with light pink icing but I wasn't exactly neat about it either.
Step 4
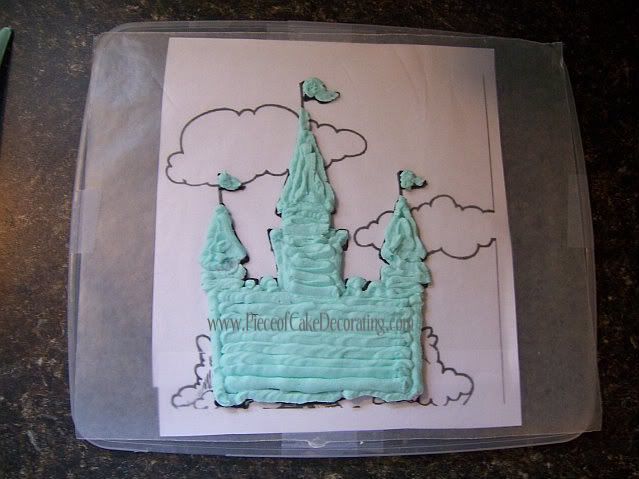 Now that your picture is completely filled in, take uncolored (or colored) transfer icing and a rose tip (flat and angled). Add one last layer of icing to the entire transfer.
*** If you remember from the final picture at the top, my castle was on a blue background. I colored the final layer of transfer icing to match so it blends more when it is placed on the cake. ***
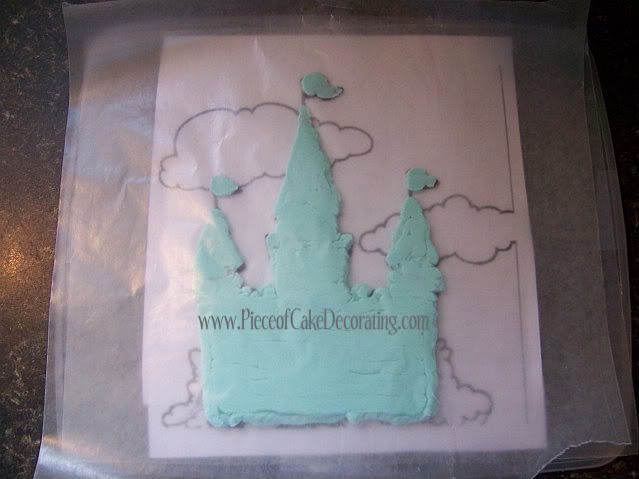
When that is complete, place another layer of wax paper on top and lightly push down on your transfer. Do not flatten the transfer. You are simply easing the piping lines together so they show up as a solid picture in your final picture.
Step 5
For best results, keep in your freezer for 1 day. If you are in a hurry, you may be able to get away with freezing it for a few hours.
Step 6
Place on your cake!


These are just a few examples of what you can do with a frozen buttercream transfer. It is simple to use and is a great way to get a picture on your cake without using an edible ink printer. As you can see with these cakes, the picture can either cover the entire top of the cake (Beatles Cake) or can be used as an accent (castle and Eagles cakes). It is really your preference, just make sure to plan ahead. After making your buttercream transfer icing, follow these simple steps to make a frozen buttercream transfer.
Step 1
Find, copy, or print out a picture. Keep in mind that your final product will be a mirror image so, it is best to use the mirror image setting on your printer (especially when including letters). Once you have your picture, tape it to a stiff, movable surface like a cake board. Then, tape a piece of wax paper over your picture.
Step 2
***Notice how any detail I want to show in the final image is black (ie bricks on the castle) and I ignored those I was not interested in like the bushes and shadow lines. ***
Step 3
Now you need to start thinking of your picture in layers. For example, when making a face, you should fill in the colored part of the eyes, then the white parts, then the mouth, then the whole face. I say this because, when filling in the white part of the eye, you will not only pipe into the empty space but over top of the colored part as well. The same goes for the entire face. When filling in this area, you will cover the eyes, nose and mouth. If you do not fill in these features first, you will not see them in your final product. In other words, the first layer of your picture is the front of the picture. The last layer will be the part of the transfer that is laying on the cake.
With that being said, you can now start coloring your icing and piping it onto your picture. Round tips work best. The size will vary depending on the amount of space you need to cover. Fill in with straight lines, as close together as you can. If you are still confused as to what order to pipe in, here is how I made the castle...
First fill in all the small pink and purple details like the tower peaks, windows, sills, door, and flags.
Then cover the entire large area of the castle with light pink icing. The door and windows should be covered too. I didn't cover the ENTIRE castle with light pink icing but I wasn't exactly neat about it either.
Step 4
*** If you remember from the final picture at the top, my castle was on a blue background. I colored the final layer of transfer icing to match so it blends more when it is placed on the cake. ***
When that is complete, place another layer of wax paper on top and lightly push down on your transfer. Do not flatten the transfer. You are simply easing the piping lines together so they show up as a solid picture in your final picture.
Step 5
For best results, keep in your freezer for 1 day. If you are in a hurry, you may be able to get away with freezing it for a few hours.
Step 6
Place on your cake!
____________________________________________________________________________________________


May 26, 2010 at 1:38 AM
I love this method but never thought of using it as a side decoration for the side of the cakes. U did a wonderful job. love it.
May 27, 2010 at 7:50 AM
Krisinda - The cakes that I use these transfers on are almost always the favorites of my customers. It really gives that wow factor and is a great decorator's secret that makes me look much more talented than I really am :)
June 17, 2011 at 8:32 PM
what's transfer icing?
June 20, 2011 at 4:42 PM
Transfer icing is a buttercream icing that will freeze better than those containing vegetable shortening. This way you can place your transfer on your cake without messing up your work. If you click the link mentioned above, you will be directed to the recipe I use.
January 14, 2012 at 2:52 PM
you say above that "Transfer Icing" freezes better than those containging shortening in them. But your recipe uses a cup of shortening. Seems like it contradicts itself. Am I misunderstanding something?
January 14, 2012 at 10:20 PM
I think you are misunderstanding. In the recipe I do say that Transfer Icing freezes better but that is because it contains butter. Butter freezes better than shortening (Crisco) so the Transfer Icing will freeze better than My/Wilton's Buttercream Icing Recipe even though it does contain shortening. Basically I'm just saying that the butter is important.
January 16, 2012 at 9:11 AM
Where can I find "the beatles" picture you used on the cake?
January 17, 2012 at 9:43 AM
If you Google "Beatles cartoon picture it should come up." That is all I did.
June 11, 2012 at 9:56 PM
How long can I leave the transfer in the freezer before I use it. If I leave it in the freezer for 2 days or so, will it crack or not be as usable as if I only left it for 1 day?
June 13, 2012 at 9:02 AM
I have left it in the freezer for as long as a week so 2 days is not a problem.
March 7, 2013 at 9:24 AM
Thank you so very much for this tutorial! I have seen others that are not as well done and really needed a good guide. My 6 year old will appreciate it too as being able to do this is very important for the design of his cake (even if he doesn't realize that).
Approximately how much will the recipe make? I will be making a design to cover almost the entire top of my son's rectangle birthday cake as well as decals for the sides and need to plan accordingly for my shopping trip.